
Peermark
Peermark is a peer review assignment tool that utilizes the Turnitin system to process documents related to a peer review process. Instructors can create and manage Peermark assignments that allow students to read, review, and evaluate one or many papers submitted by their classmates. Advanced options in Peermark allow reviews to be set as anonymous or attributed.
Peermark assignment activities are created differently than Tii assignments. Managing users (typically instructor role) use a different creation and grading process whereby Peermark assignment activities set-up, document handling, and management originate from the Content area of a course and NOT from the Assignments area of a course. It is advised to clearly communicate this to students when using the Peermark system.
Creating a Peermark assignment activity
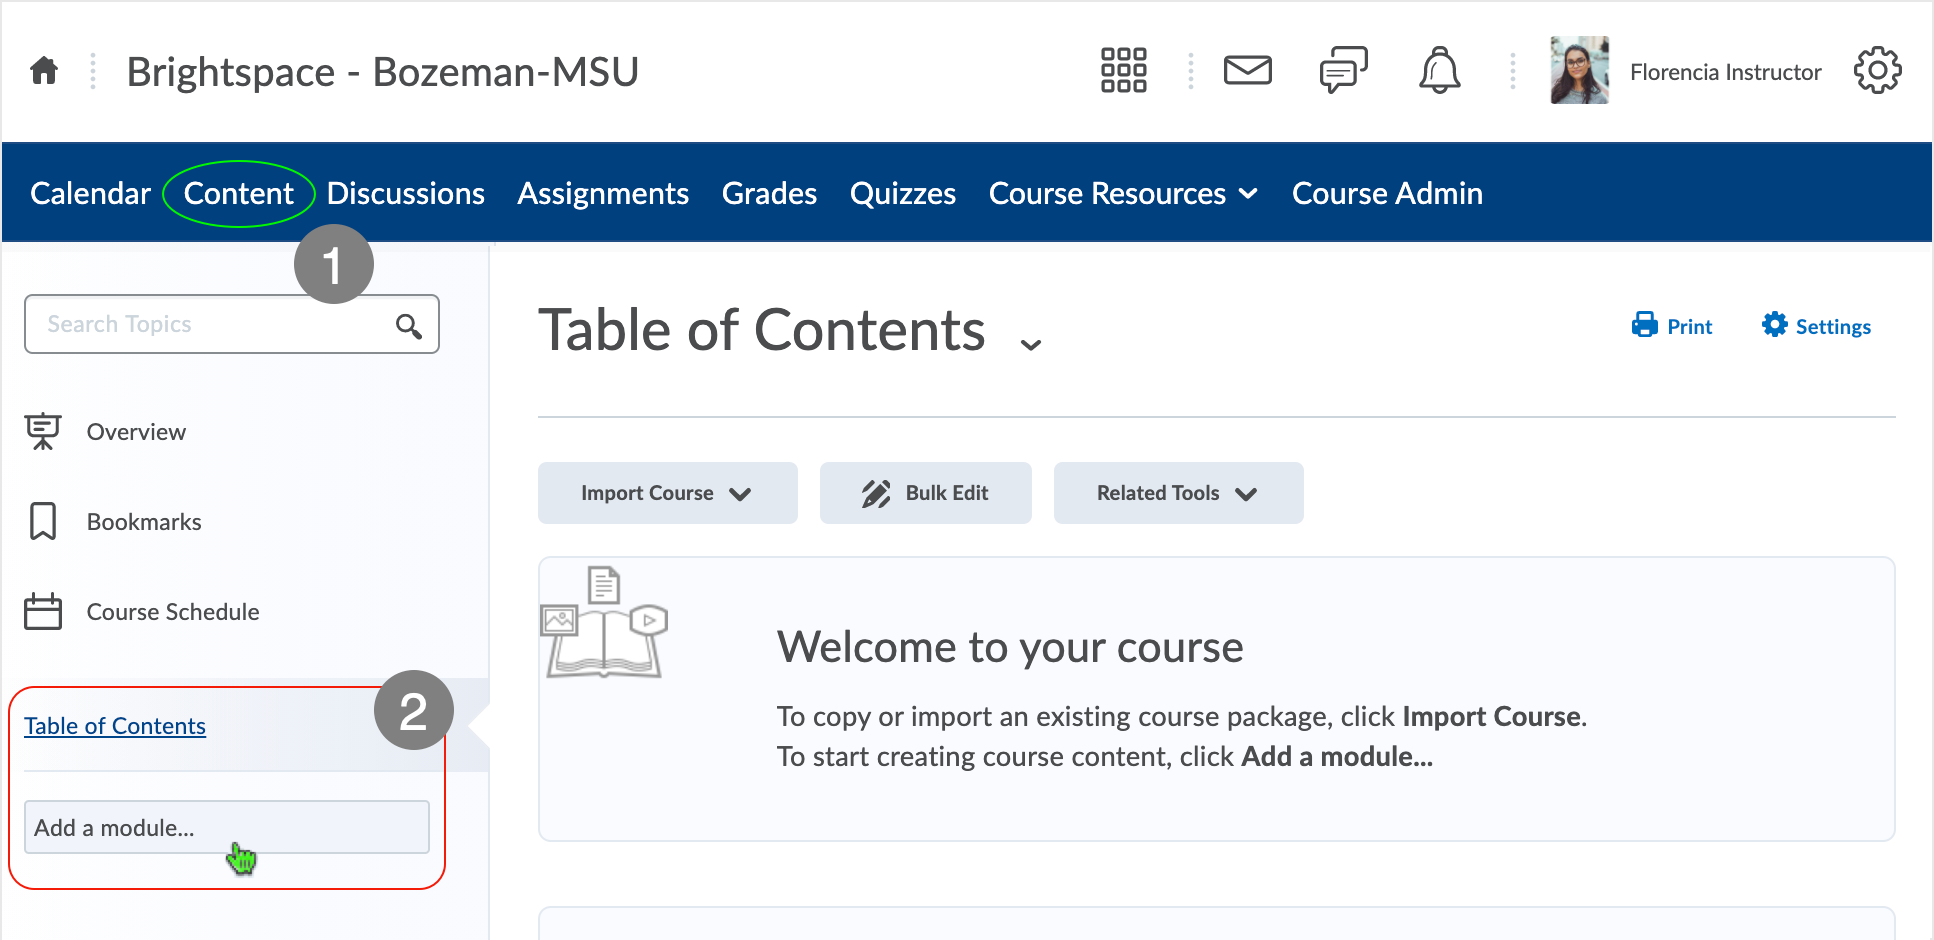
Add a module to the Content area of a course.
- When inside a course, select "Content" from the course nav bar.
- Select "Add a module..." and enter the name of the module.
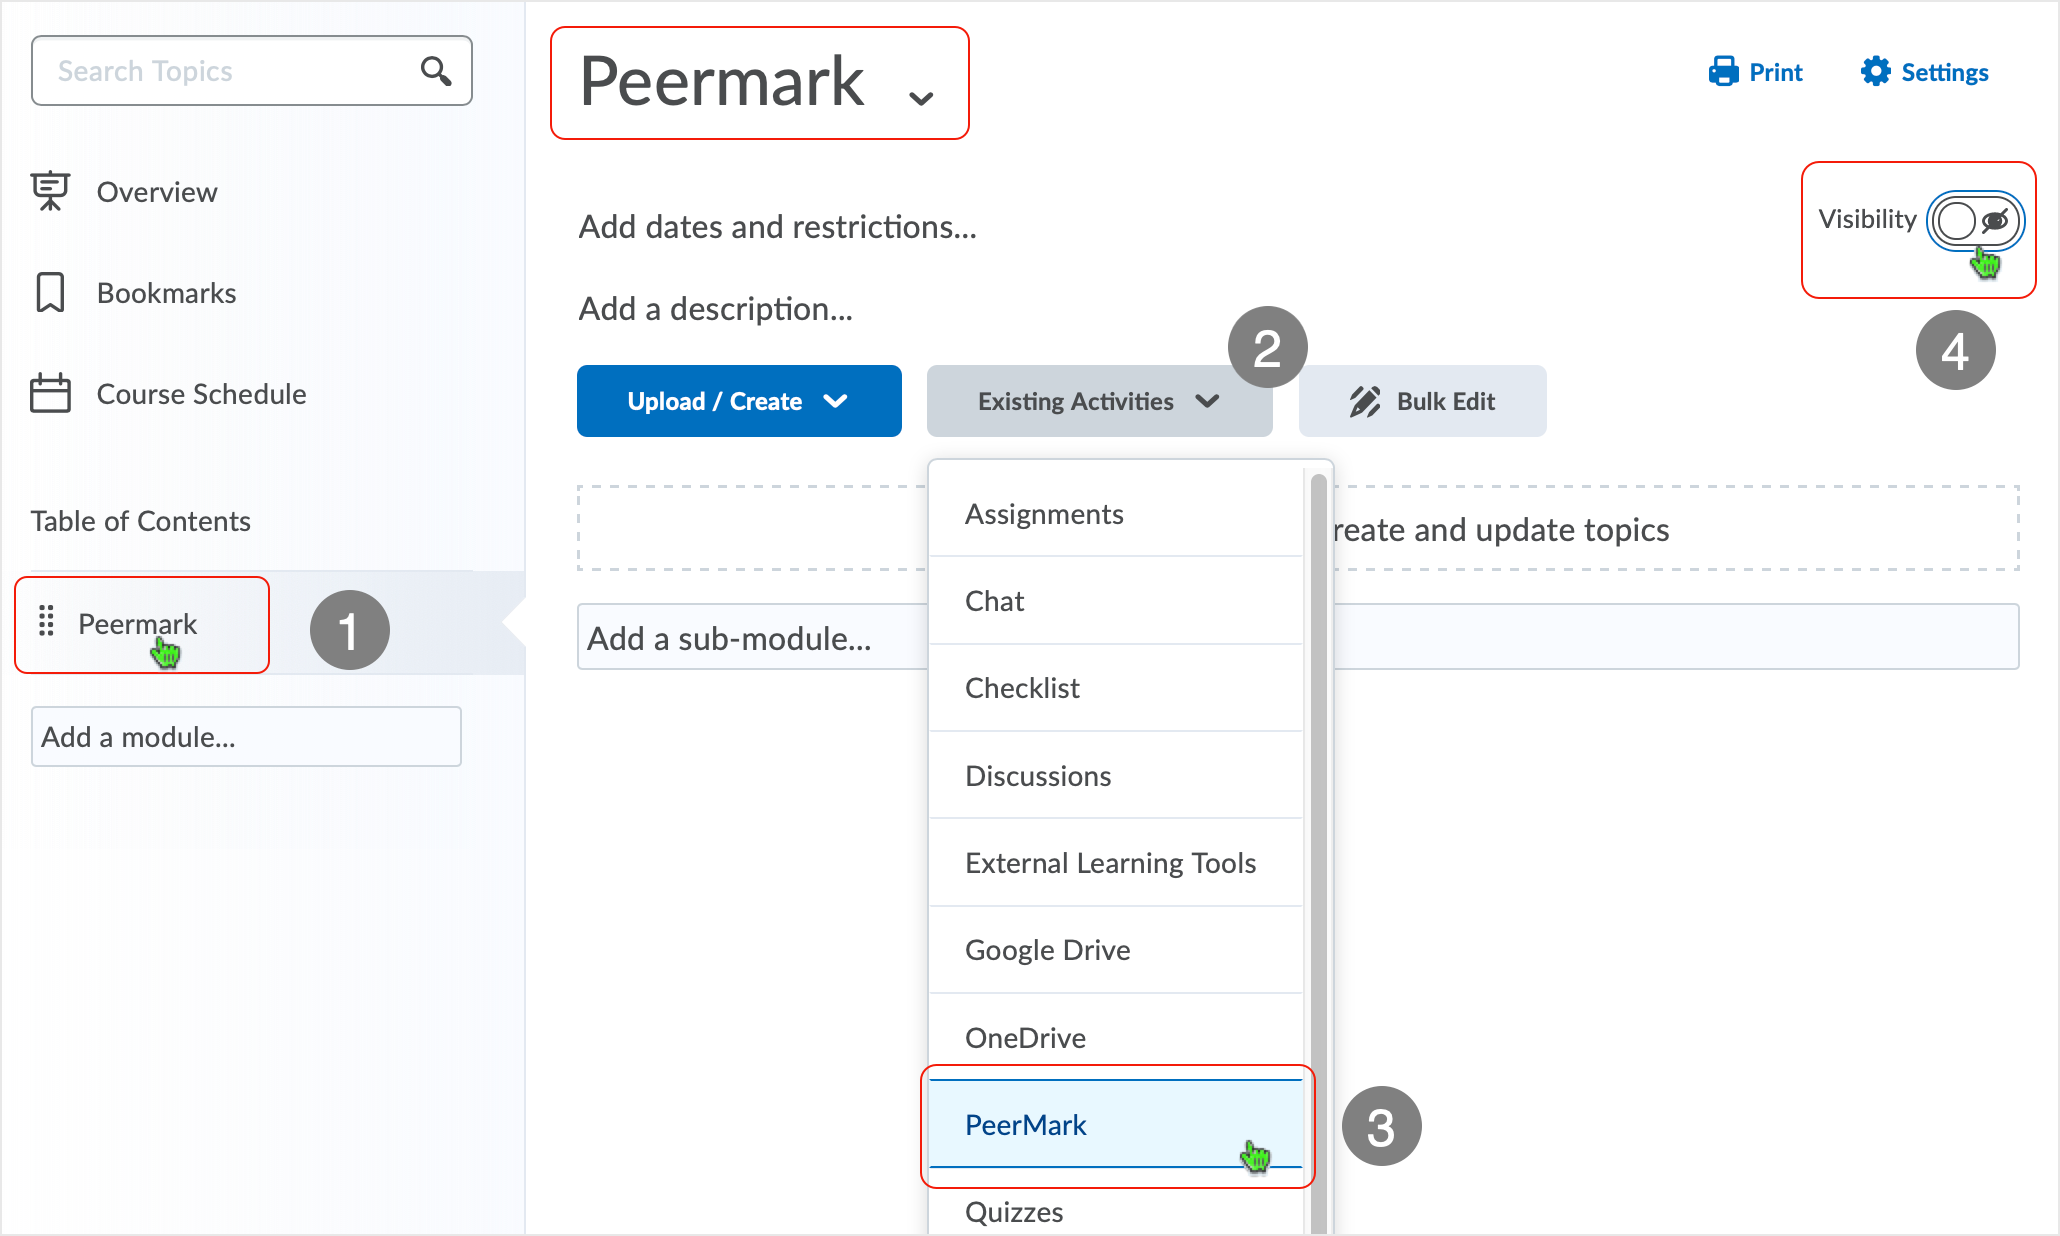
Add PeerMark from the "Existing Activities" drop-down menu.
- "Peermark" has been entered as the name of the module.
- Selecting the module title makes the module active and able to be worked on.
- Select the "Existing Activities" button.
- Choose the "PeerMark" option from the "Existing Activities" drop-down menu.
- This action creates the Peermark External Learning tool as a topic in the content module.
- Change the visibility of the module to "Hidden" to allow set-up to occur without interference.
- This will hide it from students until ready for release.
It is not necessary hide the module in all instances. Users can elect to change visibility on either the module or the topic in the module depending on user requirements. User may choose to leave the module and/or the topic visible throughout the entirety of development with the understanding that when an assignment activity is being set-up, the activity will be accessible by all users in the course. Submissions made by learners during or prior to completed set-up may lead to unpredictable results.
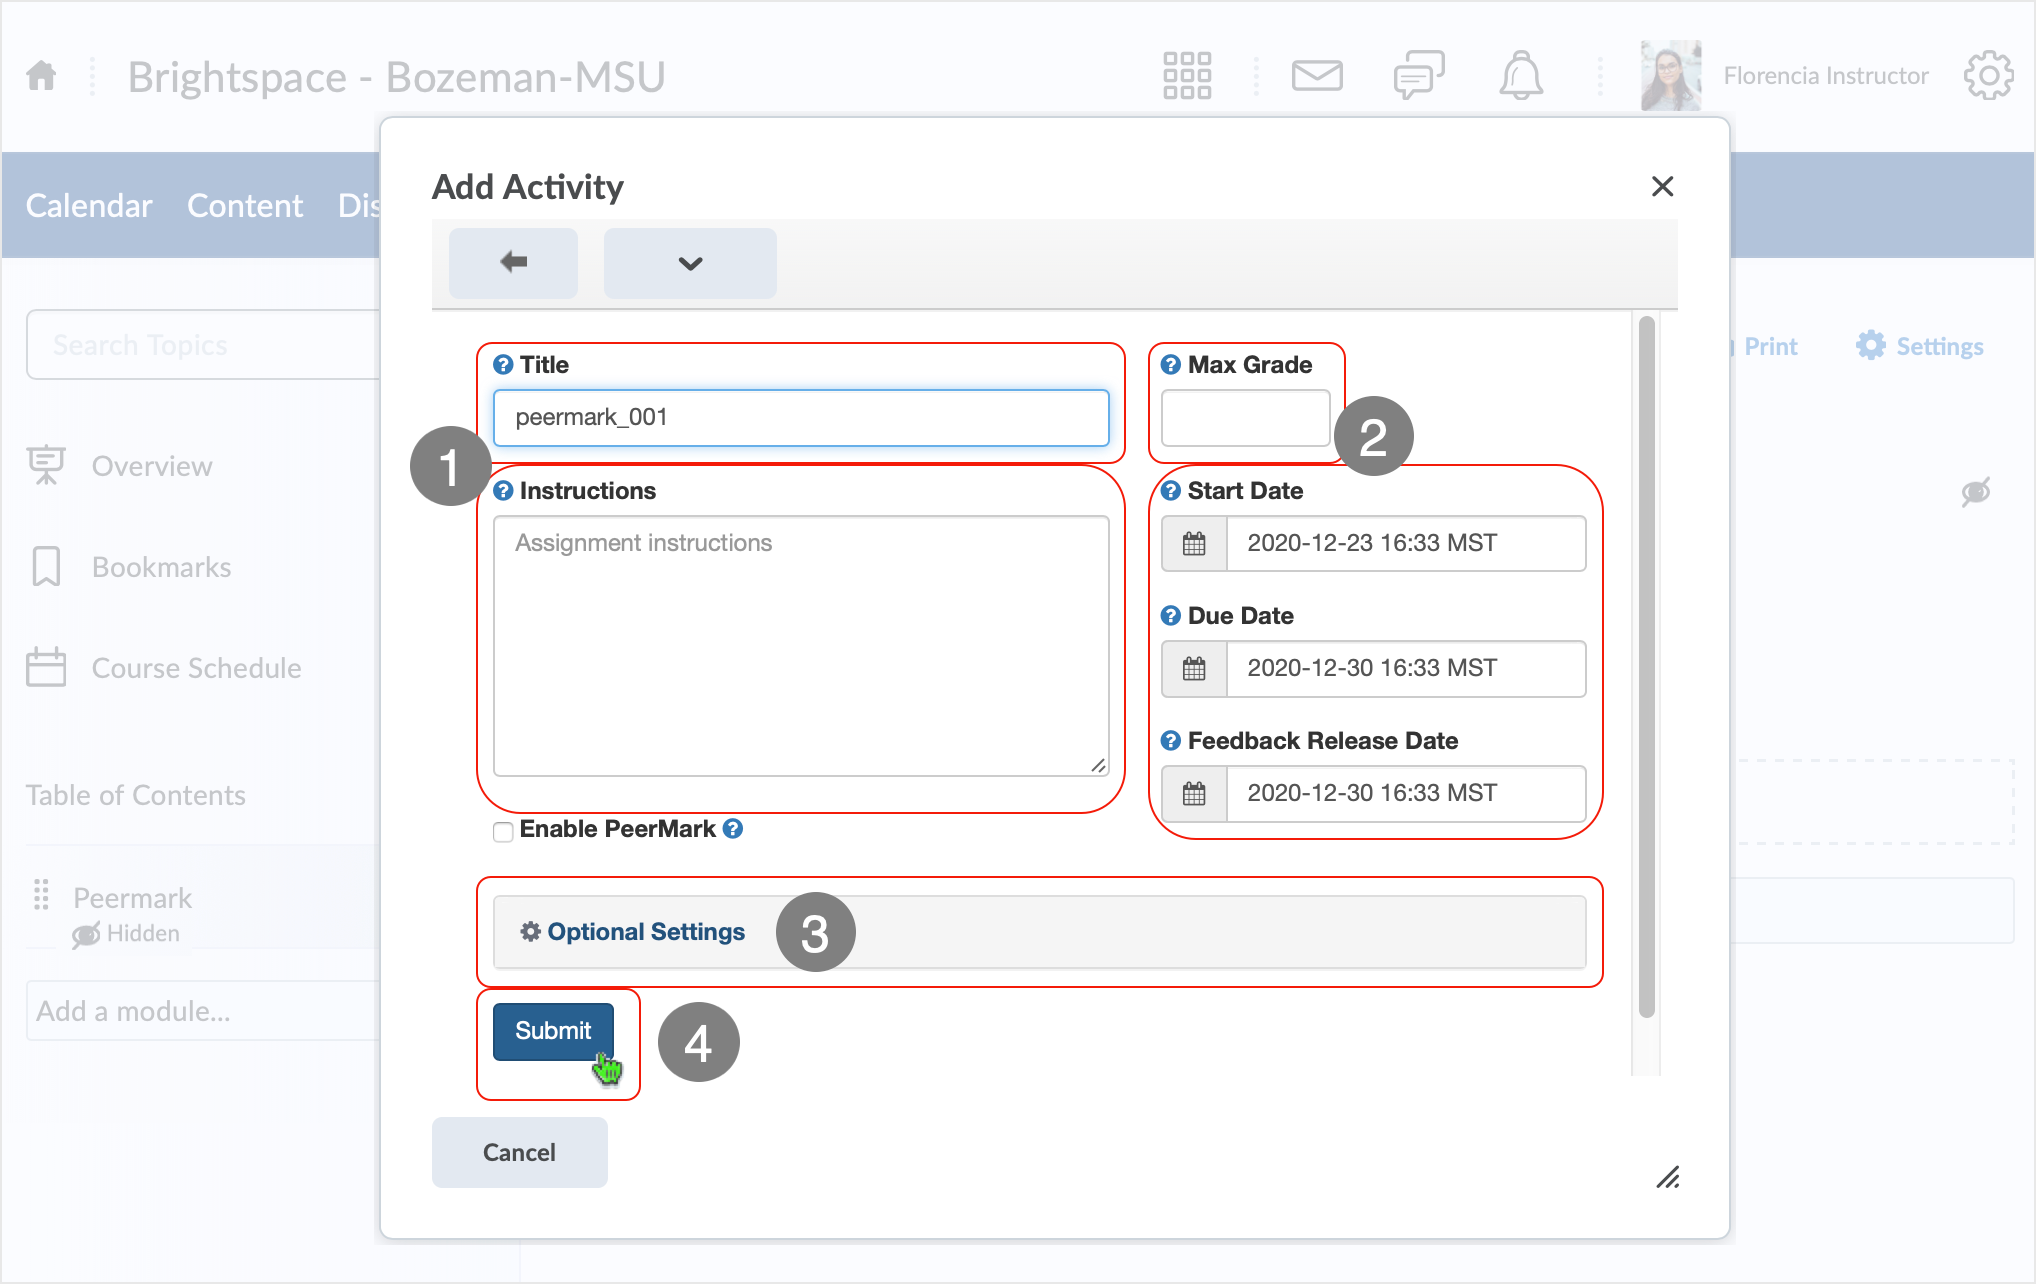
Add the activity and perform the initial set up.
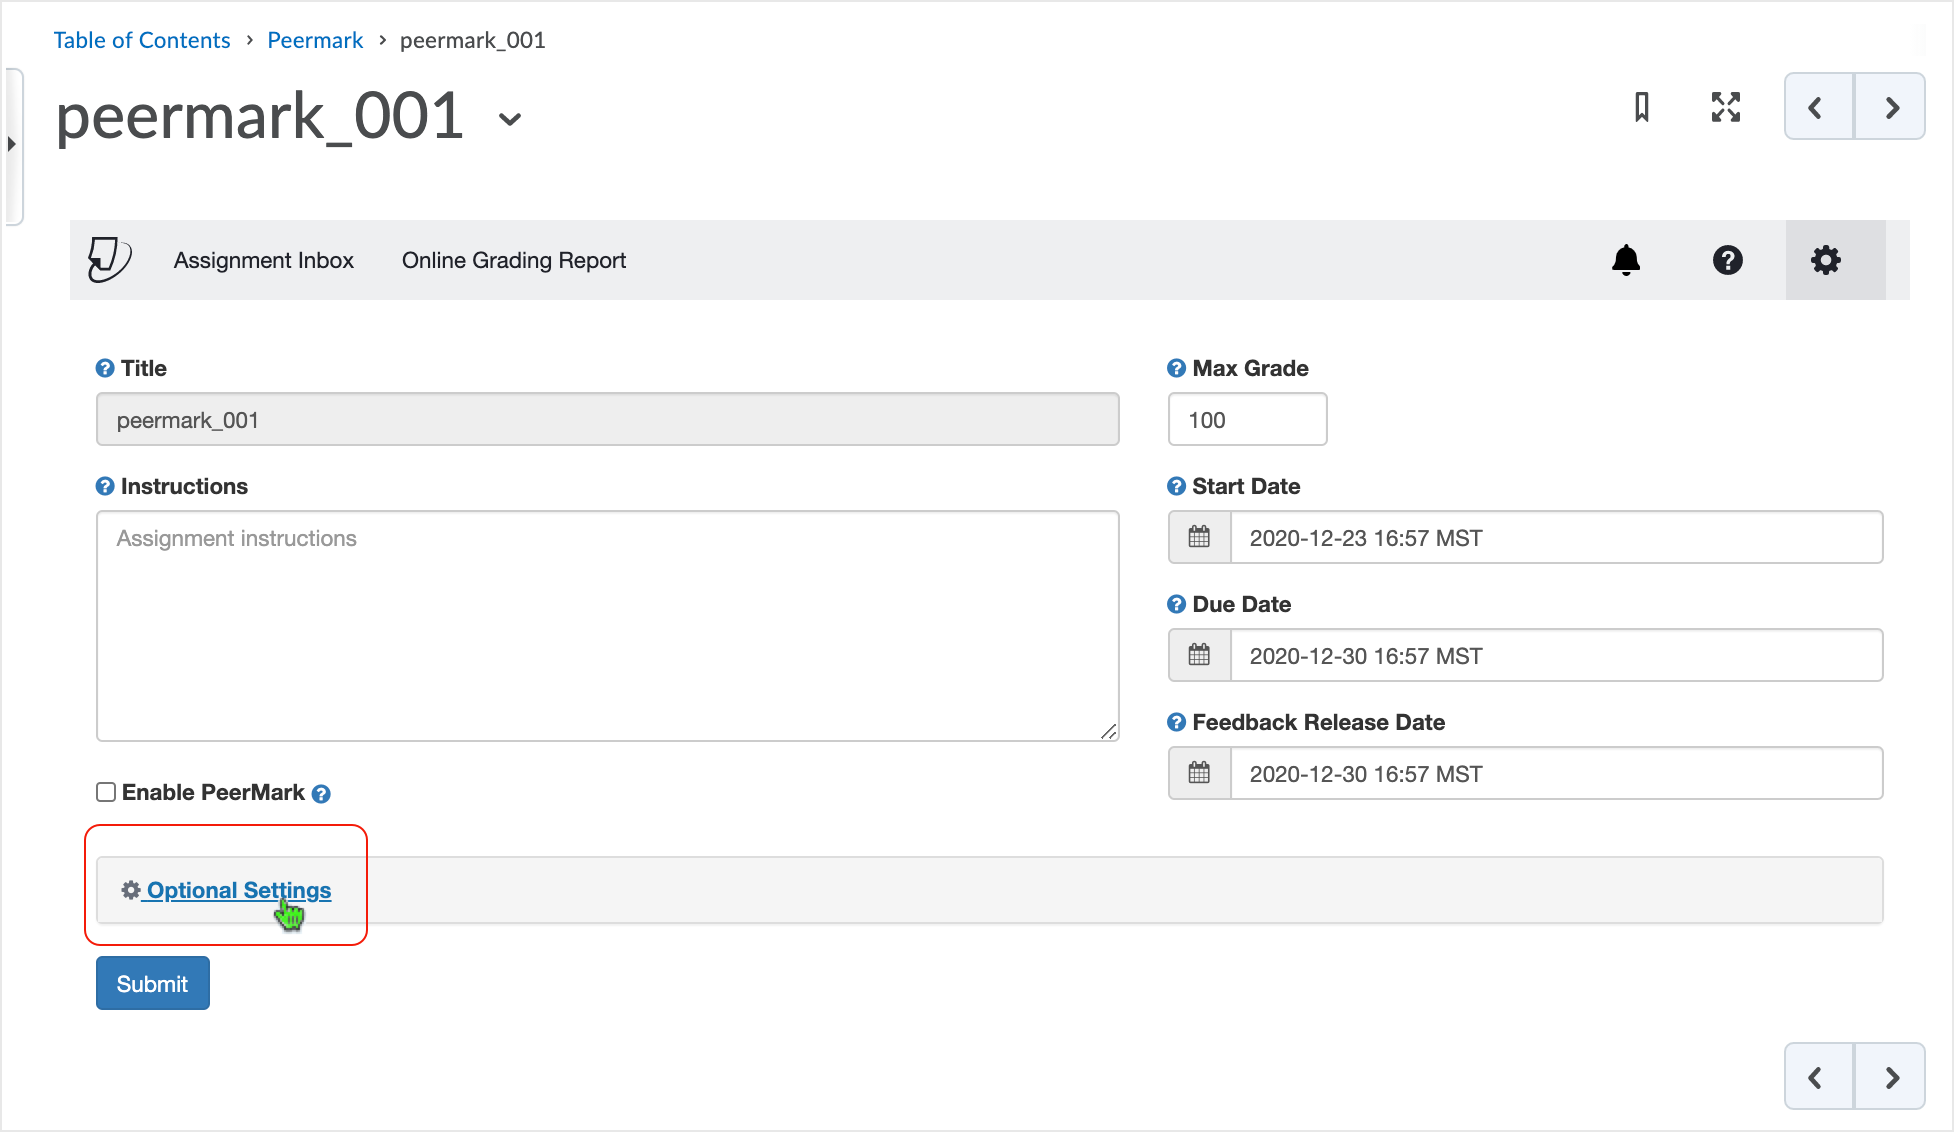
- Add Assignment Title and Instructions.
- Add Max Grade and set dates for the original hand in: Start, Due and Feedback Release.
- If no Max Grade is initially entered, a '100' point value is automatically assigned.
- A grade related to this initial assignment activity is created automatically in the grades area of the course. The name of the grade item is the same as the name of the activity.
- In "Optional Settings" there are selectable Turnitin settings that are similar to
a normal Tii assignment set-up.
- Edit the settings at this stage or wait and edit the settings at a later stage.
- Select "Submit" to add the activity to the Content module.
- User may need to scroll to see the "Submit" button.
- Clicking "Submit" at the bottom of the page forces a redirect back to the content area.
- If submitted at this stage, set-up is not finished yet.
User can "Enable Peermark" at this point or not, but it is advised to finish this "first level" of set-up before enabling the Peermark piece. Selecting the "Submit" and forcing the re-direct creates the assignment activity in the module. Save early - save often.
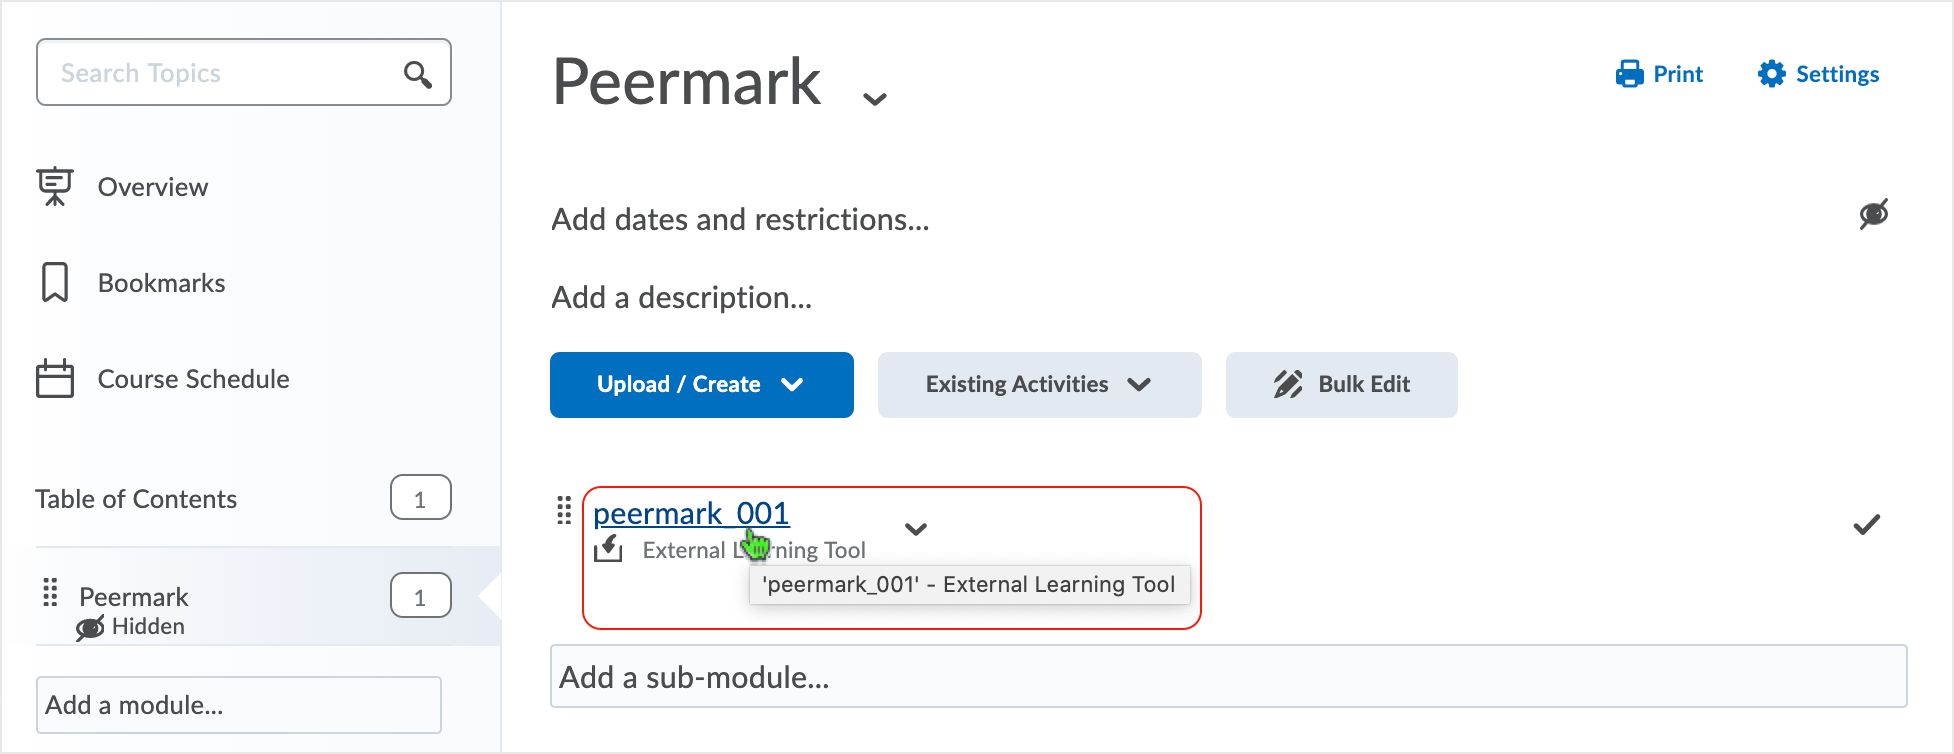
Access the activity to continue set up.
After the re-direct back to the module page, select the activity link from the module.
In this example, "peermark_001" is the activity and "Peermark" is the module.
Selecting the link gives access to the activity to enable further set-up.
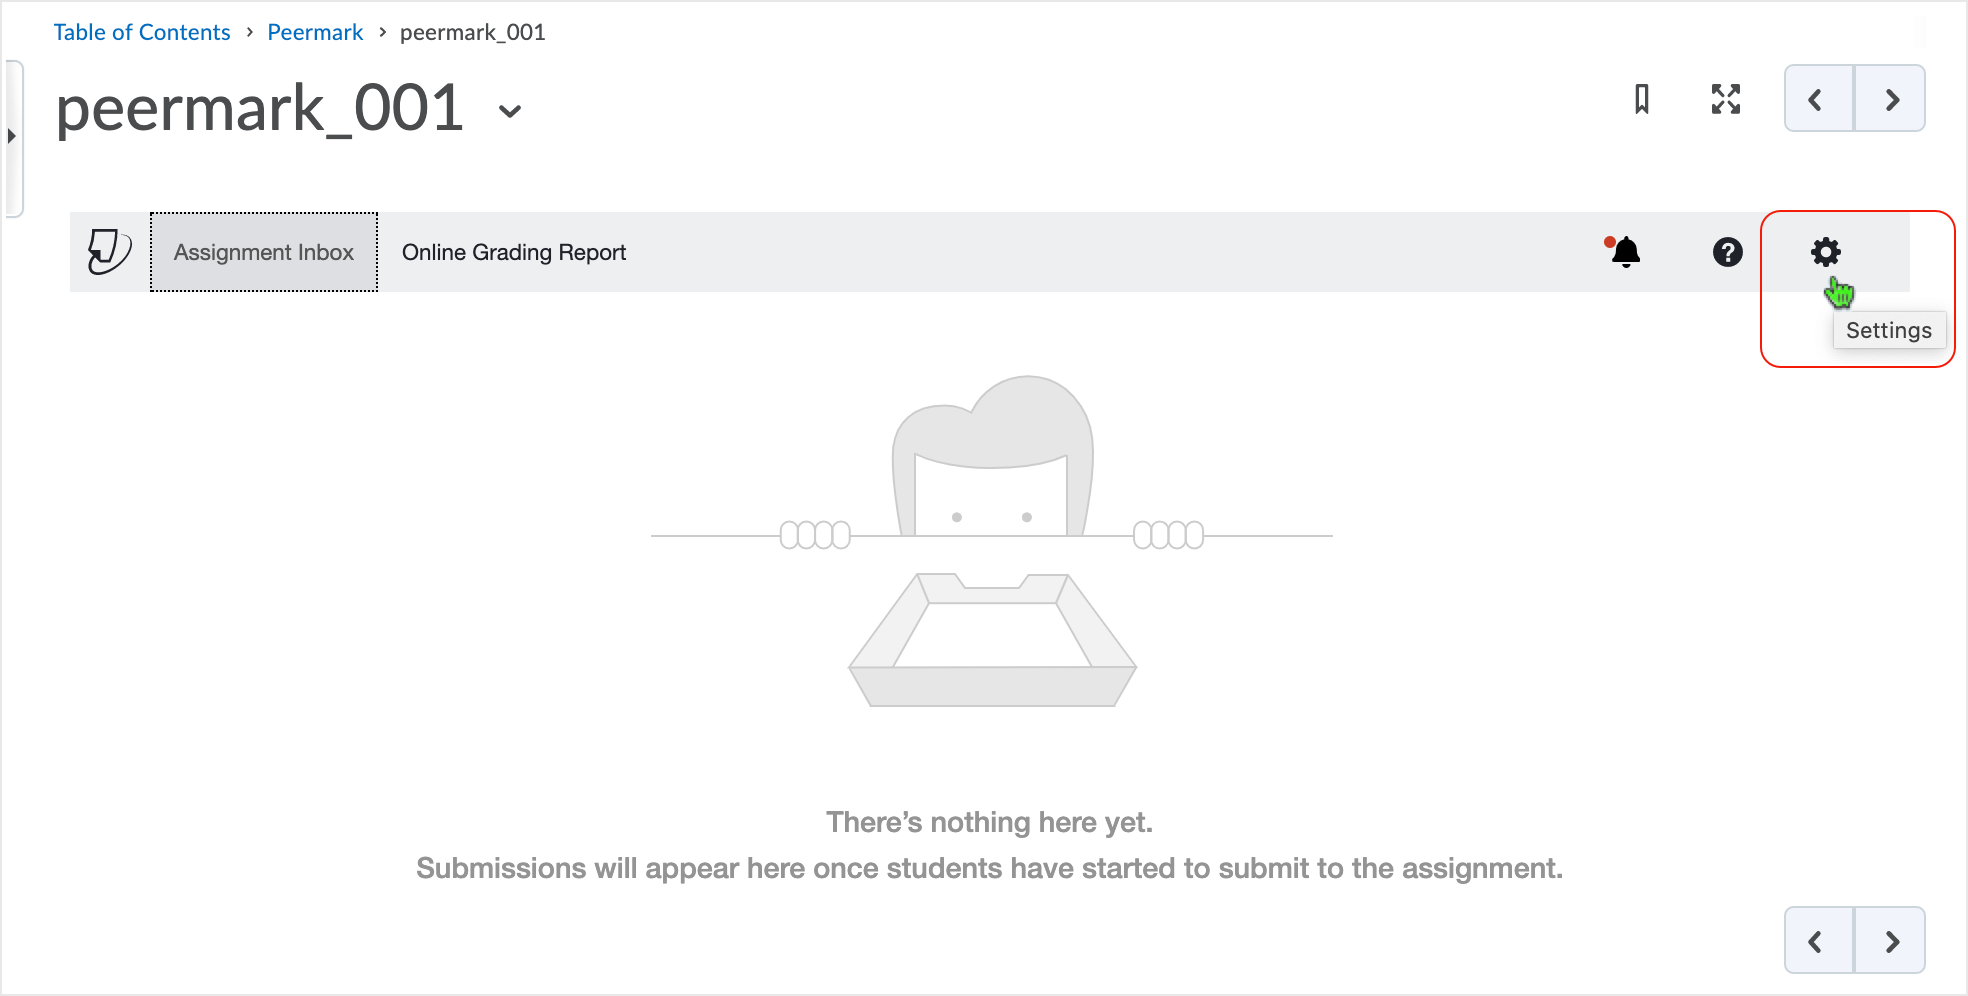
The Peermark "Assignment Inbox" is the landing page after selecting the link.
Use the "Settings" gear icon as necessary to access the initial set-up ("first level" ) of the activity assignment.
Select "Optional Settings" to adust Turnitin settings.
If Tii settings were not adjusted earlier, click the "Optional Settings" link to adjust Turnitin behavior related to this assignment activity at this point.
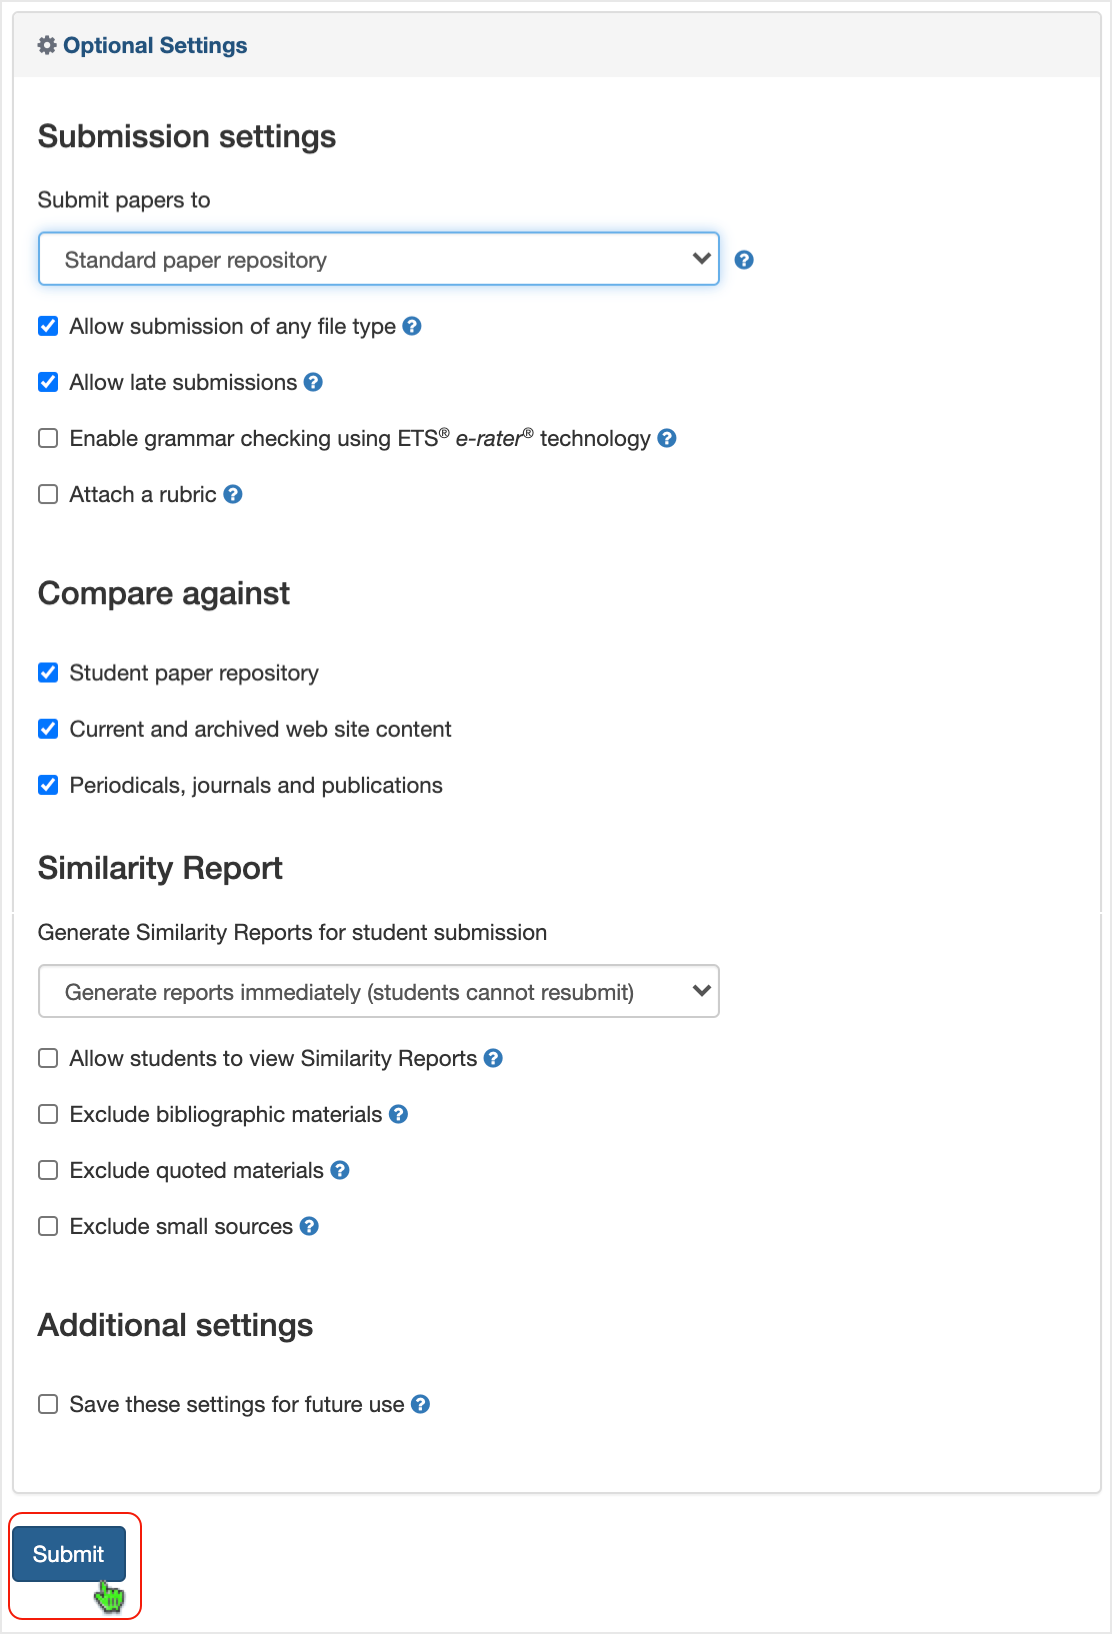
Optional Settings: Turnitin optional settings are similar to the settings found in a normal Tii assignment set-up.
Recommended:
- Use the "Submit papers to" drop-menu to access "Do not store the submitted papers"
if the assignment is a draft paper exercise.
- Selecting "Do not store the submitted papers" assures paper(s) won't be in the system when final draft papers are submitted (at which point "Standard paper repository" could be enabled if desired).
- Use the "Generate Similarity Reports for student submission" drop-menu to access "Generate reports immediately (students can resubmit until due date)." to assist with student ability to submit papers with no restrictions.
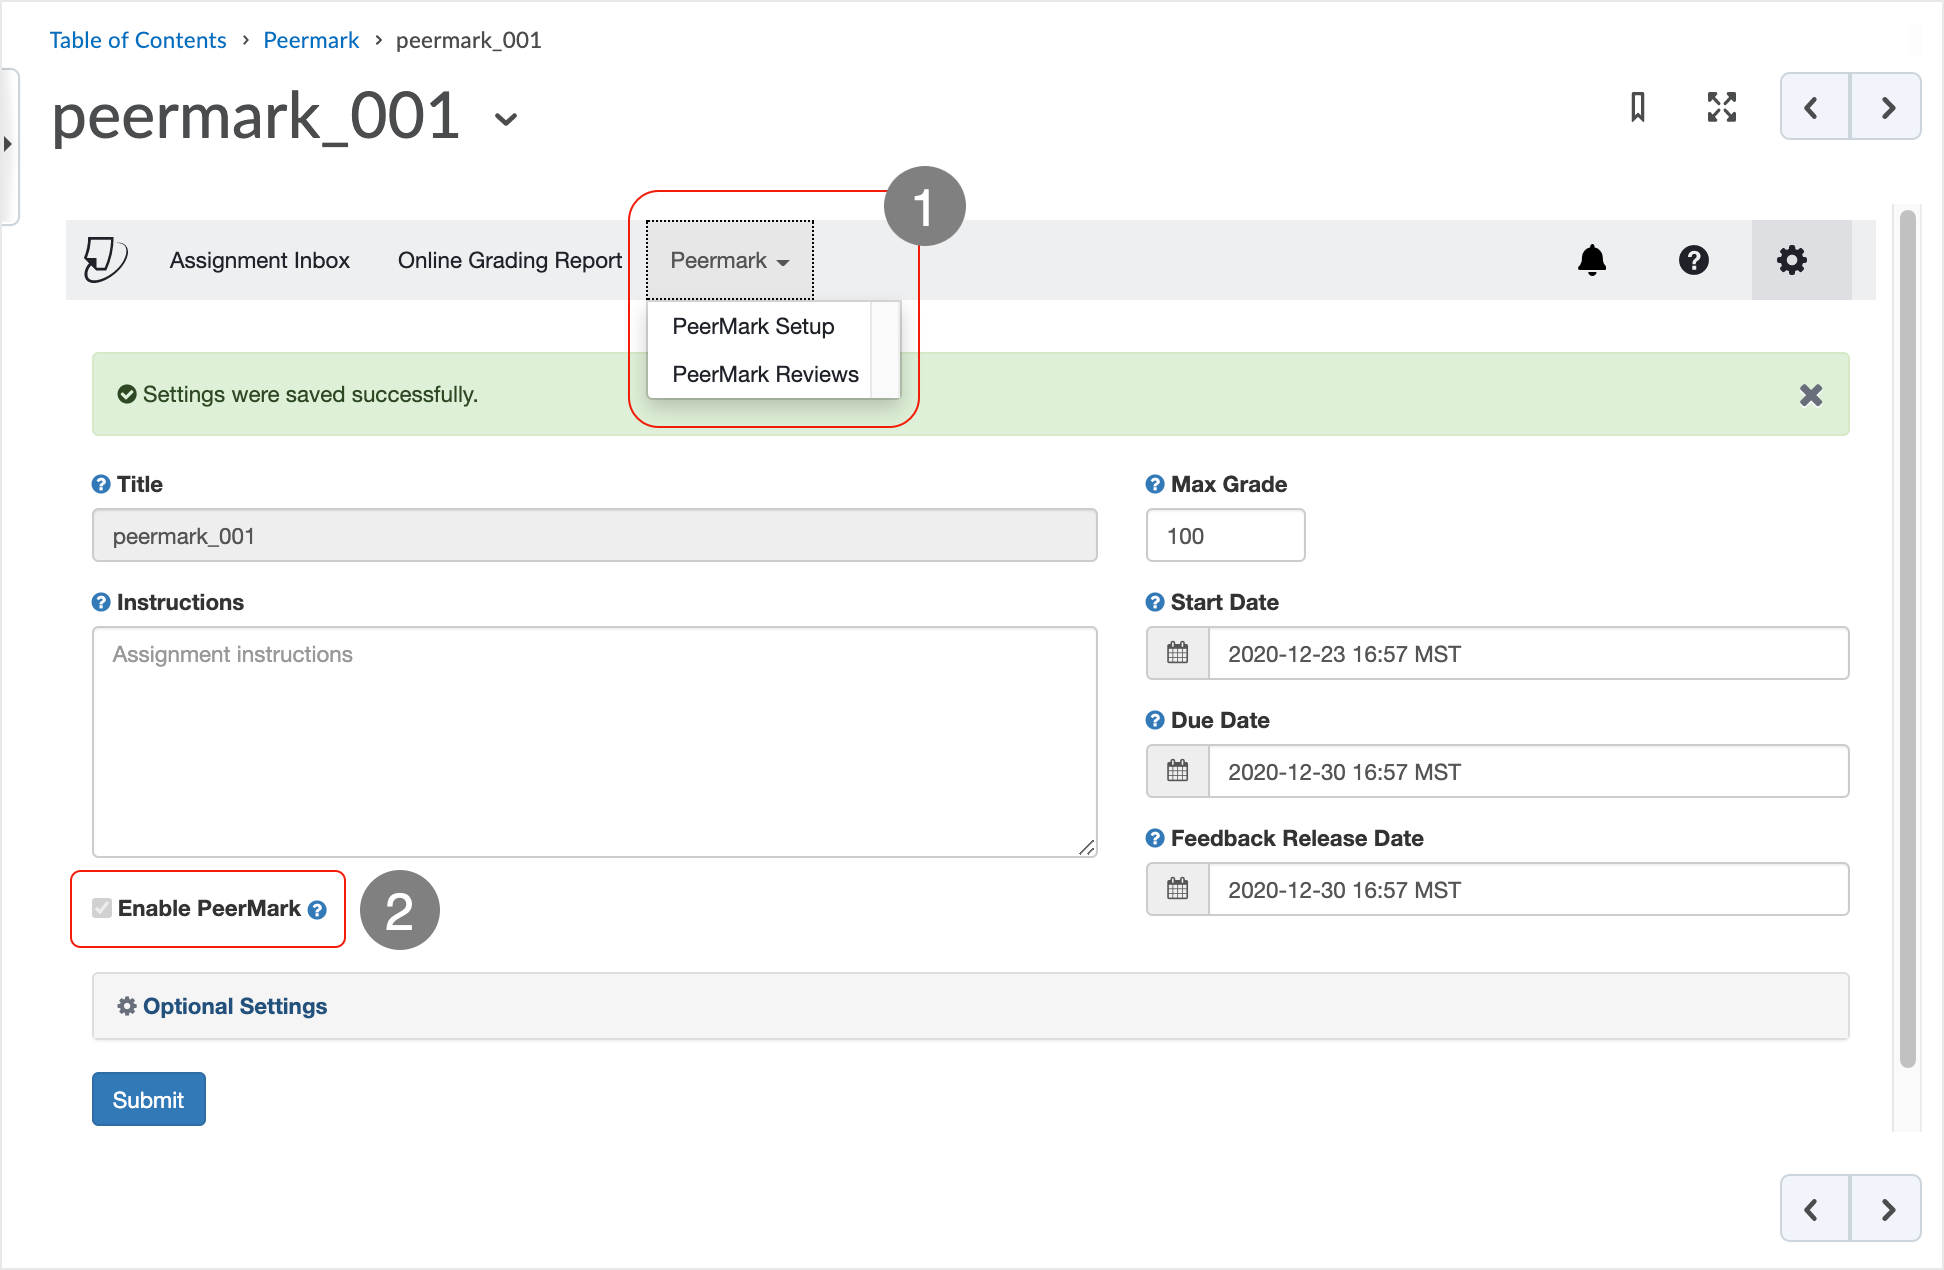
Enable Peermark and "Submit" the activity.
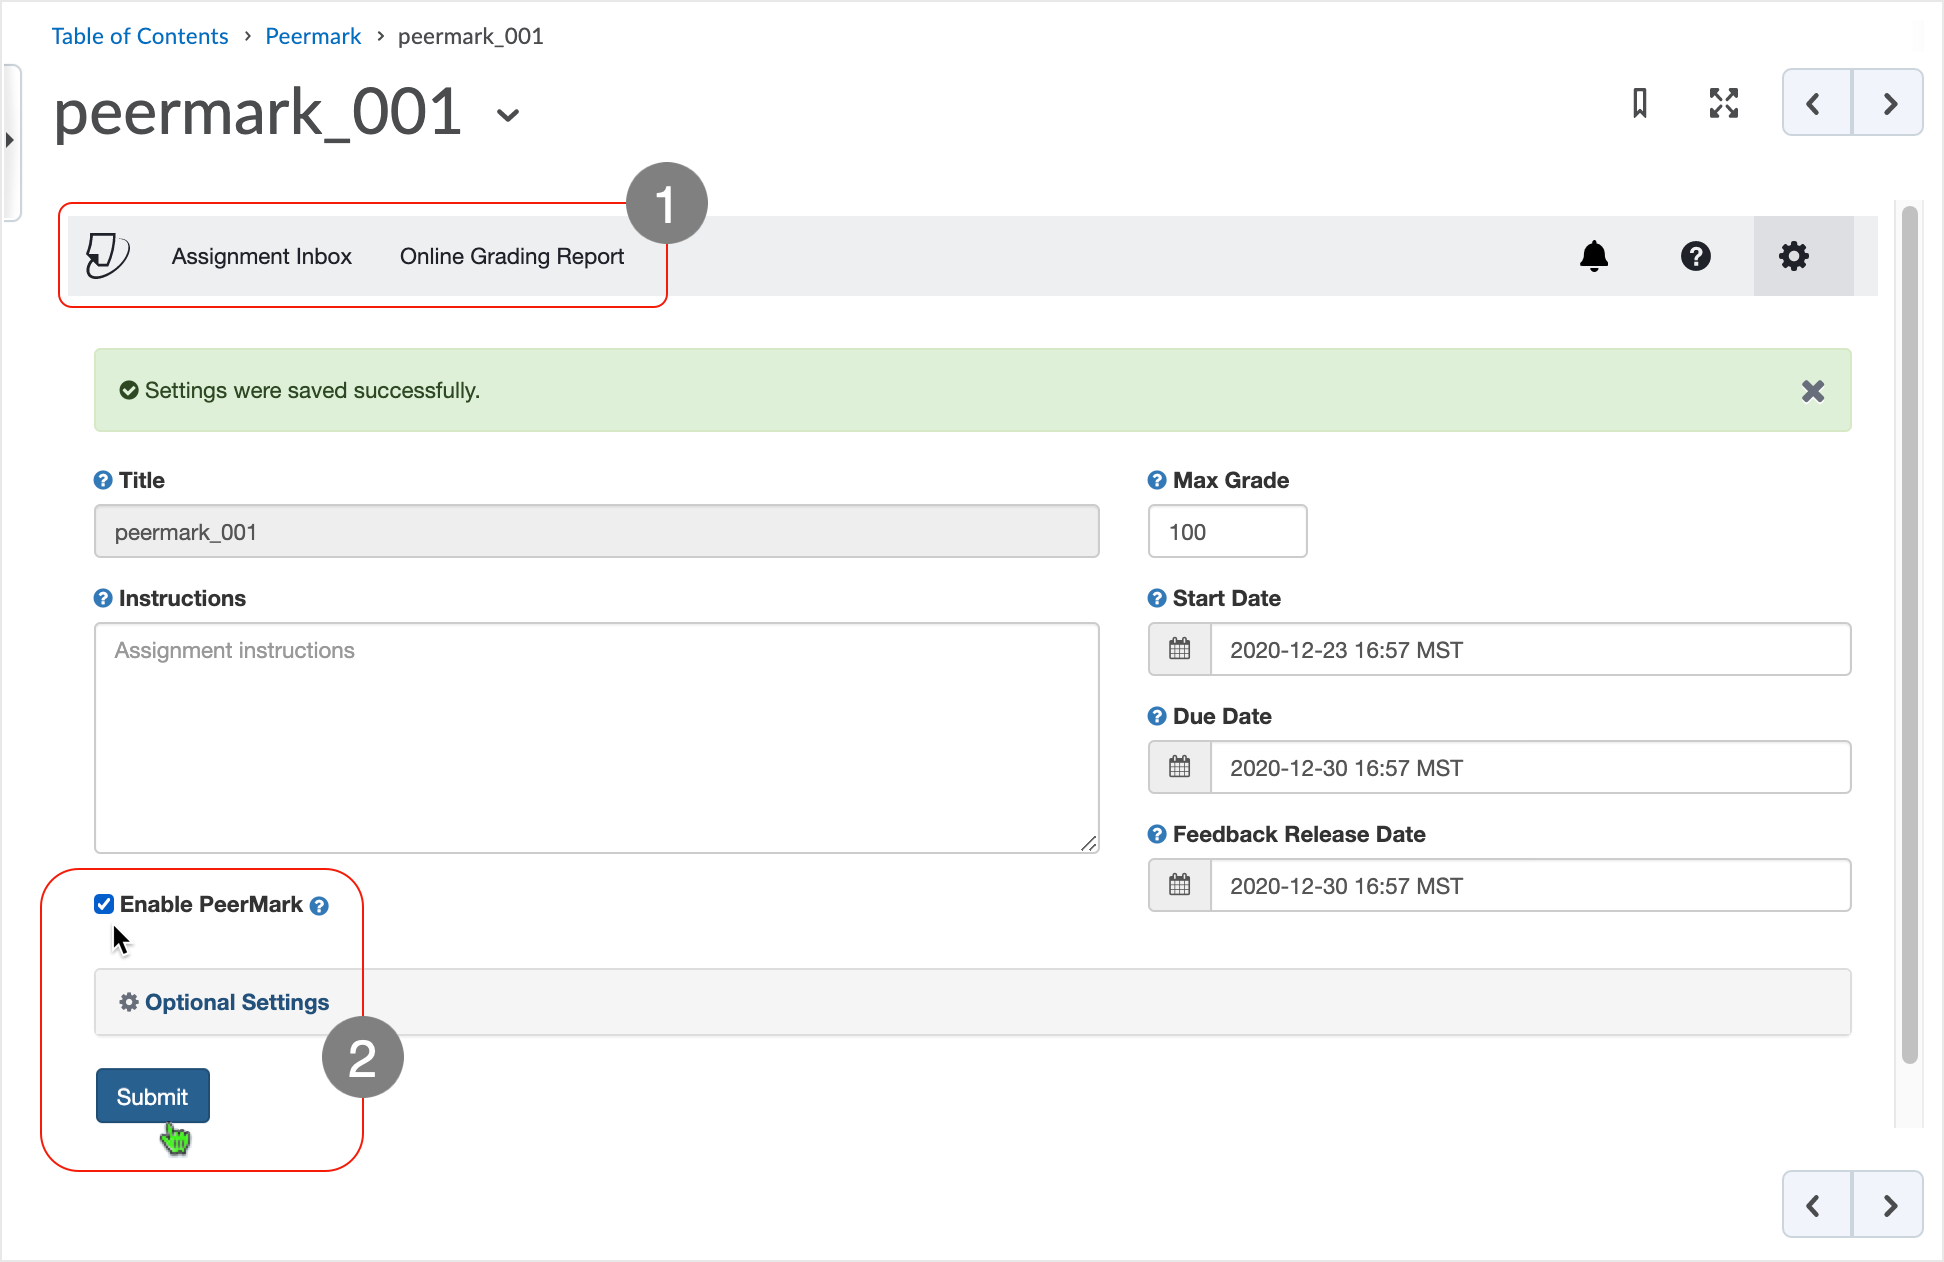
- The "Assignment Inbox" navigation bar shows "Online Grading Report" and the Notifications,
Helpdesk, and Settings icons to the right.
- The "Settings were saved successfully" advisory language displays.
- Select the "Enable PeerMark" checkbox and select the "Submit" button.
- Enabling Peermark and then selecting "Submit" does not force a re-direct at this stage.
Enter PeerMark Setup to access the Peermark settings for the activity.
- Select the "Peermark" link which appears now on the "Assignment Inbox" navigation
bar, and select "PeerMark Setup" from the drop menu.
- The "PeerMark Setup" area represents the "second level" of set-up related to the assignments activity.
- Note that the "Enable PeerMark" checkbox is now grayed out.
- "Settings were saved successfully" advisory language displays.
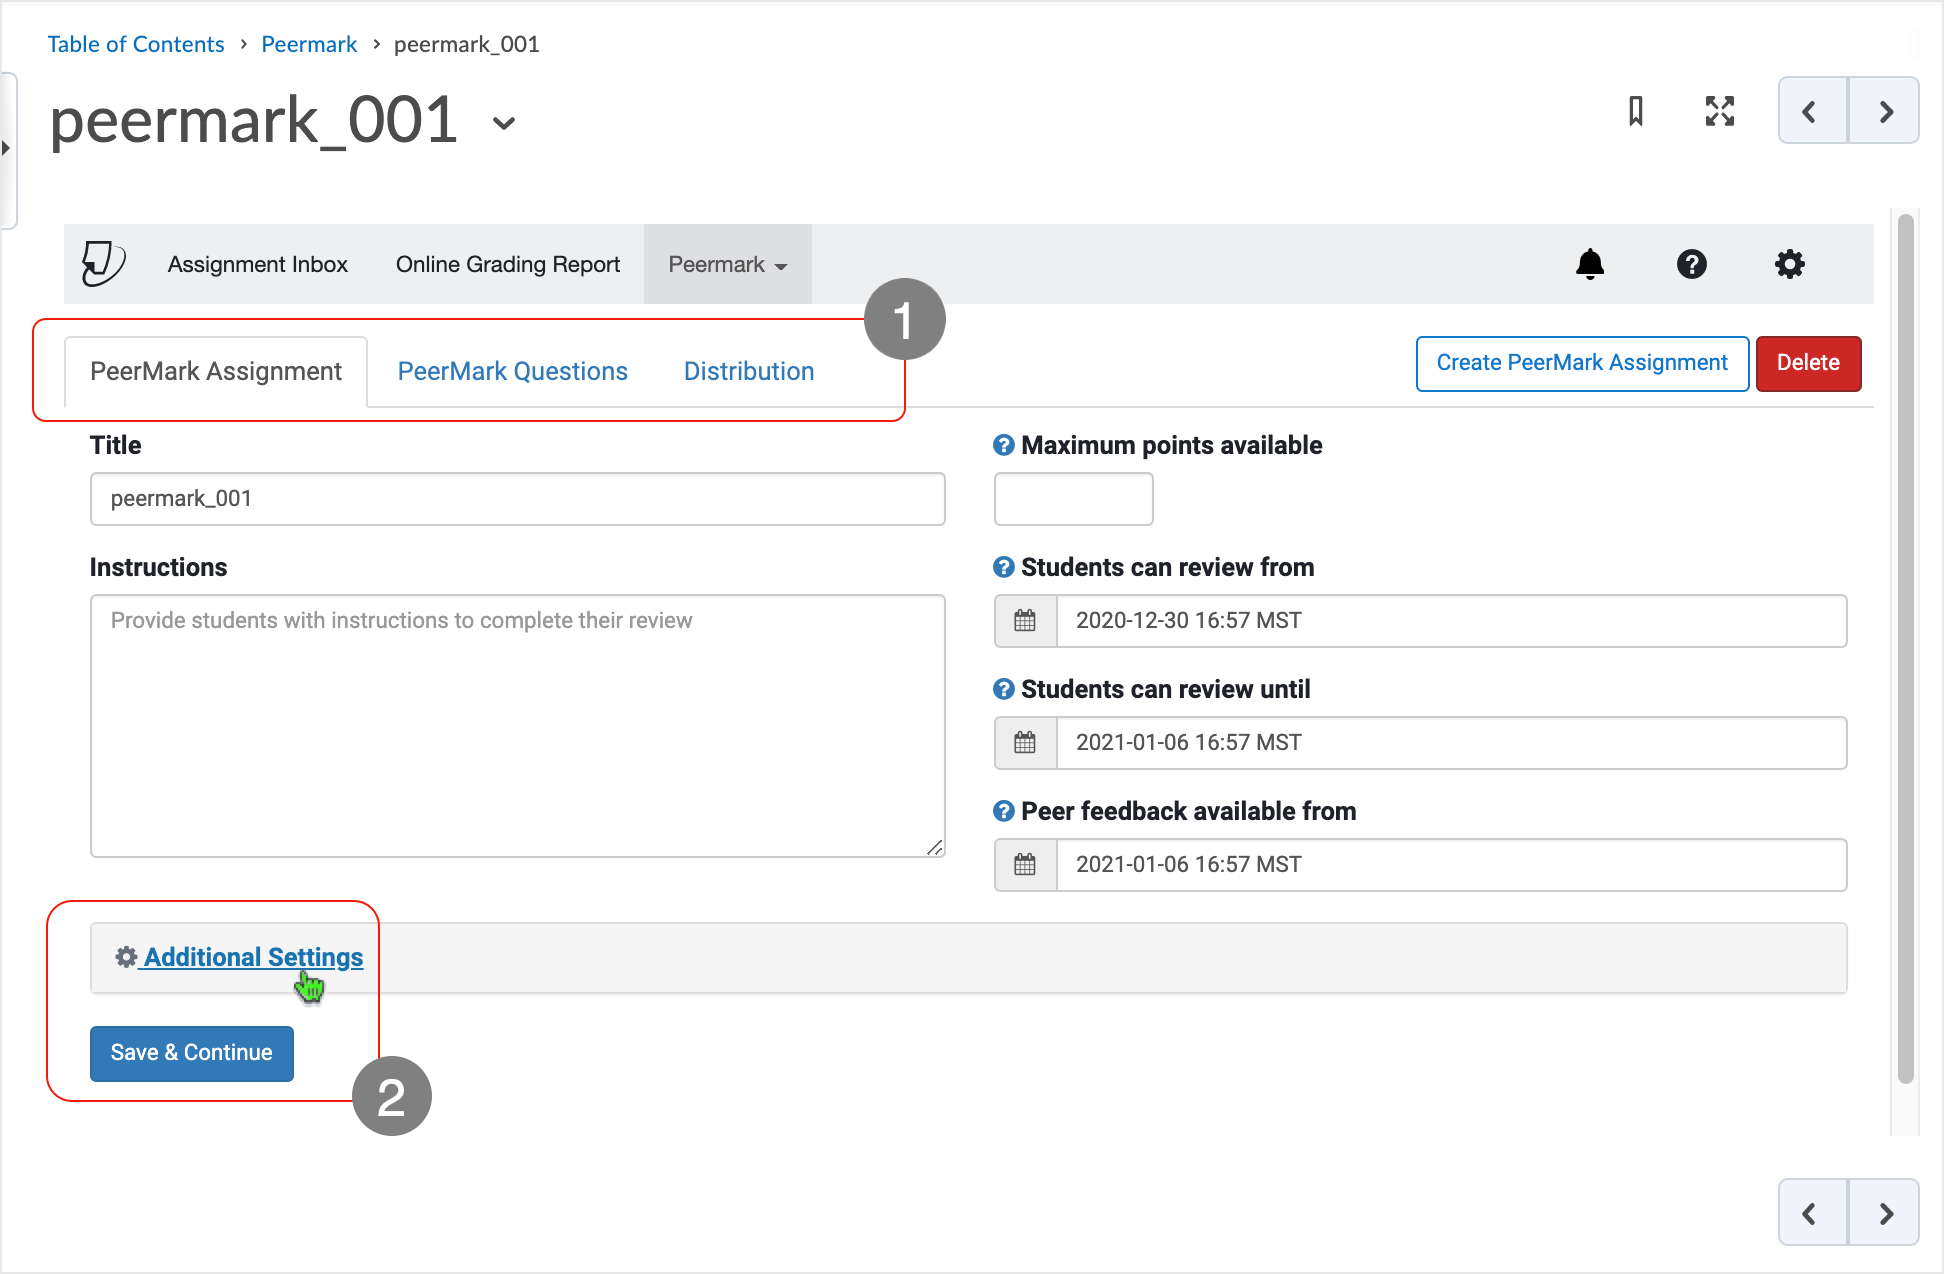
Display in the "second level" of Peermark assignment activity set-up.
- A series of three tabs are now available.
- "PeerMark Assignment" tab gives access to entering the Maximum Points Available for student reviewers. Setting dates for when students can review each others work, and view the feedback from other classmates.
- "PeerMark Questions" tab gives access to set-up what students will mark against.
- "Distribution" tab gives access to edit the paper distribution for students.
- After changes are made on the "PeerMark Assignment" tab, select the "Save & Continue"
button.
- Selecting "Additional Settings" brings up choices related to the peer review dynamics.
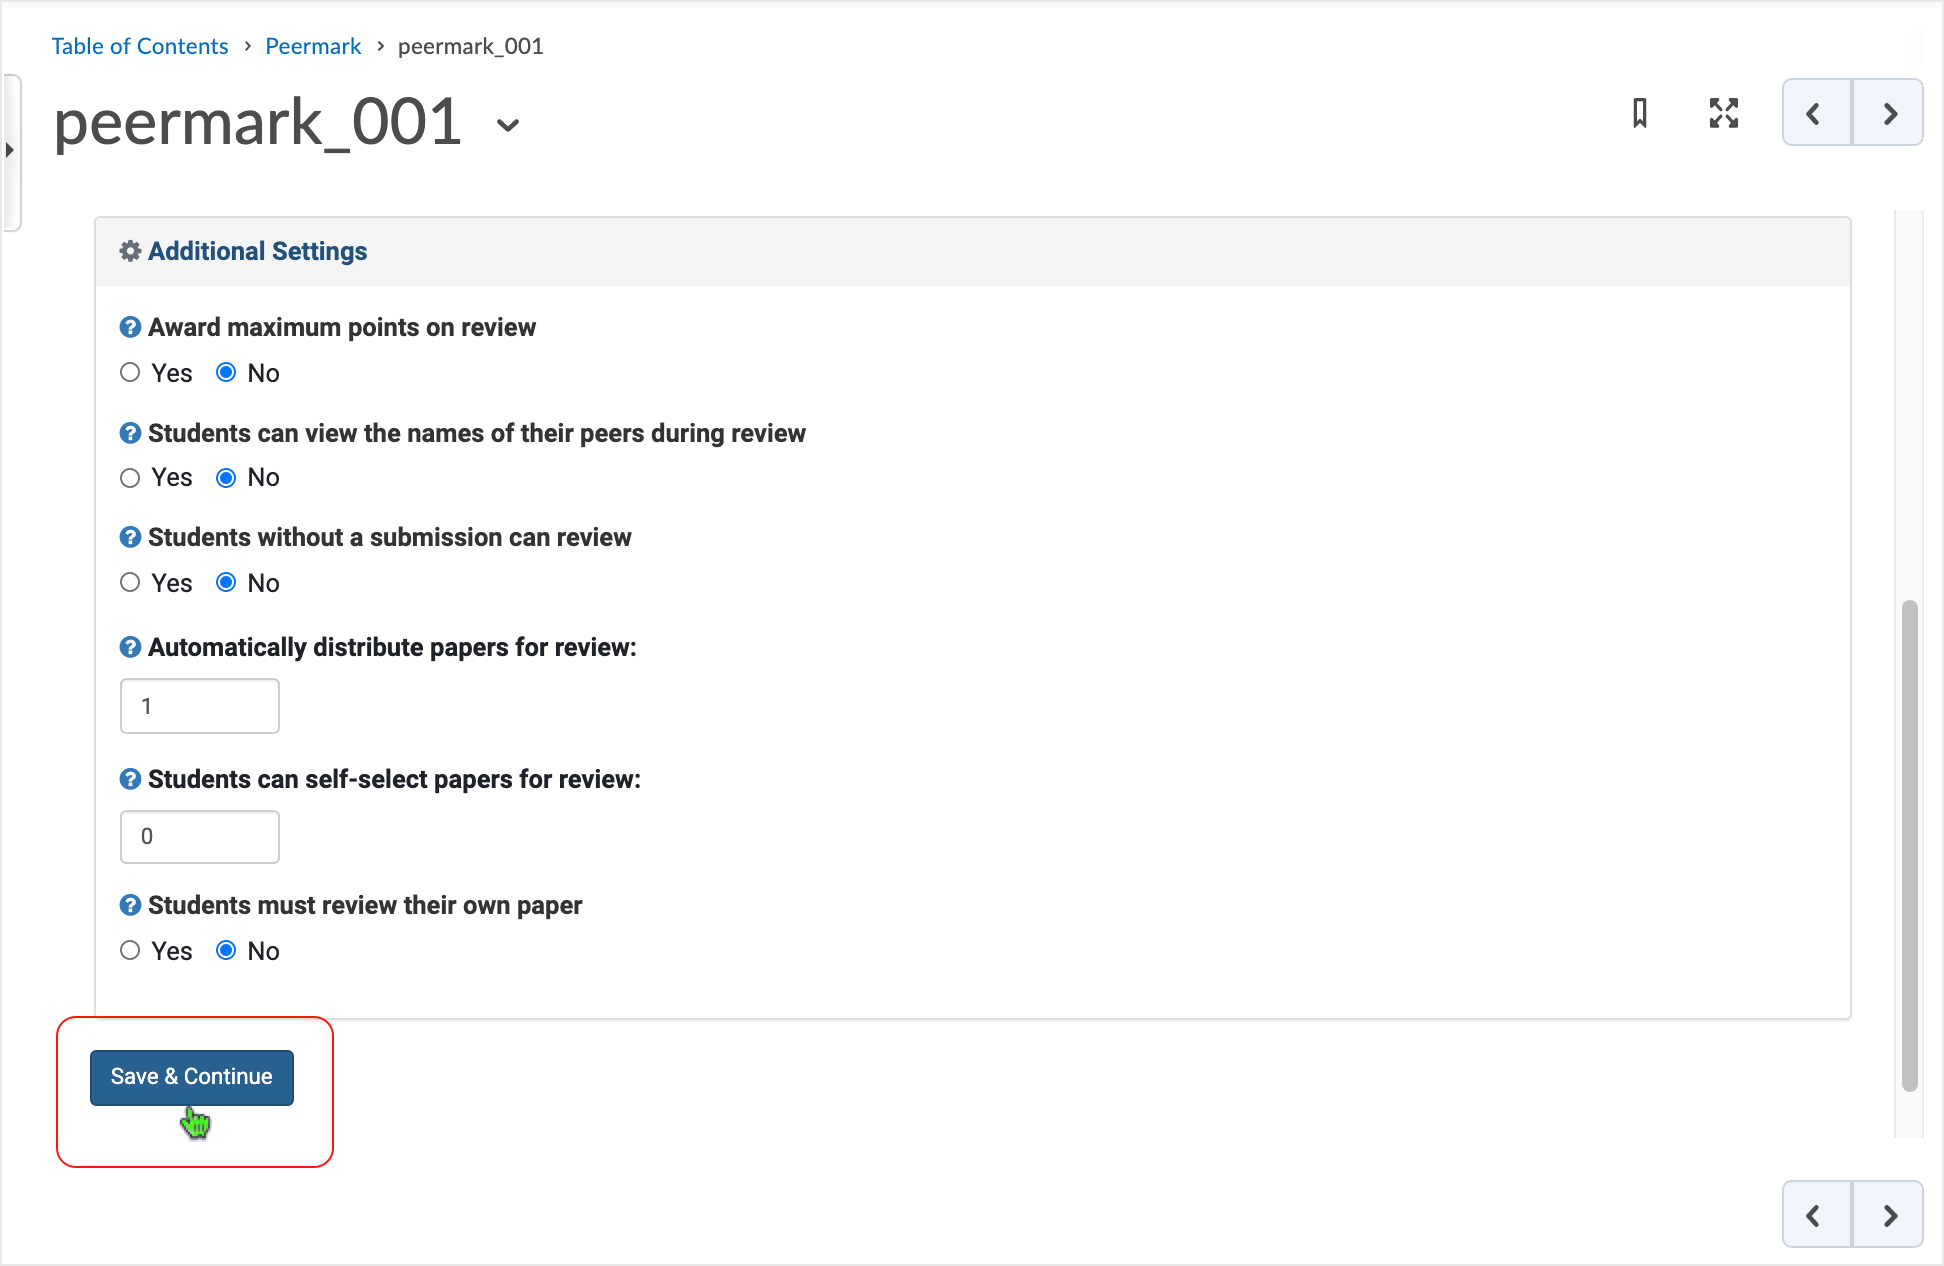
Adjust "Additional Settings" as necessary.
- In Additional Settings:
- Award Maximum Points on review:
- To award the maximum amount of points to a student for completing a review click Yes.
- The standard option is No.
- Students can view the names of their peers during review:
- To allow students to know whose work they are reviewing, or who has reviewed their work, click Yes.
- For the work to remain anonymous, click No.
- Students without a submission can review:
- This will allow students who have not yet submitted a piece of work to see their peer’s work and review it.
- Automatically distribute papers for review:
- This will automatically distribute assignments to each student for them to review and mark.
- Students can self-select papers for review:
- This will present the student with a selection of papers from which to choose.
- The students can see a preview of the assignment before selecting the one they want to review.
- Students must review their own paper:
- This will automatically put the student's own paper in the list of assignments to review.
- Award Maximum Points on review:
- Users can select just one of these options or a combination.
- Click "Save & Continue" to save the settings.
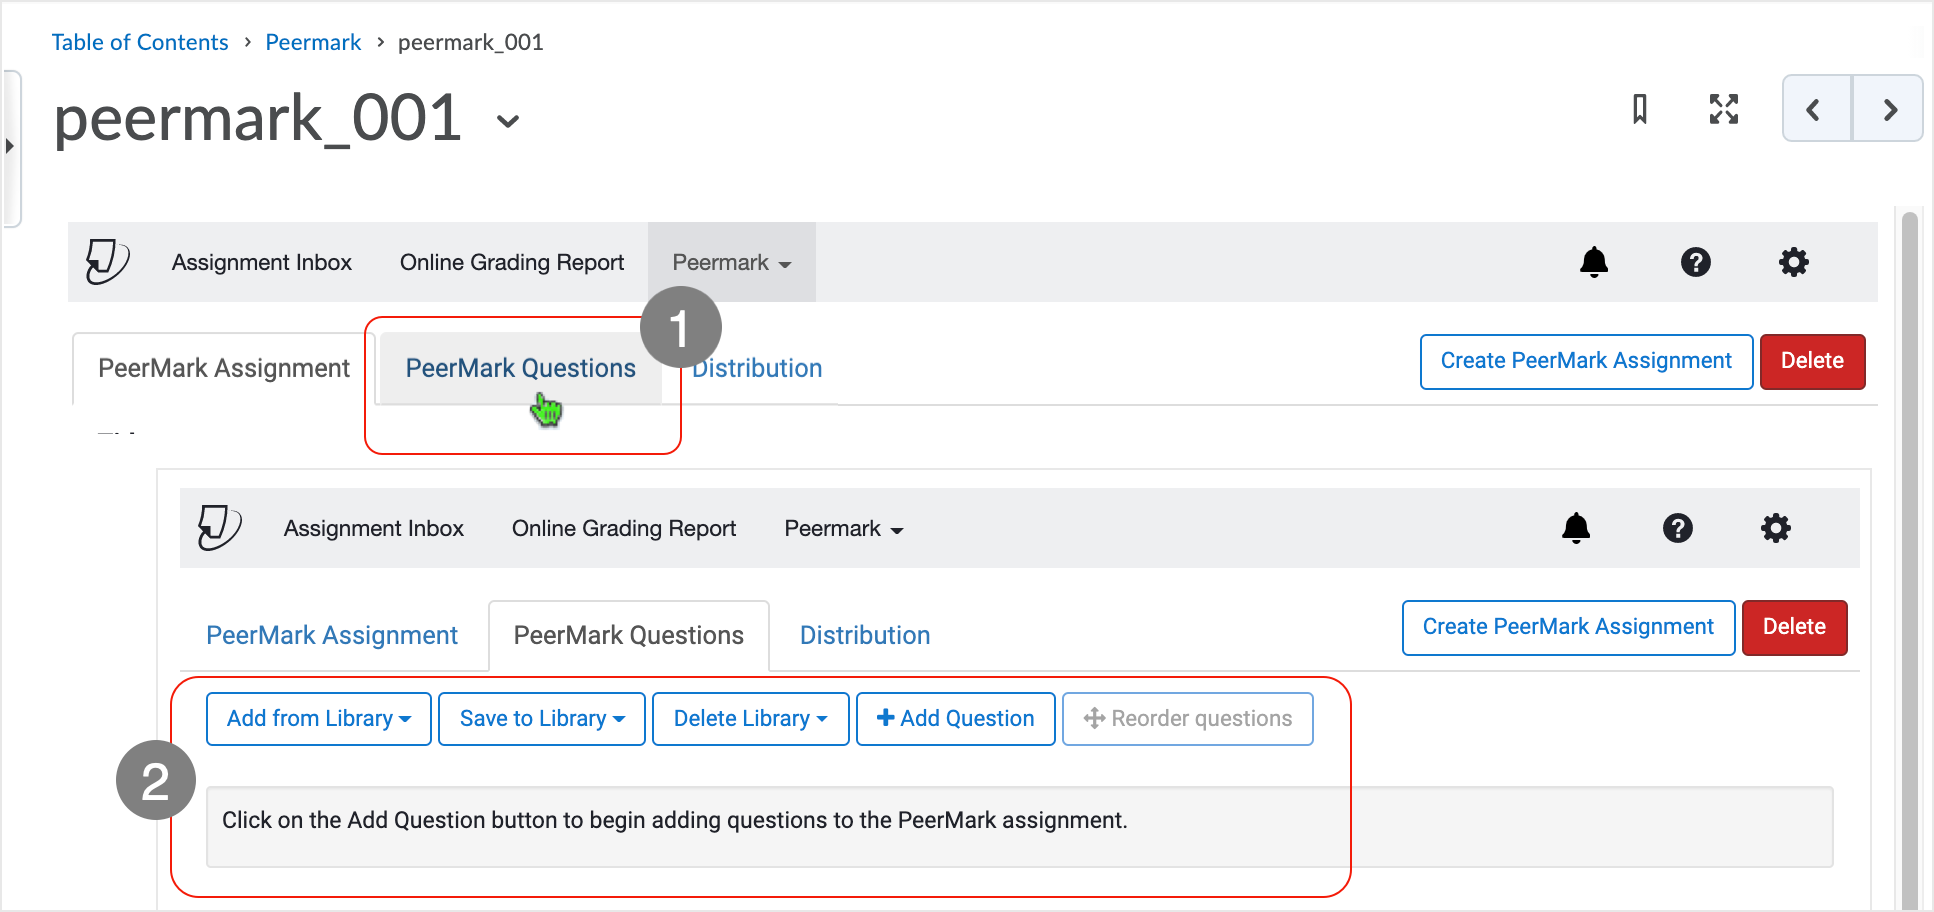
The "PeerMark Questions" tab - set up what students will mark against.
- Select the "PeerMark Questions" tab to make it active.
- When in the "PeerMark Questions" area, users can add questions from an existing Library,
add a new question, add questions to a new Library, and Manage Libraries as necessary.
- Add from Library: select a library and use a pop-up window to select questions to
use. Then click Add Selected Questions.
- Any user created Libraries or questions previously created and saved in Turnitin should be available in Add from Library.
- This area will auto save your changes.
- Save to Library: Add a question and save it to a user-created library.
- Delete Library: Delete unwanted libraries as necessary.
- +Add Question: Choose between 2 types of questions to furnish to reviewers when reviewing papers.
- +Reorder questions: After questions have been added, this function becomes available for use.
- Add from Library: select a library and use a pop-up window to select questions to
use. Then click Add Selected Questions.
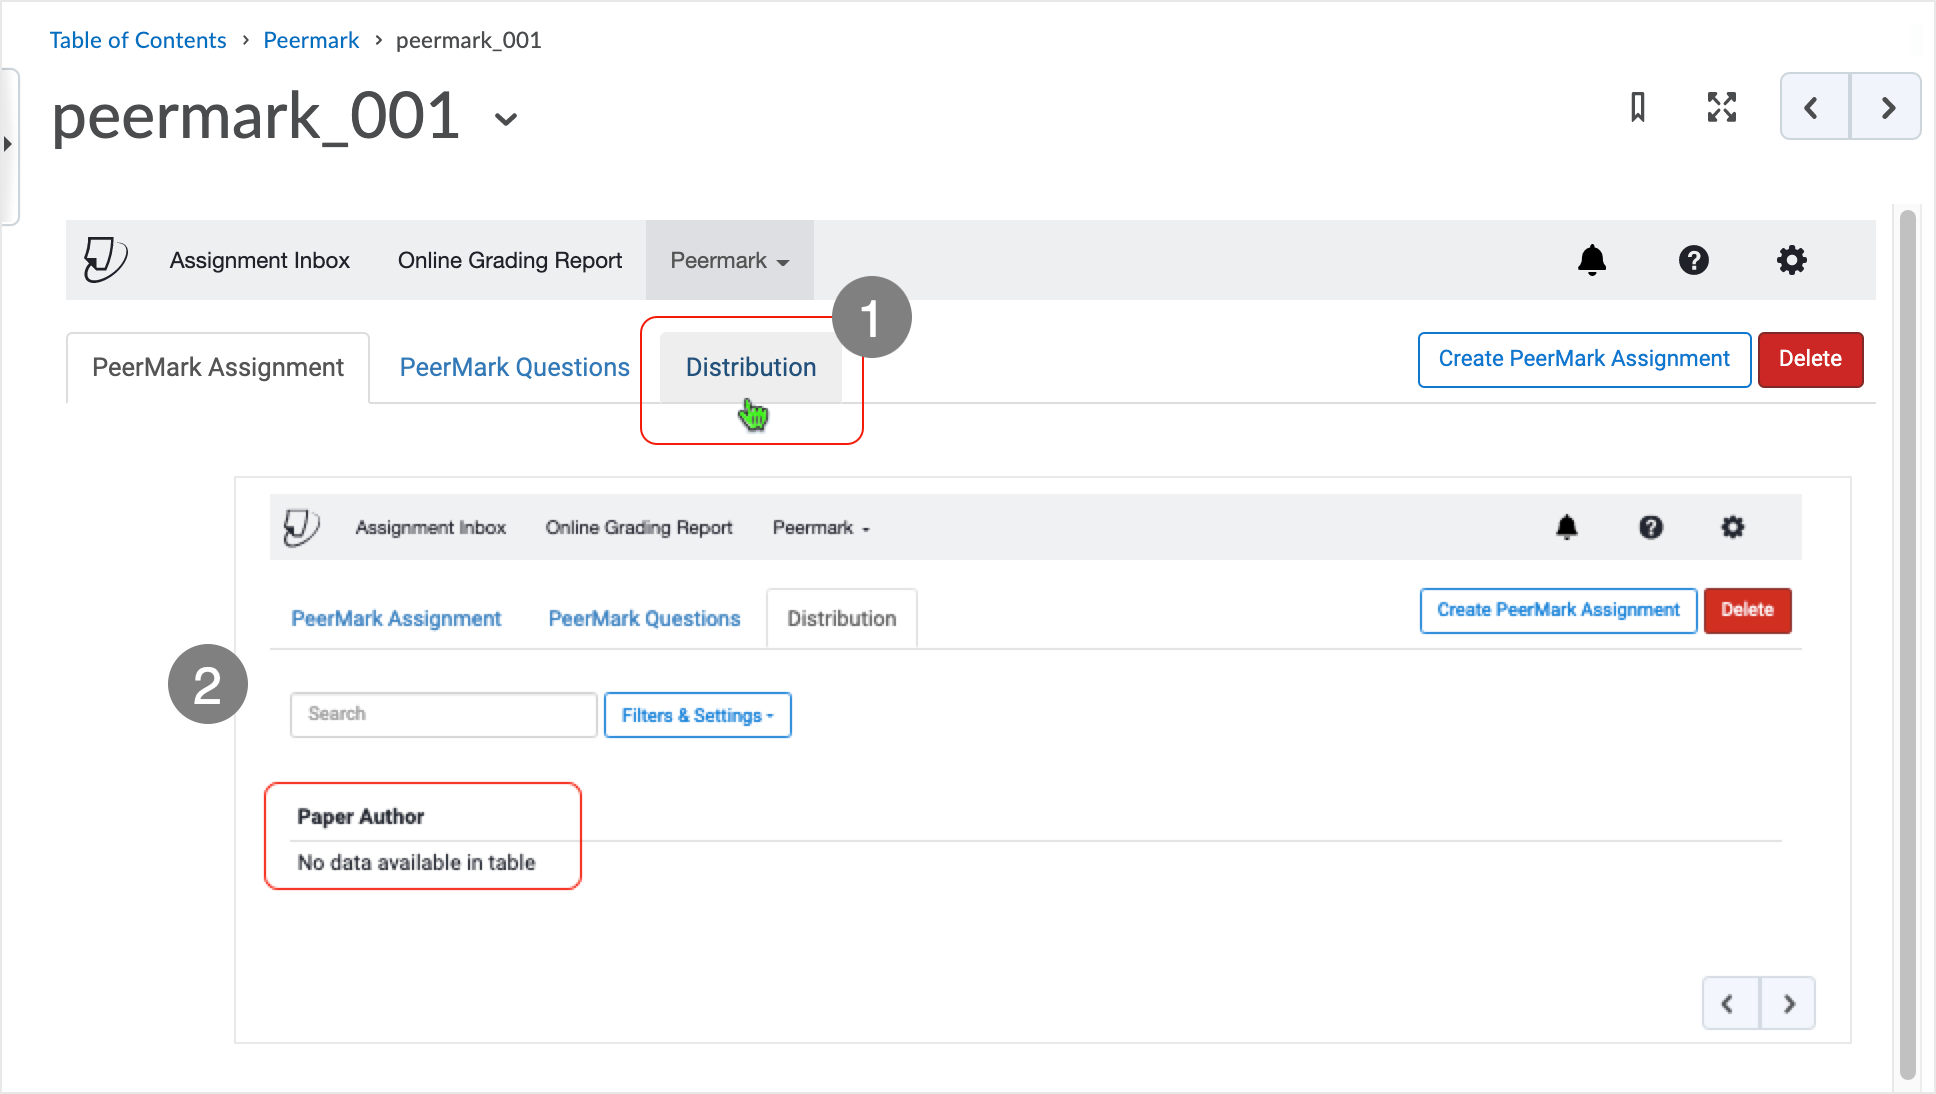
The Distribution tab - control paper distribution for students.
- Select the "Distribution" tab to make it active.
- Edit the paper distribution for students and choose who gets which one to mark. If you are happy with the system doing this automatically, or students choosing what work to mark, this tab can be left alone.
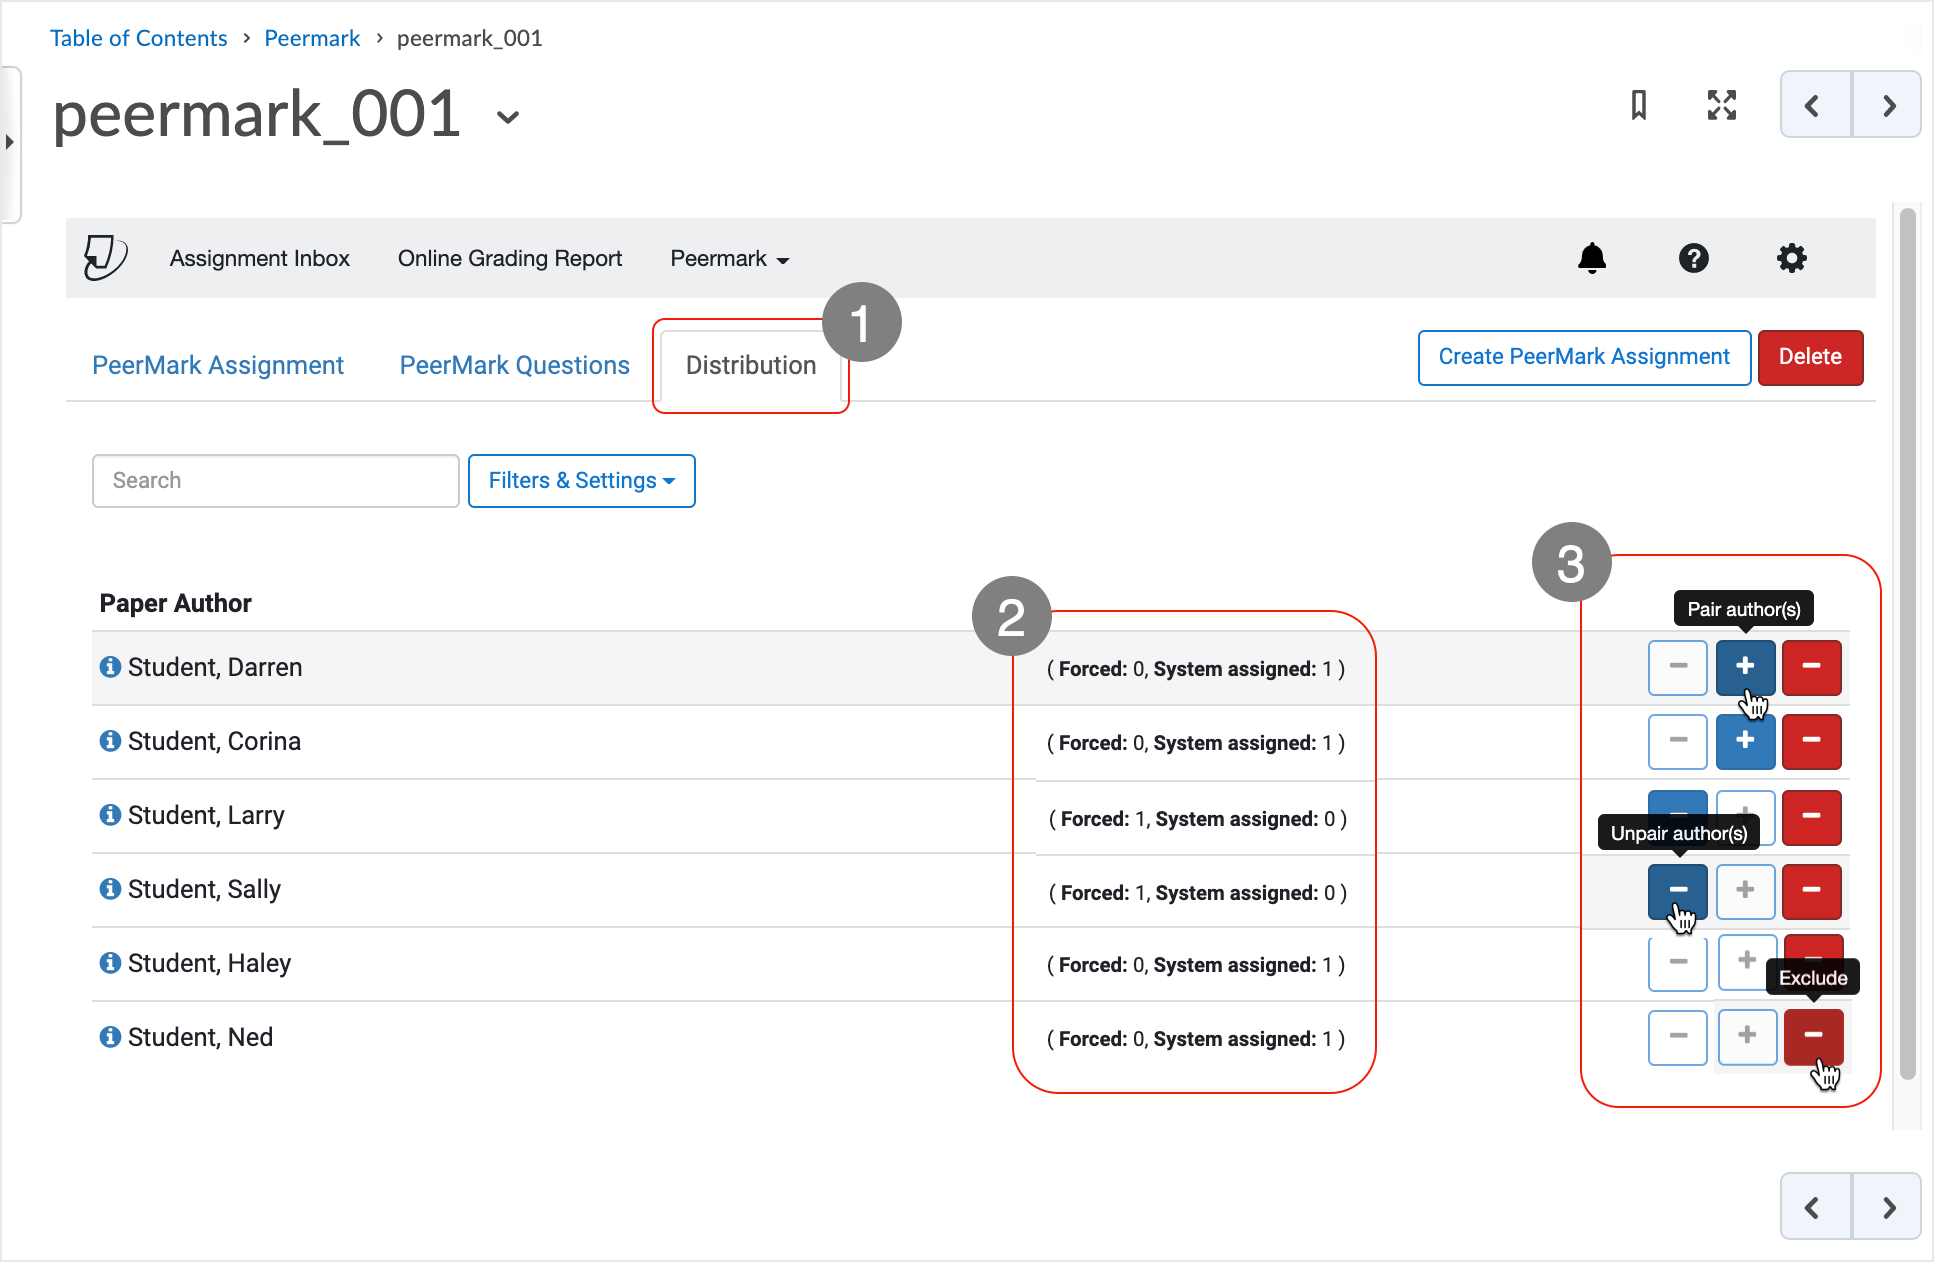
The Distribution tab - when populated with students.
- The Distribution tab is active.
- Students (Paper Authors) are either "Forced" or "System assigned" to access other
paper(s)/authors to review.
- Forced: Students are assigned classmates and related paper(s) to review by the managing user (typically instructor role).
- System assigned: The system assigns the paper(s) to review.
- Select students to review submission(s) by clicking on the appropriate icon. To exclude
a student click on the appropriate icon.
- Blue Plus icon: Pair author(s)
- Blue Minus icon: Unpair author(s)
- Red Minus icon: Exclude
When the Distribution set up is adjusted, changes will auto save.
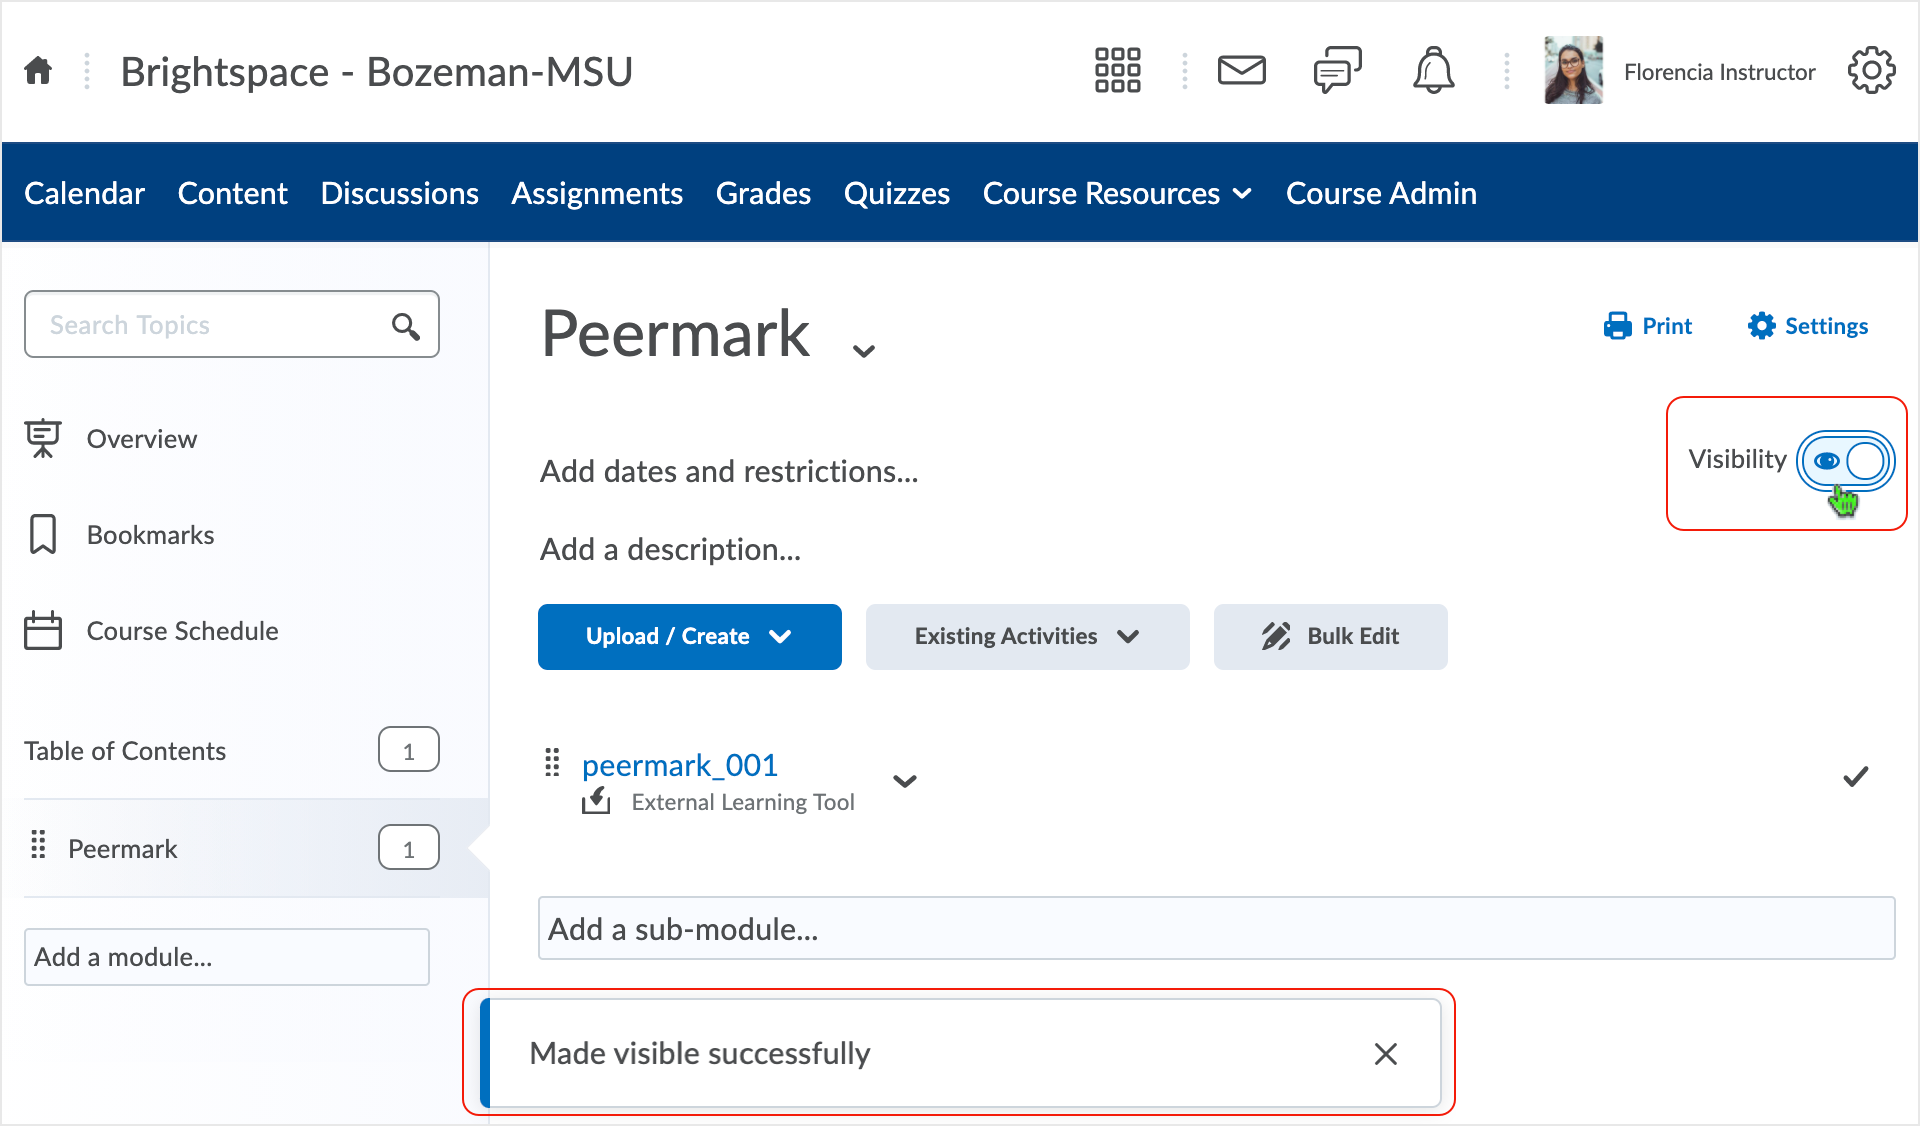
The assignment activity is ready to be made visible for access by students.
Make the Content module and/or Peermark assignment activity visible again.
Go back into the content area where the Content module containing the assignment is located. Select the visibility icon and make the module visible again.
- Or adjust any combination of visibility that was used to hold the assignment activity hidden to students while the settings were adjusted in the Peermark offering.
What dialog boxes look like and how dialog boxes and browsers interact is dependent upon the operating system and browser being used. The screenshots in this tutorial may differ from the screen that the user is viewing when performing actions described.
CD 202012