
Discussions setup
Set-up discussions in Brightspace.
Discussions Overview - Topic
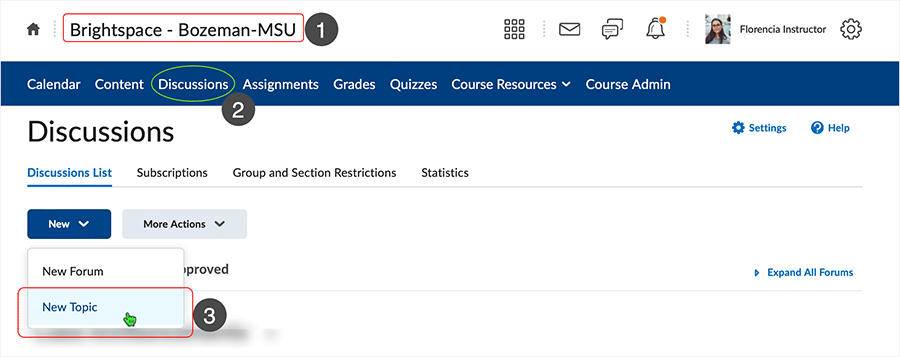
When inside a course, create a new discussions.
- Inside a course.
- Select "Discussions" link from course nav bar.
- Select the "New" button and select "New Topic" from the drop menu.
- "New Forum" is available for selection as necessary
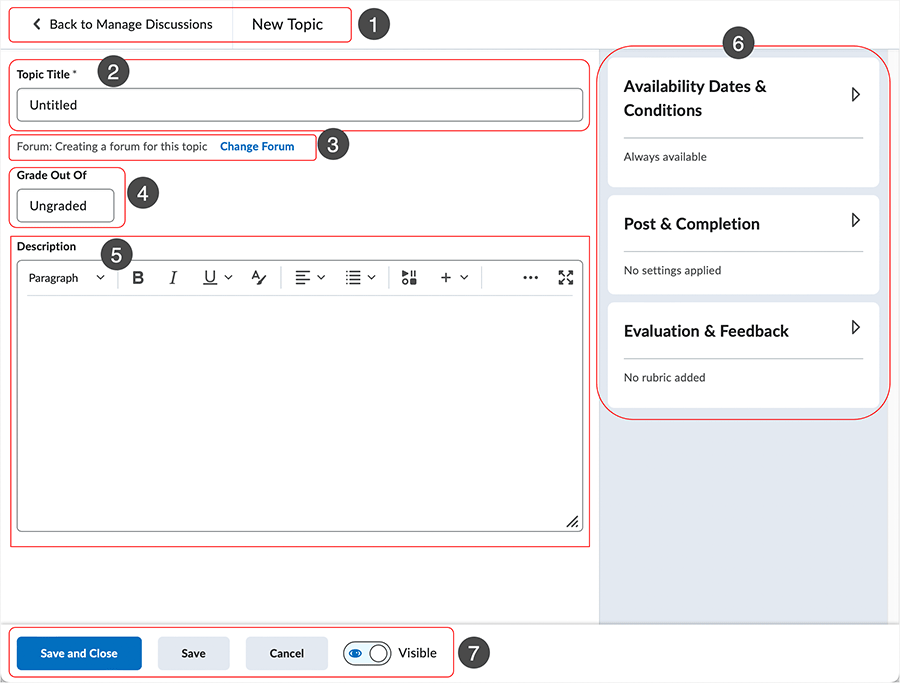
Each discussions editing area has 7 areas that control setup related to a discussions.
- Name and Navigation
- The name of the discussions displays.
- In this instance it displays "New Topic" because no name has been entered and saved.
- Select "Back to Manage Discussions" to go back to the Manage Discussions area.
- The name of the discussions displays.
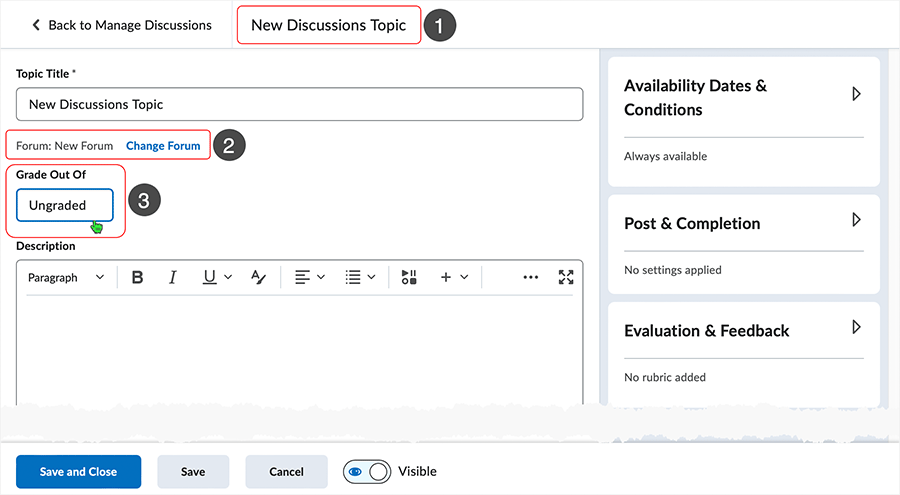
- Topic Title
- Enter the name of the discussions topic.
- Forum
- When a title for the topic is entered, when "Save" or "Save and Close" is selected, the system will automatically create a forum with the same name as the topic.
- Use "Change Forum" to associate the topic with another existing forum.
- Grade Out of
- "Grade Out Of" controls variables related to how a discussions is connected to a grade item.
- If the "Ungraded" box is not selected, the discussions topic will not include assessment.
- If the "Ungraded" box is selected, the discussions topic will automatically include assessment.
- Description
- Place a description of the discussions topic which is visible to discussions participants.
- Set up discussions parameters using the right-side navigational tools.
- Use the options to manage status of the item while editing.
- "Save and Close" - save the work and close out of editing the item.
- "Save" - save the work and remain on the editing page of the item.
- "Cancel" - exit the editing page without saving any changes. The system will warn the user.
- "Visible" or "Hidden" - toggle by selecting the button.
Forums
To function, Topics must always reside in a Forum in the Discussions area.
Select the "Change Forum" button to manage forums in relation to the topic as necessary.
Default behavior when editing a topic is that when a topic is saved, unless changes take place related to the forum, a forum is automatically created with the "Topic Title" as the title of the forum.
The user can "Change Forum" to adjust and associate the topic with another existing forum OR create a new forum for the topic.
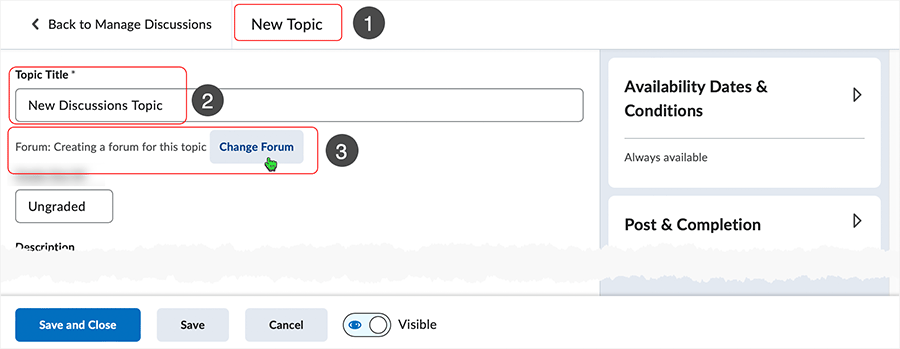
- Edit a topic.
- In this example, "New Discussions Topic" is the Topic Title.
- Select the "Change Forum" button to manage the topic association with a forum.
- Use this function if not wanting to use the "Topic Title" as the forum title.
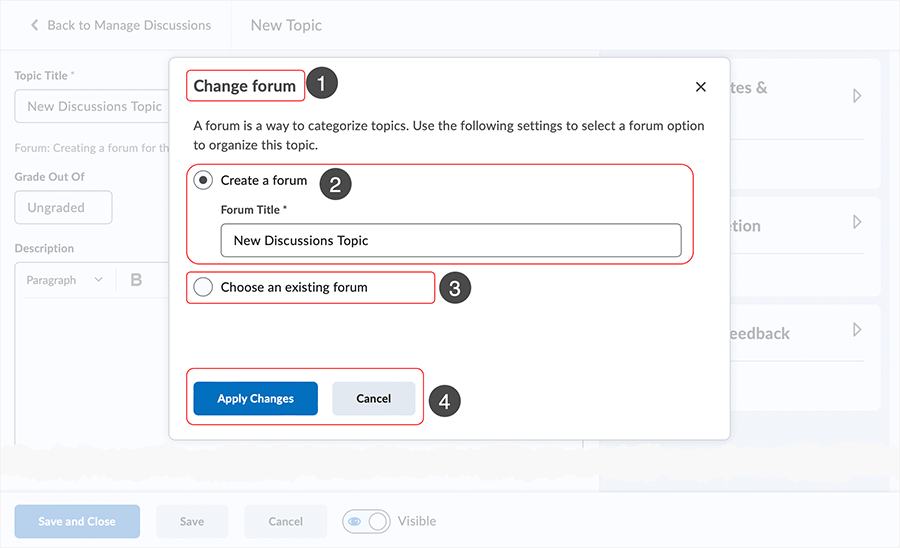
The "Change Forum" dialog box displays to facilitate forum management.
- After selecting the "Change Forum" button, the "Change Forum" dialog box displays.
- The "Create a forum" radio button is automatically selected by default.
- The "Create a forum > Forum Title" text box auto-populates with the current Topic
Title.
- In this example "New Discussions Topic" displays.
- If the topic title is acceptable as a forum title, leave it intact.
- To change the "Forum Title" directly, select the text in the text box under "Forum Title" and type in a new forum title as needed.
- The "Create a forum > Forum Title" text box auto-populates with the current Topic
Title.
- If a forum already exists in the discussions list area, select the "Choose an existing forum" radio button.
- Select "Apply Changes" or "Cancel" as needed.
Use "Choose an existing forum" to link to a previously created forum that exists in Discussions List area.
- "Change Forum" dialog box displays.
- Select the "Choose an existing forum" radio button.
- "Untitled" displays - select the drop menu arrow to see existing forums.
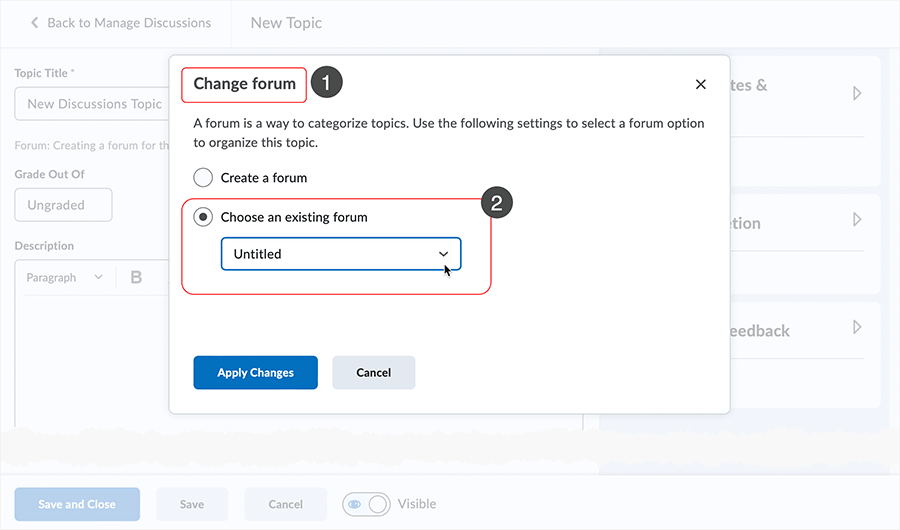
Choose an existing forum from the "Choose an existing forum" drop list.
- "Change Forum" dialog box displays.
- Selecting the drop menu shows existing forums.
- In this example, "New Forum" is chosen from the list.
- "Apply Changes" button is selected.

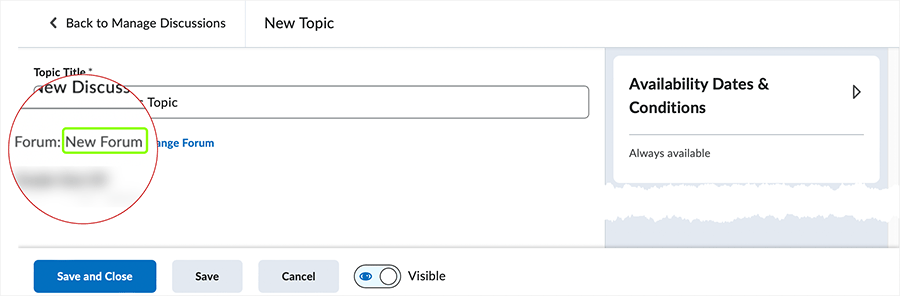
The newly created or selected forum displays on the edit page of the topic.
In this example, the selected existing forum named "New Forum" displays.
When a Forum is created using Topic Title, the forum appears at the bottom of the Discussions List. To change forum position in the list, select "More Actions > Reorder" function.
If a user forgets to select a Forum when creating a Topic then, as indicated, the Forum will be created with the title of the topic. If the user then chooses to adjust and move the topic to another forum, the forum created with the title of the topic stays in the Discussions List and must be manually deleted.
In all instances, when editing a discussions topic, selecting "Save and Close" or "Save" is necessary for changes to be applied to the discussions topic.
Grade Out Of
The "Grade Out Of" area makes various discussions-to-grade item controls available.
"Ungraded" displays when a discussions is not linked to a grade item.
Edit or Link to existing
To associate a grade item with a discussions topic, users can create a new grade item OR link to an existing grade item.
- Editing the "New Discussions Topic" topic.
- "Forum: > New Forum" displays as the chosen forum.
- Click on it to reveal the options in the drop menu.
- "Grade Out Of" displays "Ungraded" - select "Ungraded" text box.
After selecting the option, the discussion topic is made assessable.
"In Grade Book" option.
- Editing the "New Discussions Topic" topic.
- By virtue of selecting the "Ungraded" textbox "In Grade Book" appears.
- The Discussion Topic is now assessable.
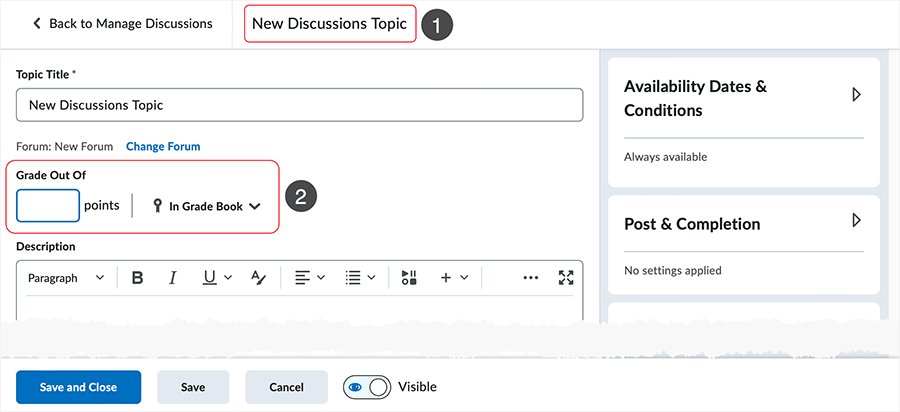
"Grade Out Of" must have a point total entered.
If the user attempts to save at this point, a message will appear "Your discussion wasn't saved. Please correct the fields outlined in red." and user will have to fill out a "points" total in the box.
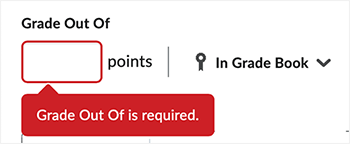
Note: After "points" are entered into the box the user can save the topic. If the user saves the topic at this point, a grade item will be created in the grade book (at the bottom) named with the topic title.
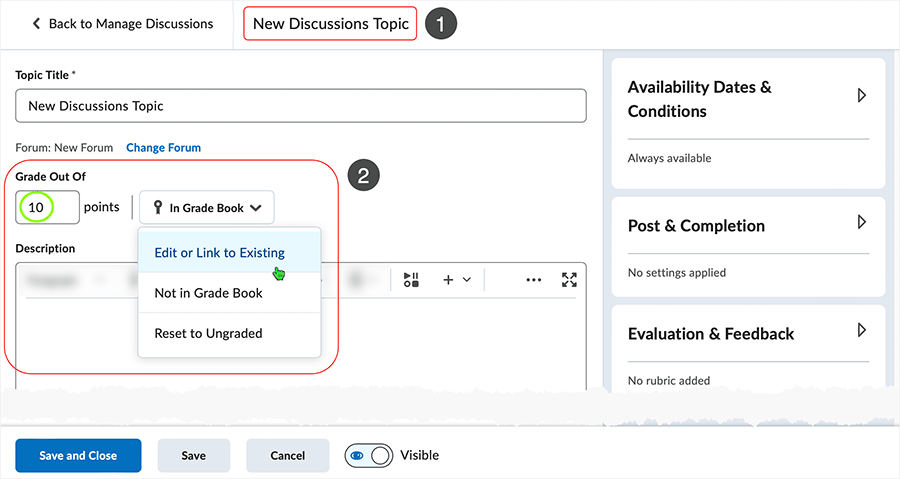
After points are entered into the "Grade Out Of" text box, "In Grade Book" displays.
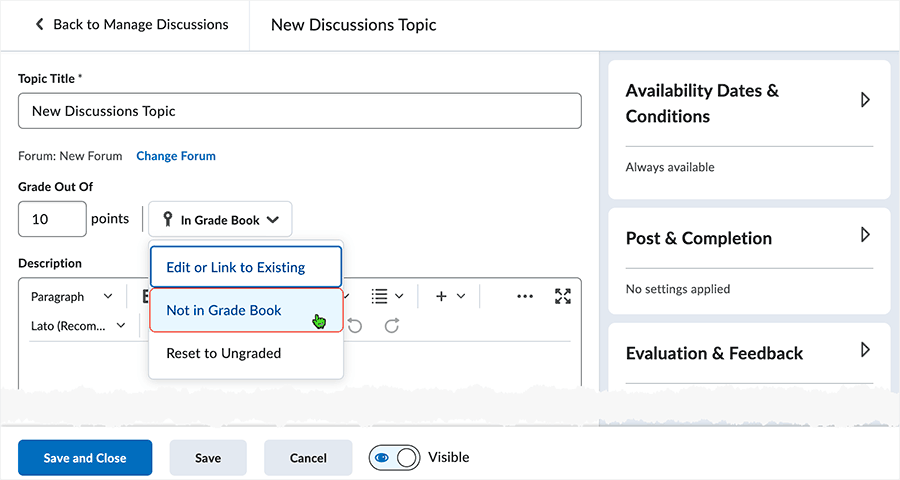
- Editing the "New Discussions Topic" topic.
- "In Grade Book" displays.
- The grade item related to the discussion is worth 10 points.
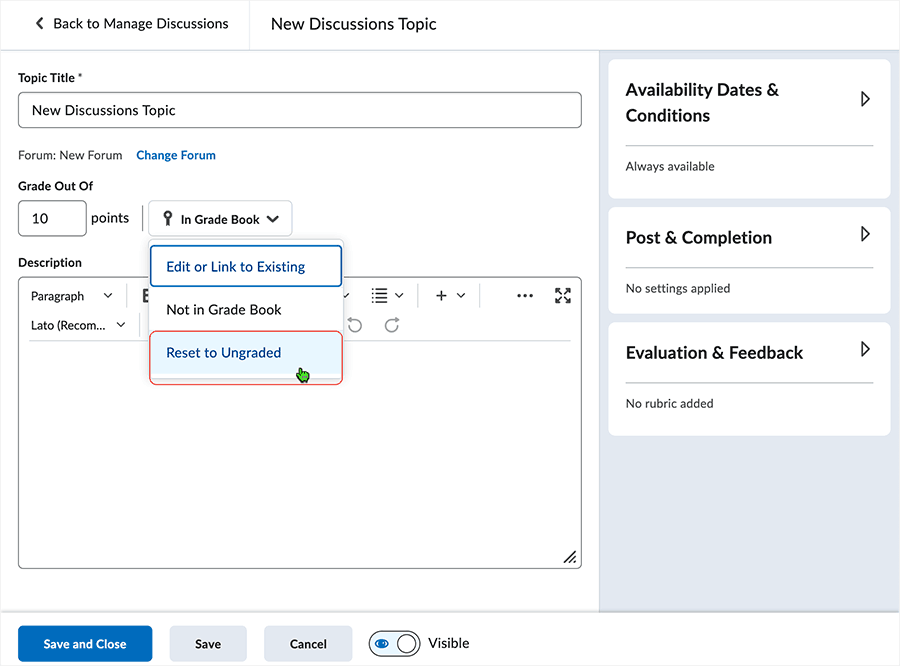
- Selecting the "In Grade Book" area shows a selectable drop menu.
- "Edit or Link to Existing" gives user options related to grade item association.
- "Not in Grade Book" removes the linkage to a grade item but leaves the "points" available.
- "Reset to Ungraded" returns the discussion topic to "Ungraded" status.
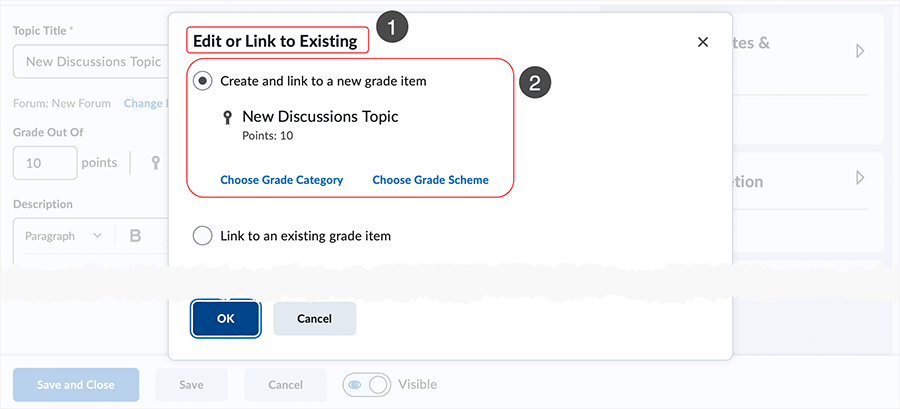
"Edit or Link to Existing" behavior - "Create and link to a new grade item" option.
When in this area, selecting the "Create and link to a new grade item" will give an option to create another "New Discussions Topic" grade item in the grade book.
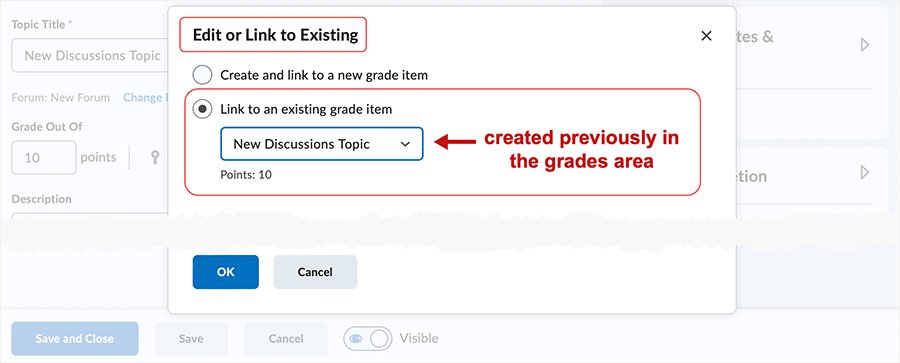
"Edit or Link to Existing" behavior - "Link to an existing grade item" option.
If the discussion topic has already been saved prior, selecting the "Link to an existing grade item" shows the "New Discussions Topic" already in the Grade Book.
Note: When a grade item has been created, selecting any of the "In Grade Book" options does not remove any created grade items from the grade book.
back to top
back to "Grade Out Of" top
Breaking an association between a discussions topic and a grade item
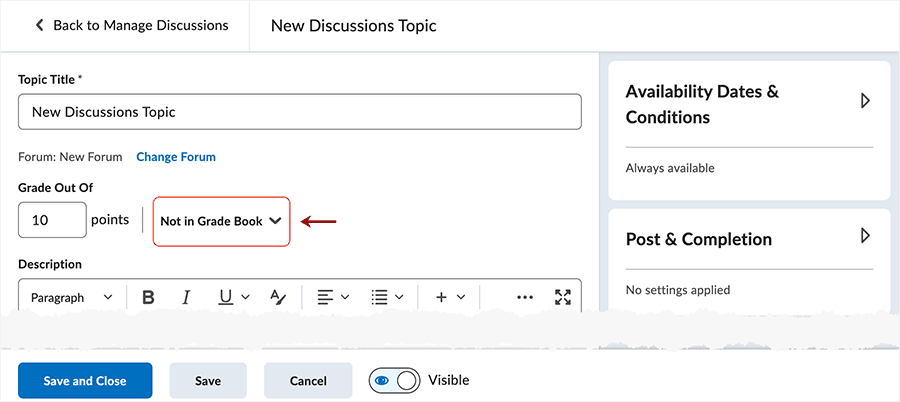
Use "Not in Grade Book" selection to break association between the discussions topic and the grade item.
Select "Not in Grade Book" from the "Grade Out Of" drop menu to break the current association between the discussions topic and the grade book item.
"Not in Grade Book" displays after the option is selected - the amount of points remains in place and the topic remains assessable.
Use "Reset to Ungraded" to break the association between the discussions topic and the grade item.
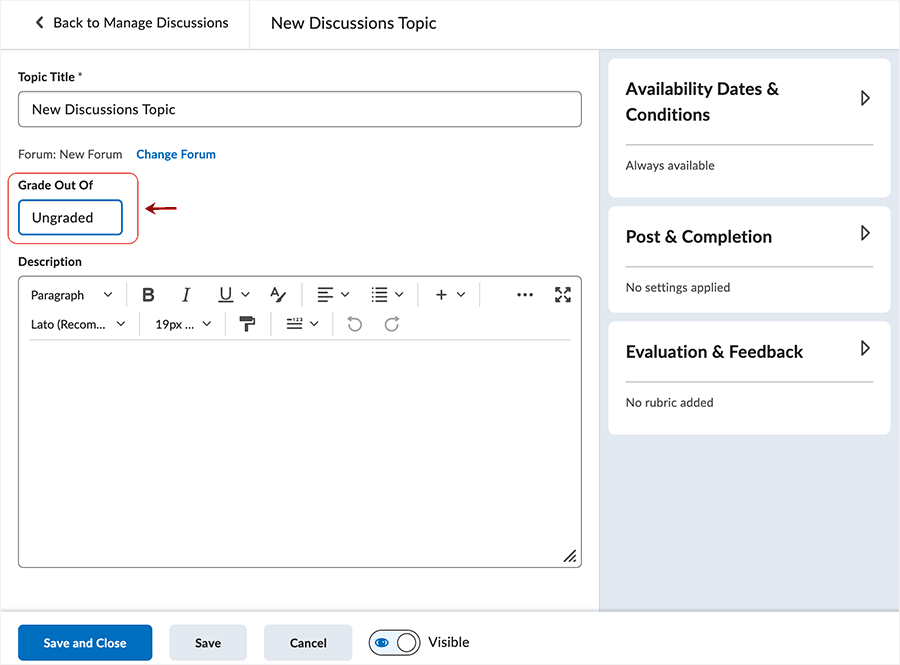
Select "Reset to Ungraded" from the "Grade Out Of" drop menu to break the current association between the discussions topic and the grade book item.
"Ungraded" displays after the option is selected - the topic is no longer assessable.
In all instances, when editing a discussions topic, selecting "Save and Close" or "Save" is necessary for changes to be applied to the discussions topic.
back to top
back to "Grade Out Of" top
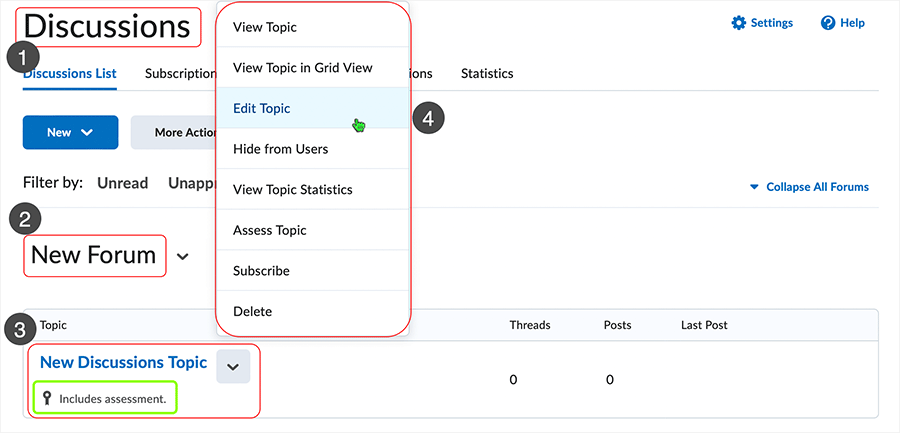
Discussions List Display
In the Discussions area of a course, information displays related to Forum and topic.
- When in a course and after selecting "Discussions" from the blue course navigation bar, the "Discussions List" displays forum and topic information.
- "New Forum" is a forum in which the topic is nested.
- "New Discussions Topic" is a topic in the forum.
- If the topic has been made assessable, the grade icon and statement "Includes assessment." displays.
- Selecting the action caret to the right of the topic title gives access to a contextual
menu with multiple options available to select:
- "View Topic" and "View Topic in Grid View" allow access to threads in the topic.
- "Edit Topic" accesses the editing area of a topic.
- "Hide from Users" or "Make Visible to Users" controls topic visibility.
- "View Topic Statistics" shows use of the topic.
- "Assess Topic" gives access to the assessment area if topic is made assessable.
- "Subscribe" to a topic makes topic available in subscriptions area.
- "Delete" will remove the topic from the Discussions List.
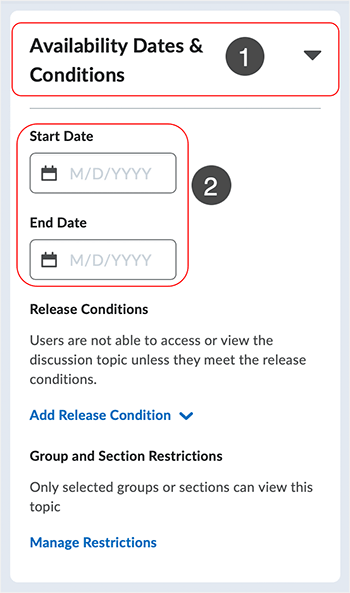
Availability Dates & Conditions
"Availability Dates & Conditions" is located at the top of the right hand nav bar. Users can set start and end dates, release conditions, and Group restrictions as necessary.
Start and End Dates
Users establish the start and end dates for a discussions.
Refine availability date and time via available settings.
- "Availability Dates & Conditions" expanded.
- Select to set Start or End date by clicking in the appropriate box.
- When selecting a box, a calendar will appear.
- Choose from the calendar or enter the date using M/D/YYYY format.
- Today, Now, and Clear functionality is available at the bottom of the calendar - click the selection.
- Time can be set via a drop menu - or enter time using the appropriate format.
back to top
back to top of Availability Dates and Permissions
Release Conditions
Users can associate release conditions from this area.
- "Availability Dates & Conditions" expanded.
- Select "Add Release Condition" to access available functionality.
- Users can use "Create New" to set up a new conditional.
- Users can use "Add Existing" to select from conditionals that have been created earlier.

back to top
back to top of Availability Dates and Permissions
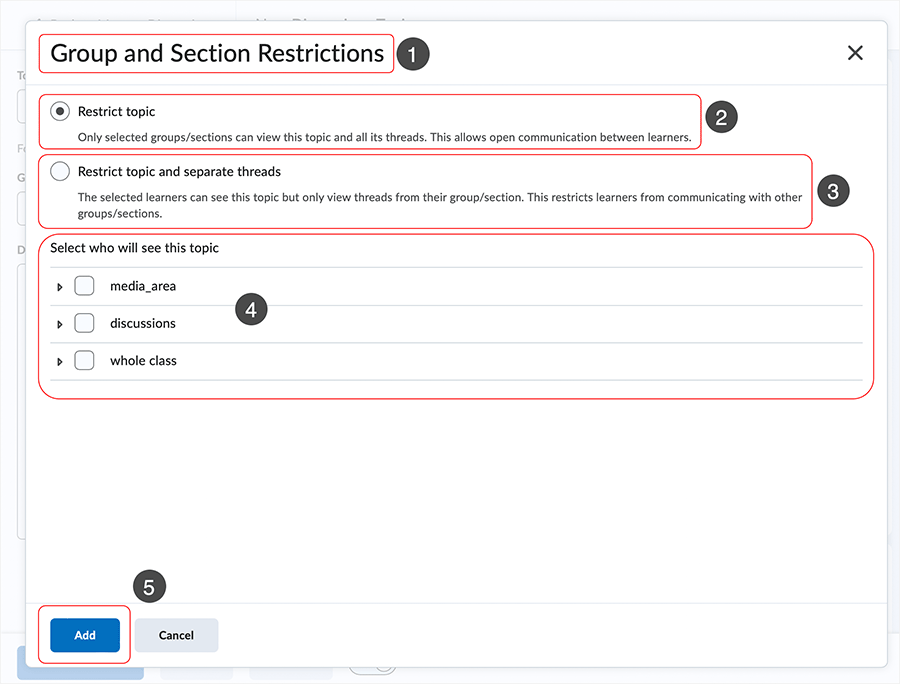
Group and Section Restrictions
Users can set up Group and Section Restrictions from this area.
- "Availability Dates & Conditions" expanded.
- Select the "Manage Restrictions" button.

The "Group and Section Restrictions" page allows selection of options related to Group and/or Section discussions.
- The "Group and Sections Restrictions" page displays.
- "Restrict topic" function is selected by default.
- Select the radio button associated with "Restrict topic and separate threads" to deploy this function.
- Choose which "Groups" (or "Sections" if applicable) will be able to see the restricted
topic.
- Select the group associated checkbox to apply the desired restriction.
- Hover over asnd select the "arrow" icon to expand the group category as necessary.
back to top
back to top of Availability Dates and Permissions
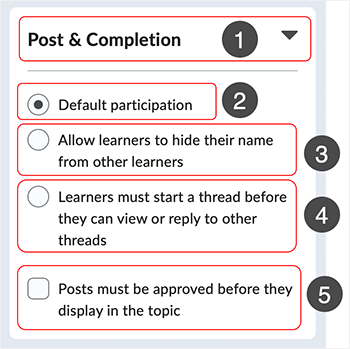
Post & Completion
Located 2nd down from the top of the right hand nav bar, users set variables related to discussions topic posts.
- Expanding the "Post & Completion" area reveals available variables.
- "Default participation" is set as default. All users can see and participate in all posts in the topic.
- "Allow learners to hide their name from other learners" renders the topic posts anonymous.
- "Learners must start a thread before they can view or reply to other threads" requires that users post first before having access to other posts.
Evaluation & Feedback
Located 3rd down from the top of the right hand nav bar, users set Rubric, associate learning objectives, and define the Evaluation of posts as necessary.
- Expanding the "Evaluation and Feedback" area reveals available variables.
- In the "Rubrics" area, select the "Add Rubric" button to select from "Create New" or "Add Existing" options.
- In the "Learning Objectives" area, select "Manage Learning Objectives" to "Associate Learning Objectives" with the discussions topic.
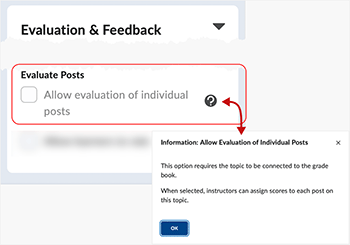
- In the "Evaluate Posts" area:
- A topic associated with a grade item will allow the selection of the "Allow evaluation of individual posts" option.
- "Allow learners to rate posts" is available whether the topic is assessable or not.
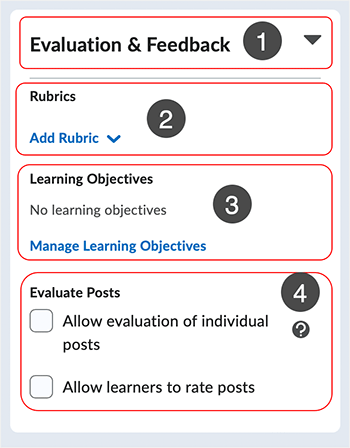
Selecting the "?" icon associated with the "Allow evaluation of individual posts" option gives information related to requiring that a topic be associated with a grade item for the selection to be viable.
In all instances, when editing a discussions topic, selecting "Save and Close" or "Save" is necessary for changes to be applied to the discussions topic.
Links will open in a new tab or window dependent on browser/OS configuration.
What dialog box windows look like and how dialog box windows and browsers interact is dependent upon the operating system and browser being used. The screenshots in this tutorial may differ from the screen that the user is viewing when performing the actions described in this tutorial.
CD 202305