
Brightspace Quiz Setup
New Quiz Overview
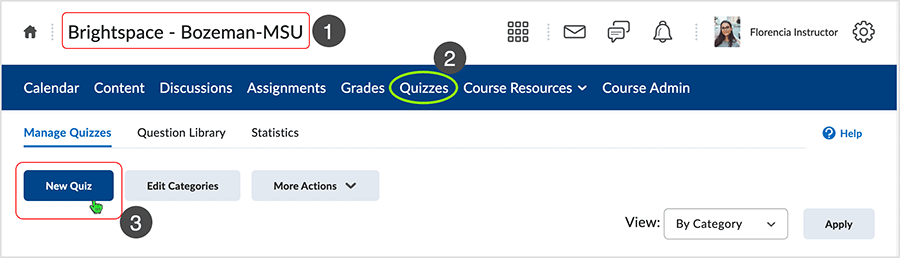
When inside a course, create a new quiz.
- Inside a course.
- Select "Quizzes" link from course nav bar.
- Select the "New Quiz" button.
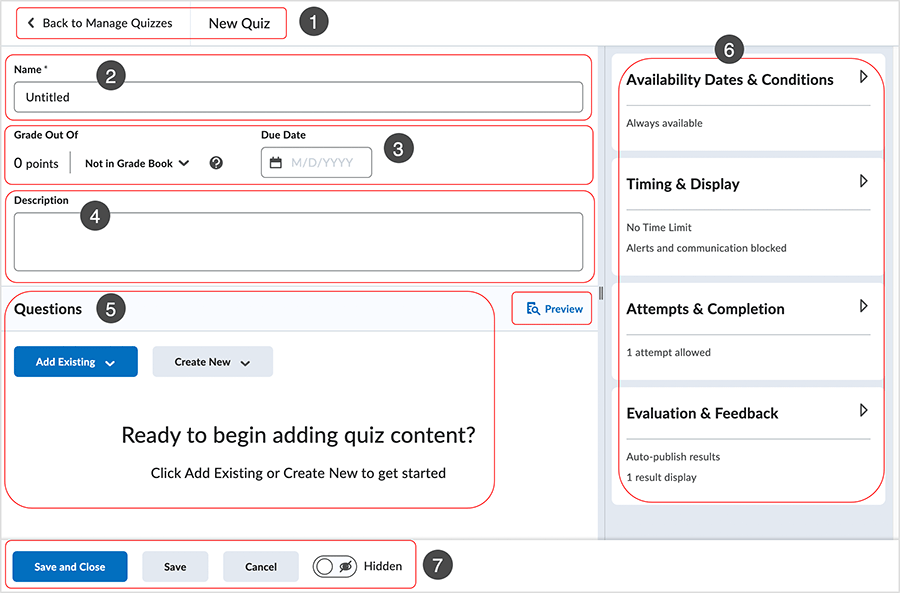
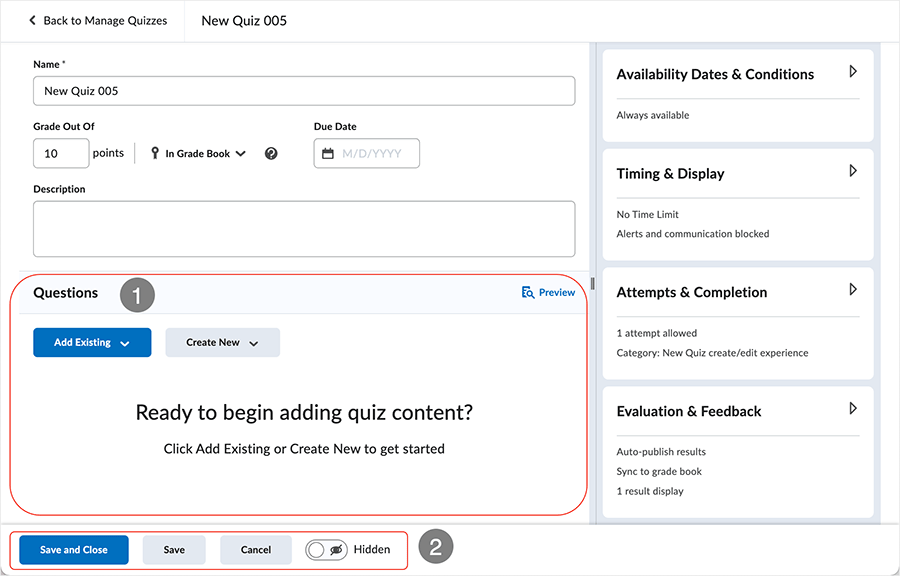
Each quiz editing area has 7 areas that control setup related to a quiz.
- Navigation and Name
- The name of the quiz displays.
- In this instance it displays "New Quiz" because no name has been entered and saved.
- Select "Back to Manage Quizzes" to go back to the Manage Quizzes area.
- The name of the quiz displays.
- Name.
- Enter the name of the quiz.
- Grade and Due Date
- "Grade Out Of" controls variables related to how a quiz is connected to a grade item.
- Set a "Due Date" for the quiz to establish the date and time of when the quiz is available to users.
- Description
- Place a description of the quiz which is visible to quiz participants.
- Questions
- Establish questions to be used in the quiz.
- Set up quiz parameters using the right-side navigational tools.
- Use the options to manage status of the item while editing.
- "Save and Close" - save the work and close out of editing the item.
- "Save" - save the work and remain on the editing page of the item.
- "Cancel" - exit the editing page without saving any changes. The system will warn the user.
- "Visible" or "Hidden" - toggle by selecting the button.
Grade Out Of
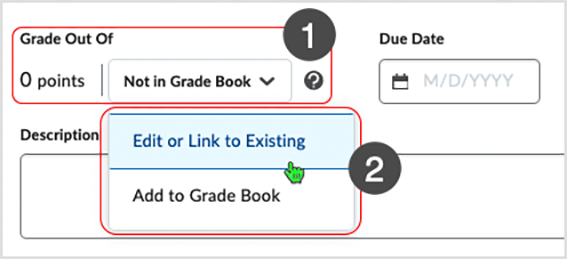
The "Grade Out Of" area makes various quiz-to-grade item controls available.
"Not in Grade Book" displays when a quiz is not linked to a grade item.
Edit or Link to existing
To associate a grade item with a quiz, users can create a new grade item OR link to an existing grade item
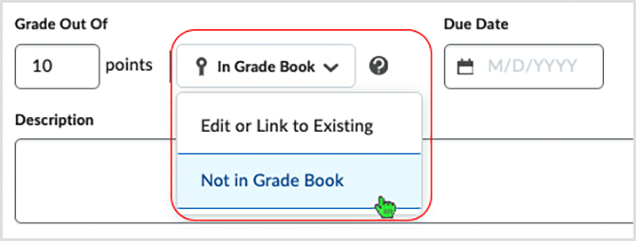
- The "Grade Out Of" area shows a "Not in Grade Book" selectable drop menu.
- Click on it to reveal the options in the drop menu.
- Users can select the "Edit or Link to Existing" option.
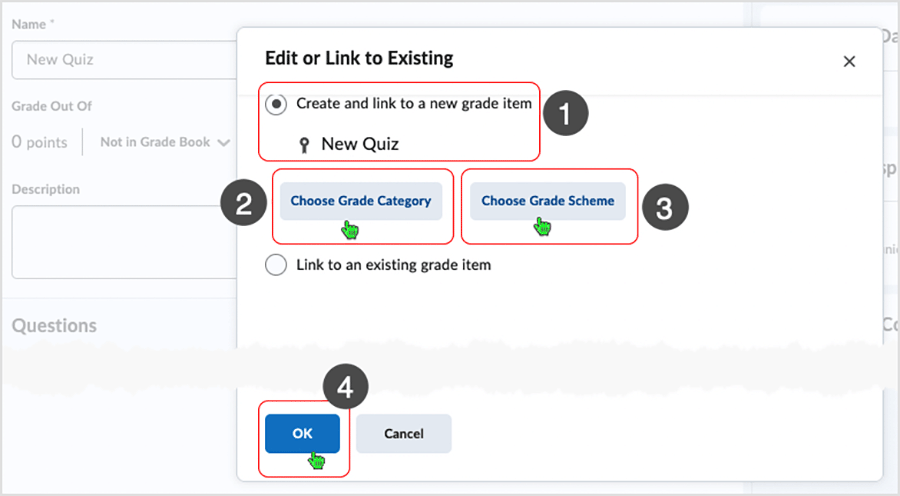
After selecting the option, the "Edit or Link to Existing" dialog page displays.
"Create and Link to a new grade item" option
- By default, the "Create and Link to a new grade item" radio button is selected and
the title of the quiz displays.
- The title of the quiz becomes the name of the grade item when applying the "Create and link to a new grade item" option.
- From this area, users can "Choose Grade Category" if necessary.
- Selecting the button displays an interface that allows selection of an existing category or creation of a new grade category.
- From this area, users can "Choose Grade Scheme" if necessary.
- If no scheme is selected via "Choose Grade Scheme" button, the default scheme for the course will be used.
- After setting or not setting the optional variables, users select the "OK" button to link to the newly created grade item.
back to top
back to "Grade Out Of" top
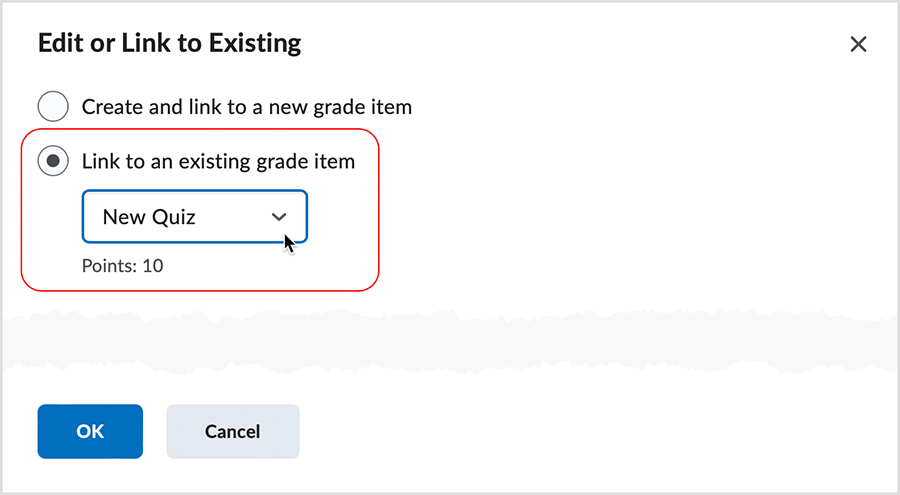
"Link to Existing" option
A user can choose to select the "Link to an existing grade item" option.
After the "Link to an existing grade item" option is selected, a grade item displays in the drop menu area.
Points related to the established grade item show under the name of the grade item.
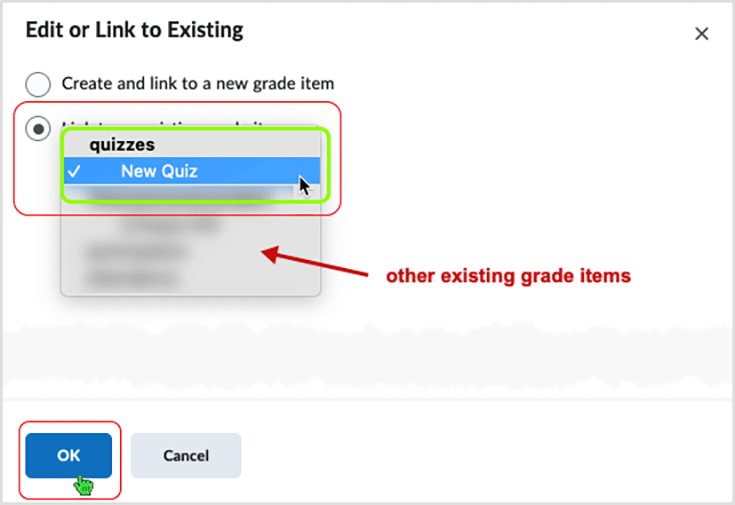
Selecting the drop menu displays the available existing grade items from which to choose.
Selecting one of the existing grade items designates it as being the one associated with the quiz.
User selects the "OK" button to save the choice and associate it with the quiz.
"Grade Out Of" display
After a grade item is associated with a quiz by either method, the "Grade Out Of" area displays the established "points" for the quiz (as determined by the points assigned to the grade item) and the "In Grade Book" statement.

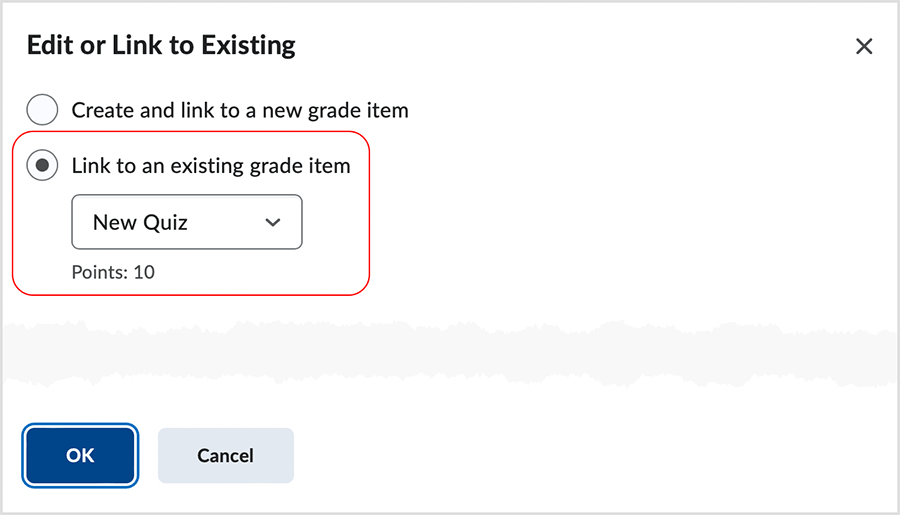
Check which grade item is associated with the quiz from the quiz area
To check the grade item the quiz is associated with, the user selects "Edit or Link to Existing" option via the "In Grade Book" drop menu and the "Edit or Link to Existing > Link to an existing grade item" dialog displays the association.
back to top
back to "Grade Out Of" top
Breaking an association between a quiz and a grade item
Use "Not in Grade Book" selection to break association
Select "Not in Grade Book" from the "Grade Out Of" drop menu to break the current association between the quiz and the grade book item.
back to top
back to "Grade Out Of" top
Using "Add to Grade Book" when "Not in Grade Book" is displaying
"Add to Grade Book" option
Select the "Add to Grade Book" option from the "Grade Out Of" drop menu.
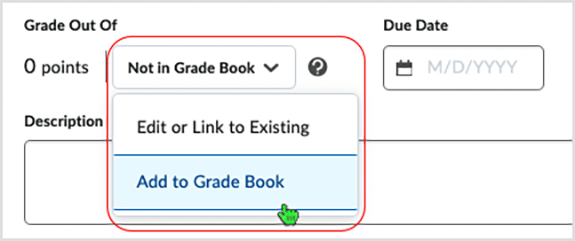
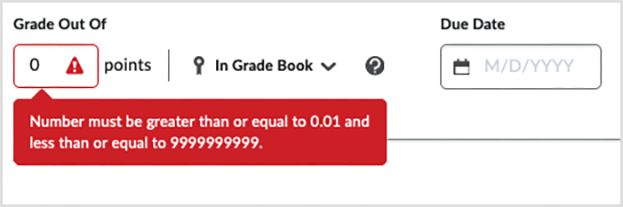
Enter the number of points in the "points" box or add questions to the quiz to automatically insert points for the quiz in the "points" box
If no points are in the "points" box the system warns the user.
Using the "Add to Grade Book" selection gives no options related to grade item name, creation of a new category and/or placement into an existing category in the grades area. Using the action inserts the grade item (named with the quiz title) into the Grade Book at the bottom of the grades area.
back to top
back to "Grade Out Of" top
"Grade Out Of" caveats
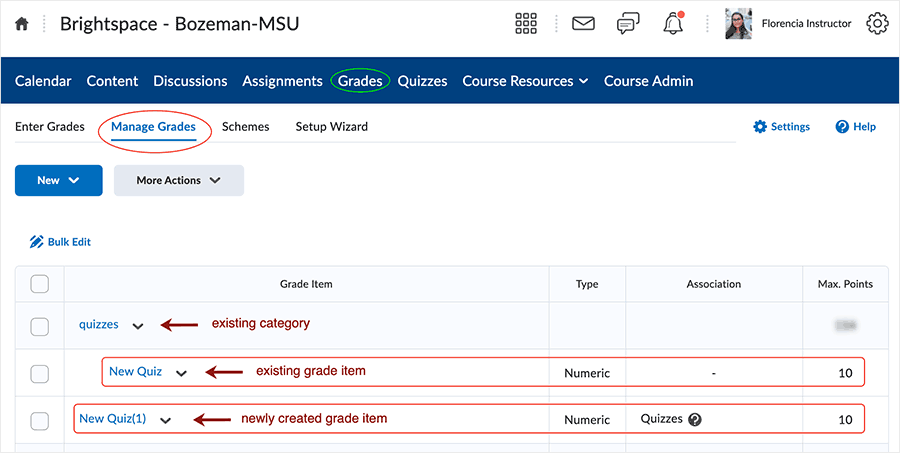
Behavior when a grade item already exists in grades area
If a grade item already exists in the Grade Book with the same name as a quiz and the "Edit or Link to Existing > Create and link to a new grade item" method or the "Add to Grade Book" method is used, the new grade item will be created in the Grade Book with a number inside a parenthesis to distinguish it from the existing grade item.
Note that the newly created grade item exists outside of any category association - it is added to the bottom of the grades area.
back to top
back to "Grade Out Of" top
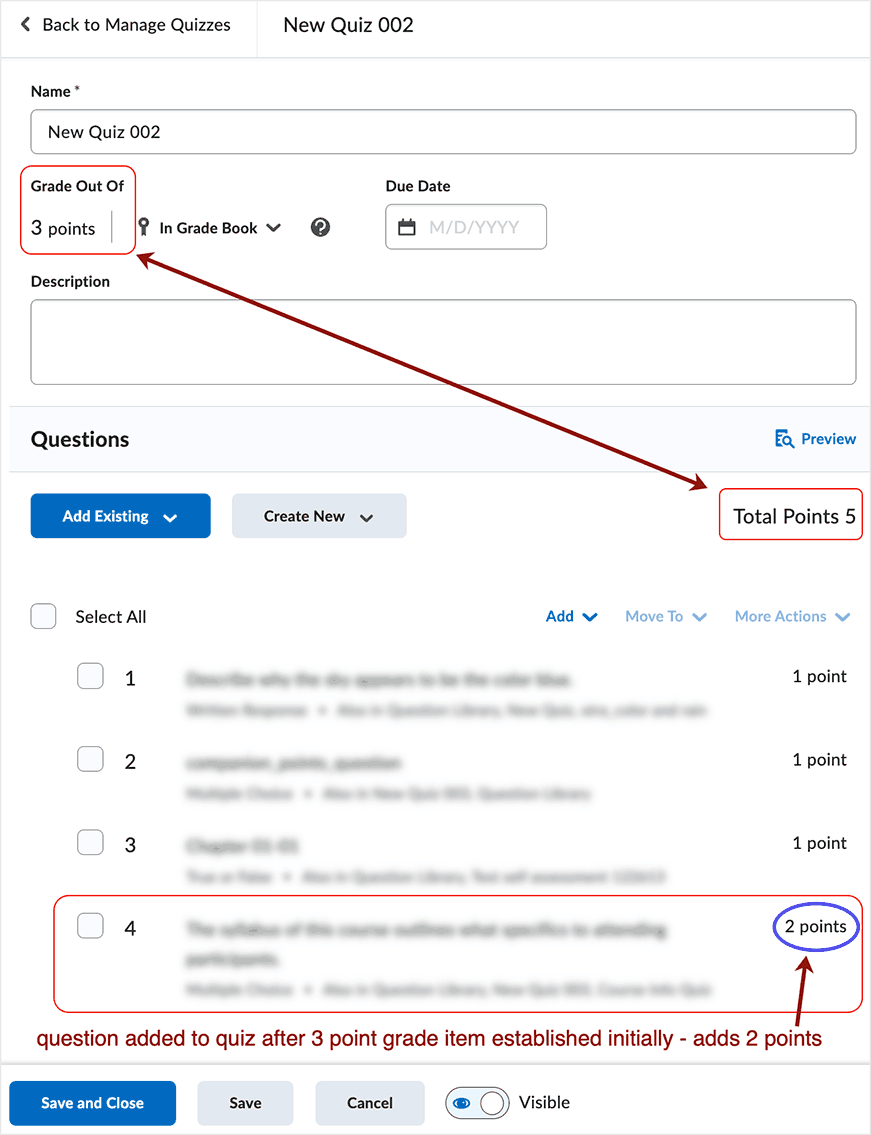
Grade point totals versus quiz point totals
When a quiz is associated with a grade item (In Grade Book), it is possible to have a quiz point total that differs from a grade item point total. When adding new questions into a quiz that already has an established associated grade item, the grade points do not automatically update. Adding new questions will change the "Total Points" of the quiz, but not the grade point total. This results in a difference between quiz total and grade item total.
Use a manual process to update the grade item if a quiz total to grade total one-to-one nature is needed.
back to top
back to "Grade Out Of" top
Difference between "Not in Grade Book" and "In Grade Book" status
Point totals are different dependent on whether "Not in Grade Book" or "In Grade Book" displays in the "Grade Out Of" area.
-
If the quiz is not associated in the grades area, "Not in Grade Book" displays in the "Grade Out Of" area and the "points" always reflect the total points of the questions added to the quiz.
-
If the quiz is associated in the grades area, "In Grade Book" displays in the "Grade Out Of" area and reflects the maximum points of the associated grade item in the grades area (Grade Book).
back to top
back to "Grade Out Of" top
Questions
The Questions area facilitates adding different types of quiz questions when creating or editing a Quiz.
Questions Area overview
The questions area of a quiz appears below the "Grade Out Of" area when editing a quiz.
- Questions area makes accessible functions related to adding questions into a quiz.
- The "Add Existing" and "Create New" buttons add functionality related to questions.
- The "Preview" button facilitates user preview of the quiz.
- Saving and Visibility options.
- "Save and Close" button saves the changes and then returns the user to the "Manage Quizzes" area.
- "Save" button saves the changes and leaves the user on the page.
- "Cancel" button cancels the page.
- "Hidden" toggle allows user control over quiz visibility in the "Manage Quizzes" area.
back to top
back to "Questions" top
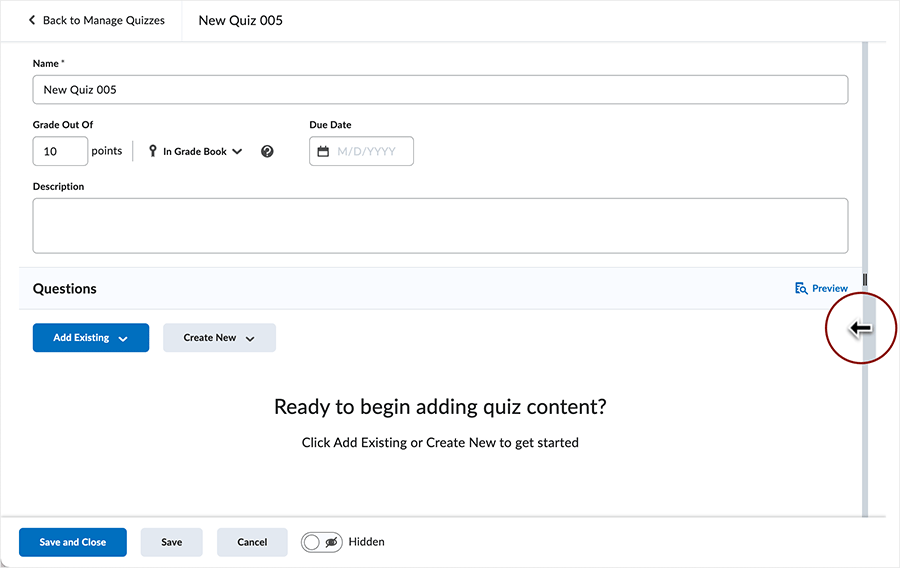
Expand question area
Users can expand the question area by dragging the right nav bar to the right.
Hover over the left side of the right navigation area, click and hold on the handle while dragging to the right to collapse the right navigation panel.
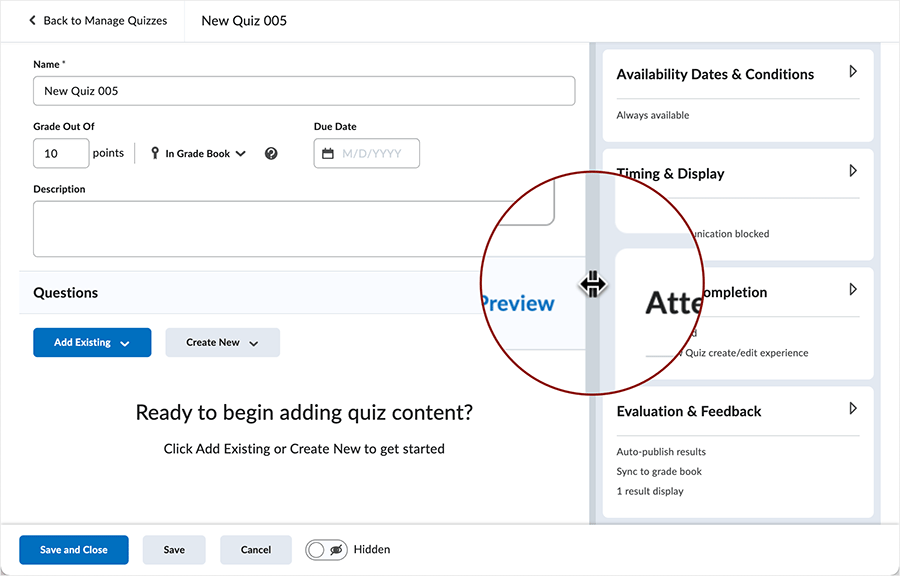
To reveal the right hand navigation area again, hover over the right side of the expanded questions area, select the handle, click and hold while dragging to the left to reveal the right navigation panel.
back to top
back to "Questions" top
"Create New" button drop menu
When selecting the "Create New" button a drop menu appears:
- Selecting the "New Question" option gives access to creating a new question in various formats.
- Selecting the "Section" option creates a "New Section" dialog box which allows a user to create a new section specific to the quiz.
- Selecting the "Question Pool" option creates a "New Question Pool" dialog box which allows a user to create a new question pool specific to the quiz.

back to top
back to "Questions" top
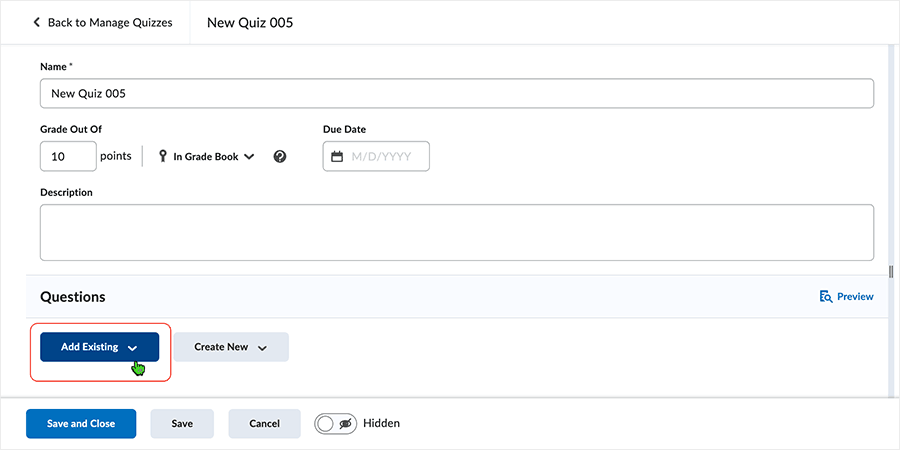
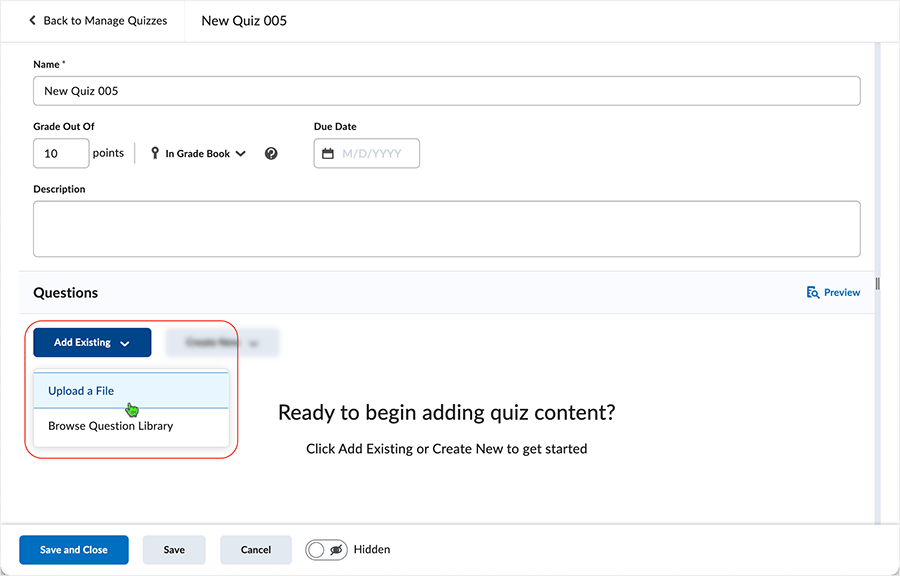
"Add Existing" button
Select the "Add Existing" button to access a drop menu.
Users can choose to "Upload a File" or "Browse Question Library" by choosing the item from the drop menu.
back to top
back to "Questions" top
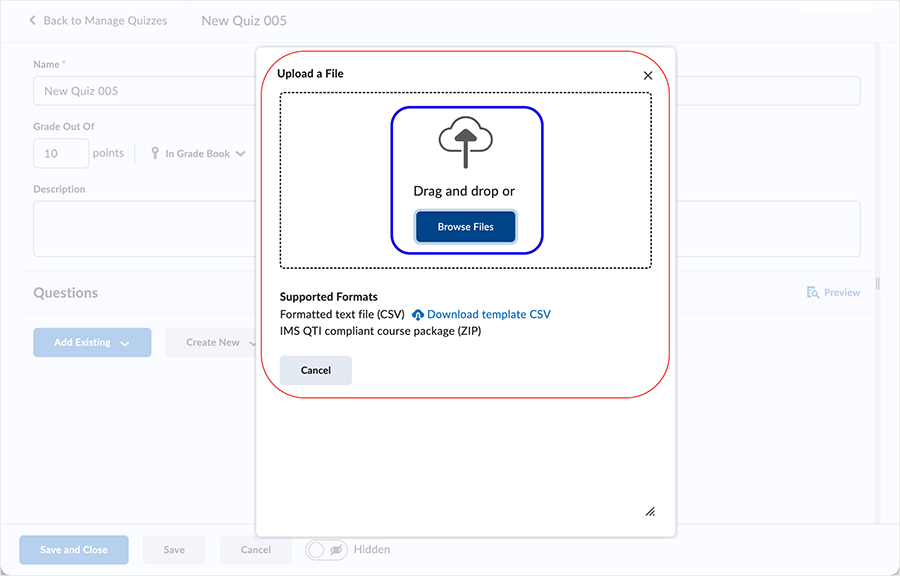
"Upload a File" selected from the "Add Existing" drop menu
When selecting the "Upload a File" button from the "Add Existing" drop menu, a user is prompted to upload a file from a local computer.
How "Upload a File" works:
When the dialog box displays, a user selects to "Drag and drop" or "Browse Files" to upload a file from a local computer. Only properly formatted files can be uploaded into the quiz area.
A "Formatted text file (CSV)" can be used - users can download the template and use it as a guide to create questions easily uploaded to the Question Library area of a course.
IMSQTI compliant course packages" can be added as well.
back to top
back to "Questions" top
"Browse Question Library" selected from the "Existing Activities" drop menu
When selecting the "Browse Question Library" option of the "Add Existing" drop menu, users are ported into the Question Library from which questions can be selected and imported into the quiz.

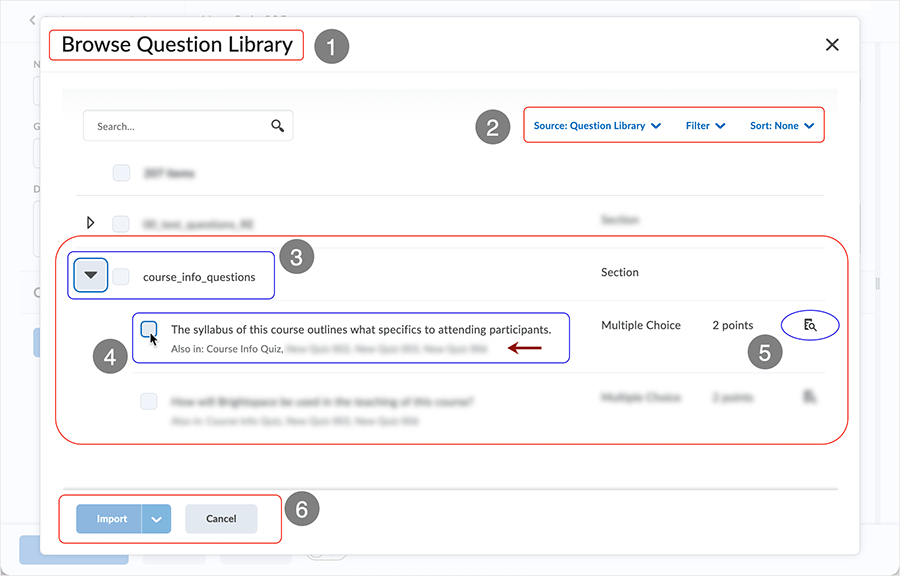
After selecting the "Browse Question Library" option, an overview of the "Browse Question Library" page displays.
- "Browse Question Library" page opens in front of the quiz page.
- Three options display to help browse the Question Library. Clicking an option reveals
a drop menu.
- Selecting "Source:" furnishes a "Source Collection" drop menu that includes "Question
Library" and any quizzes listed in the Manage Quizzes area.
- All items on the list are selectable. When selected, associated questions display.
- Selecting "Filter" shows a "Filter By" area that facilitates isolating by specific question types.
- Selecting "Sort" reveals a drop menu containing various sorts that can be applied to further refine searches.
- Selecting "Source:" furnishes a "Source Collection" drop menu that includes "Question
Library" and any quizzes listed in the Manage Quizzes area.
- Selecting the translucent "arrow" icon to the left of a sub-section title expands
the sub-section.
- Checking the checkbox associated with a sub-section will select all questions in the section.
- The arrow turns solid when expanding and turns translucent when collapsing.
- Checking the checkbox of a question will select the question for importing into the
quiz.
- The "Also in:" area alerts the user to quizzes and areas where the question is currently being used.
- Selecting the "Preview" icon displays a preview of the question.
- A "Preview Question" dialog box displays.
- Question type and question points are arrayed to the left of the "Preview" icon.
- "Import" or "Cancel" buttons are available as next steps.
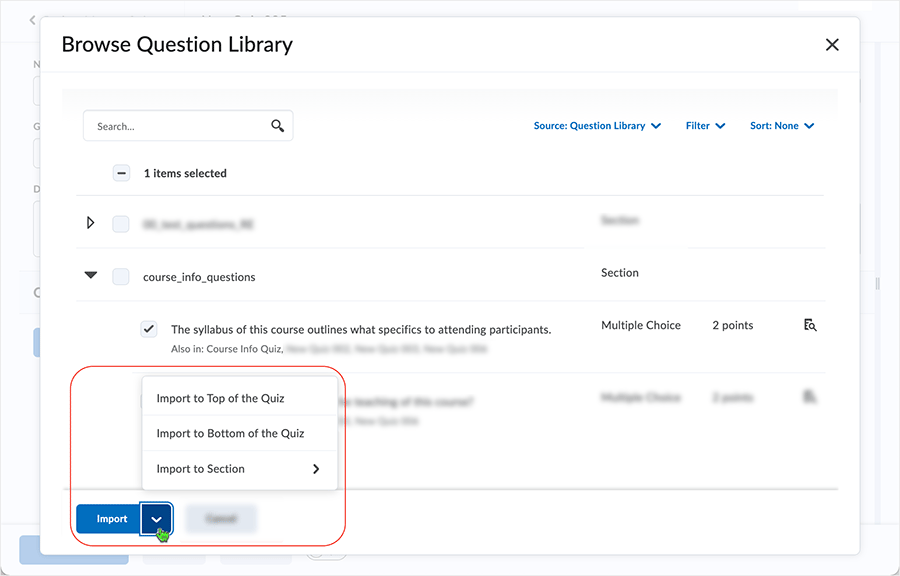
After a single question or multiple questions are selected, selecting the "Import" button will associate the question(s) with the quiz. Selecting the arrow on the right side of the "Import" button displays additional options for question placement.
back to top
back to "Questions" top
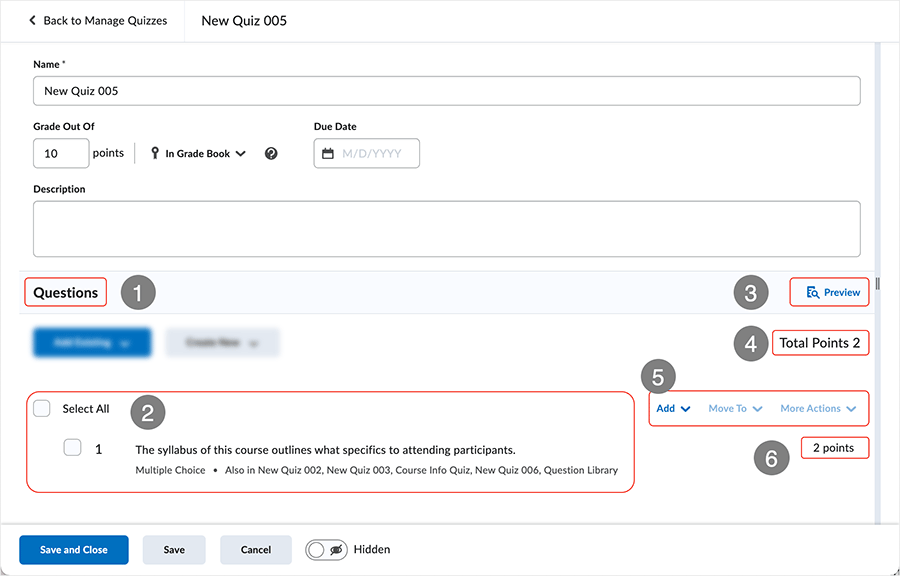
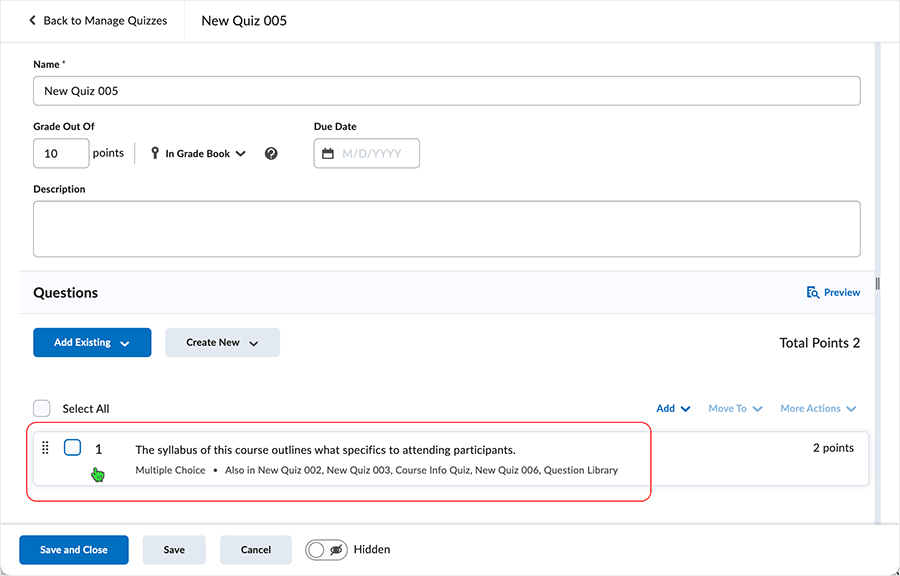
After create new and/or question import into a quiz
- After create new and/or question import, questions are displayed in the "Questions" area of the quiz edit page.
- Question display shows selection options and information related to the question such
as what type of question it is and an "Also in" listing of where the question is currently
deployed in the system.
- Checking the checkbox associated with "Select All" will select all questions in the section.
- Selecting the "Preview" icon initiates a "Preview Quiz" page which typically opens in a new tab.
- "Total Points" displays the total number of points the quiz is currently worth.
- Three options display to help manage questions. Clicking an option reveals a drop
menu.
- "Move To" and "More Actions" are grayed out (non-selectable) until a question checkbox is selected.
- "Move To" option gives Top, Bottom, and Section movement selections on selected items.
- "More Actions" option gives Delete, Toggle Bonus, Toggle Mandatory, and Set Points functionality on selected items.
- Question points information is displayed.
back to top
back to "Questions" top
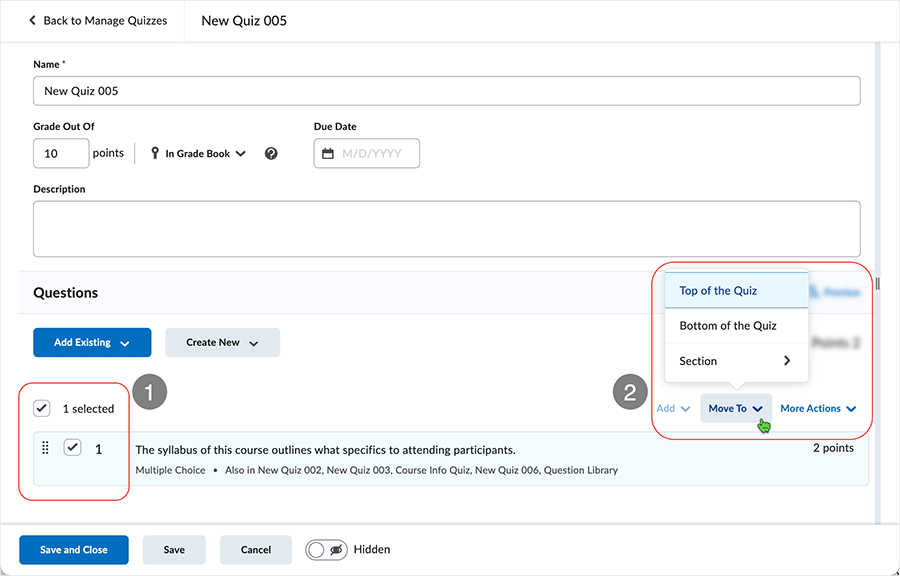
Moving questions in a quiz
The "Move To" option.
- Question selected.
- "Move to" options display in a contextual drop menu.
- Selecting "Top of the Quiz" will move selected question(s) to the top of the quiz.
- Selecting "Bottom of the Quiz" will move selected question(s) to the bottom of the quiz.
- If "Section(s)" are in the quiz, user can move the question(s) into the section by selecting the right pointing navigation arrow and choosing the section to place the question into.
Drag and drop options also exist:
User can select the  icon left of the question checkbox to move questions in this area. Selecting the
8 dot icon turns into 4-sided arrow - click and hold to drag and drop.
icon left of the question checkbox to move questions in this area. Selecting the
8 dot icon turns into 4-sided arrow - click and hold to drag and drop.
back to top
back to "Questions" top
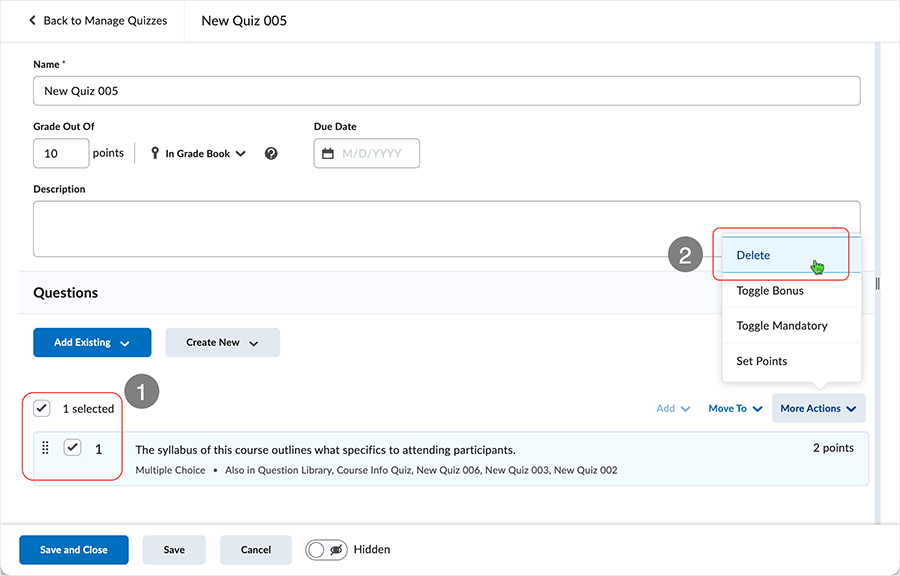
Deleting questions from a quiz
To delete a question from a quiz
- Select a question or series of questions (or section) by clicking on the checkbox associated with the question(s) or section(s).
- Selecting the "More Actions" button causes the contextual drop menu to display.
- Select "Delete" to remove the selected items from the quiz.
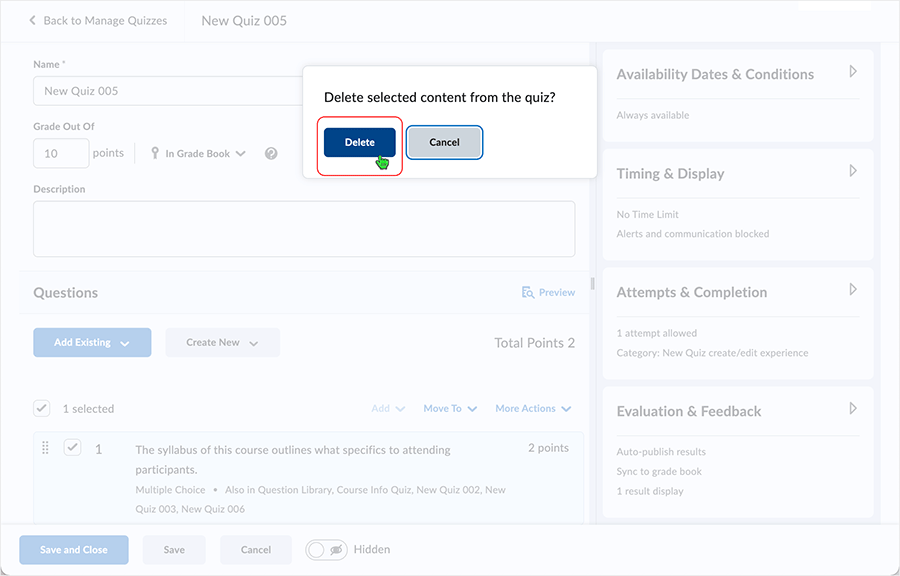
After the "More Actions > Delete" selection has been made a confirmation dialog box is displayed. Select "Delete" to complete the action or "Cancel" the action.
back to top
back to "Questions" top
Edit a question from inside a quiz
To edit a question from inside the quiz, select the question.
After selecting the question to edit, a dialog page with an "Edit type-of-question Question" title appears. The page typically covers the quiz page. "Save" choices are available.
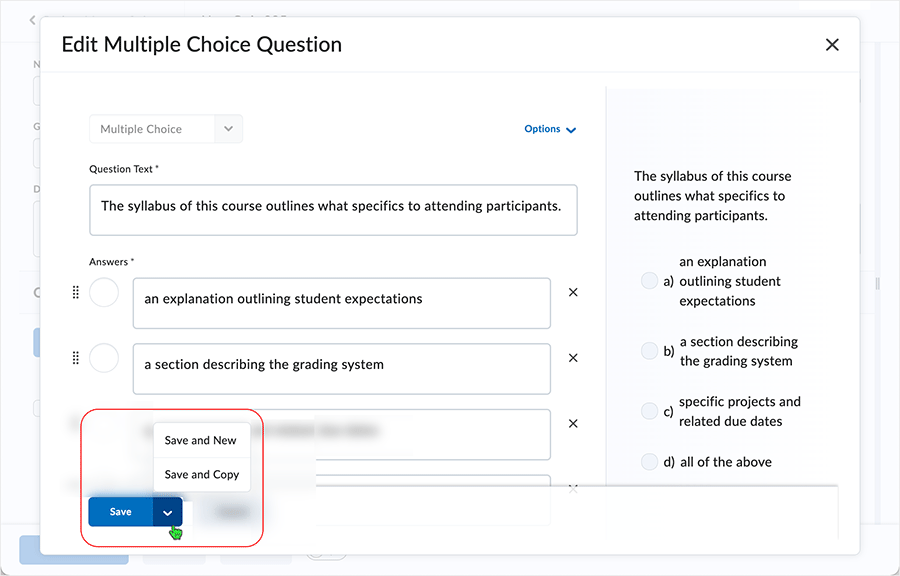
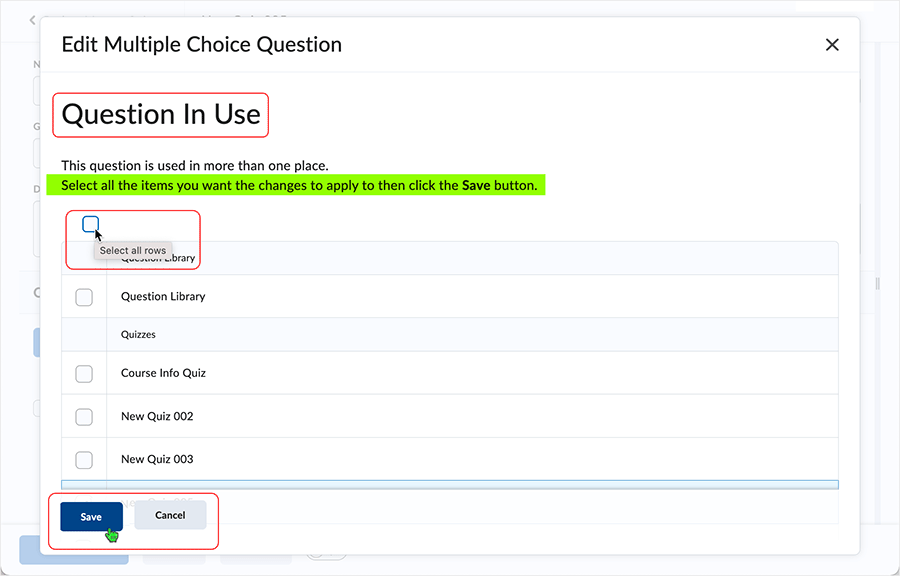
If the question is used in multiple areas, user can choose where the changes are to be saved by selecting the checkboxes associated with the destination.
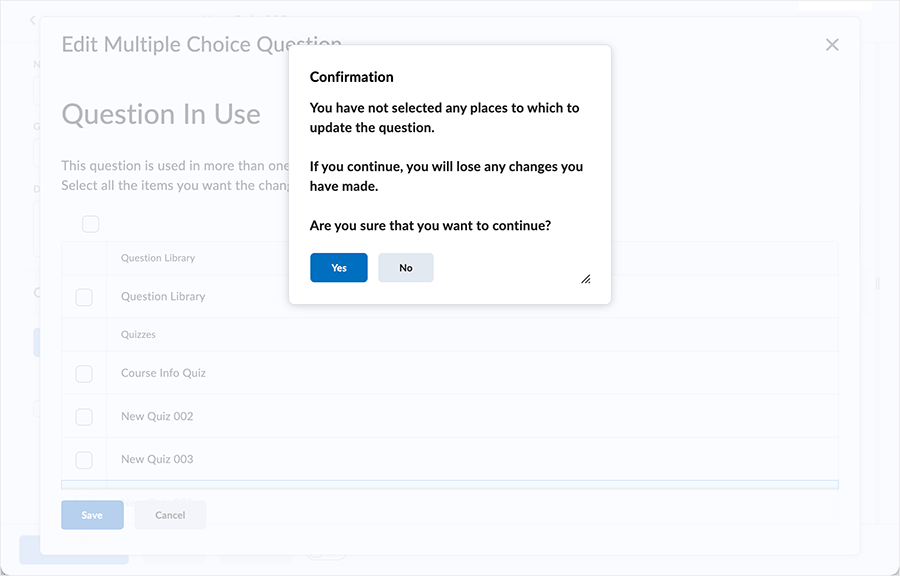
A "Confirmation" dialog box will display.
Below is a "Confirmation" dialog box with warning related to no save choice having been made.
Select "Yes" or "No" to continue.
back to top
back to "Questions" top
Availability Dates & Conditions
"Availability Dates & Conditions" is located at the top of the right hand nav bar. Users can set start and end dates, release conditions, special access, password requirements, and IP restrictions as necessary.
Overview:
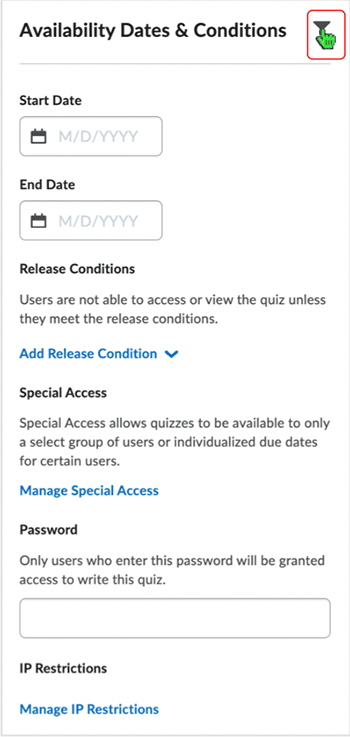
Start and End Dates
Users establish the start and end dates for a quiz.
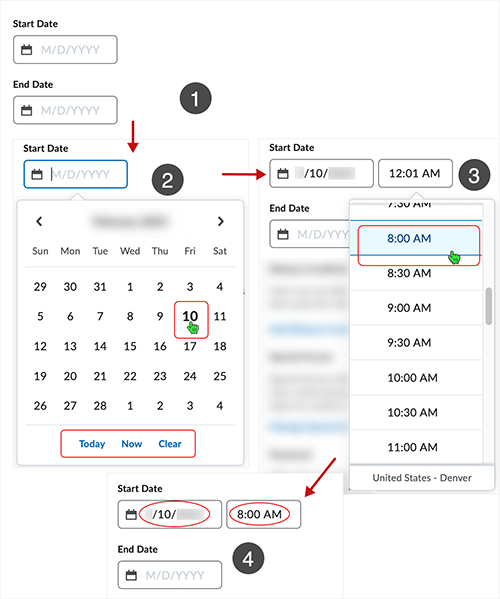
Refine availability date and time via available settings.
- Select to set Start or End date by clicking in the appropriate box.
- Choose from the calendar or enter the date using M/D/YYYY format.
- Today, Now, and Clear functionality is available at the bottom of the calendar - click the selection.
- Time can be set via a drop menu - or enter time using the appropriate format.
- Date will appear.
back to top
back to top of Availability Dates and Permissions
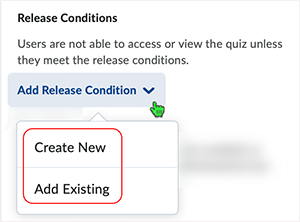
Release Conditions
Users can associate release conditions from this area.
Select "Add Release Condition" to access available functionality. Users can use "Create New" to set up a new conditional and "Add Existing" to select from any number of conditionals that have been created earlier.
back to top
back to top of Availability Dates and Permissions
Special Access
Users can set up special access for individuals from this area.
Select the "Manage Special Access" button.

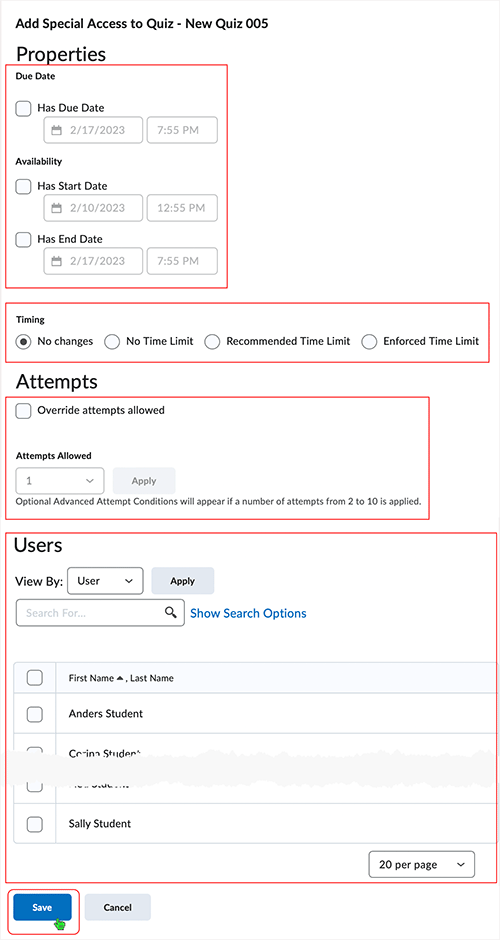
Select the "Add Users to Special Access" button.
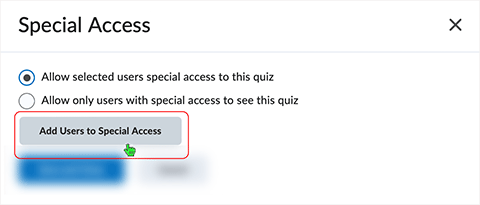
Setting up Availability, Timing, Attempts as necessary. Select the checkbox associated with user(s) to which the special access settings will apply. Select "Save" to apply the settings.
Note: Additional accessibility quiz accommodations for a learner are available in
the system:
Select this link to access information related to Quiz accommodations via the Classlist
tool.
back to top
back to top of Availability Dates and Permissions
Password and IP Restrictions
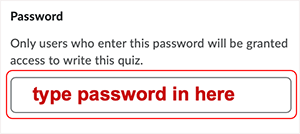
Users can establish a password to allow access to the quiz.
Enter any chosen password in the text box.
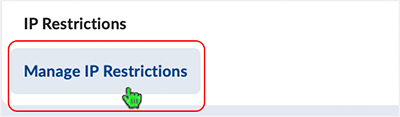
Users can restrict quiz entry using IP Restrictions.
Select the button to Manage IP Restrictions.
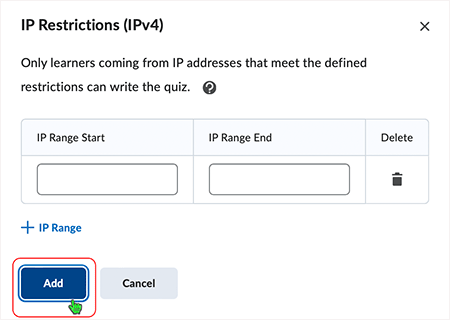
A dialog box displays from which users can control the range of IP addresses to provide restriction.
back to top
back to top of Availability Dates and Permissions
Timing & Display
"Timing & Display" is located 2nd down from the top of the right hand nav bar. Users set timing, paging, shuffle, display, and header/footer parameters for the quiz.
Overview:
Timing
When a new quiz is created there are no time limits automatically established.
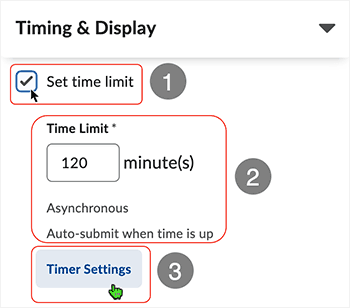
Use "Set time limit" to set timing options related to quiz behavior.
- Select "Set time limit" checkbox to place time limit on a quiz.
- When the "Set time limit" checkbox is de-selected there is no time limit on a quiz.
- Default set up for a new quiz is a "Time Limit" of 120 minutes for an "Asynchronous" quiz which will "Auto-submit when time is up."
- Select "Timer Settings" to access optional settings to place on a quiz.
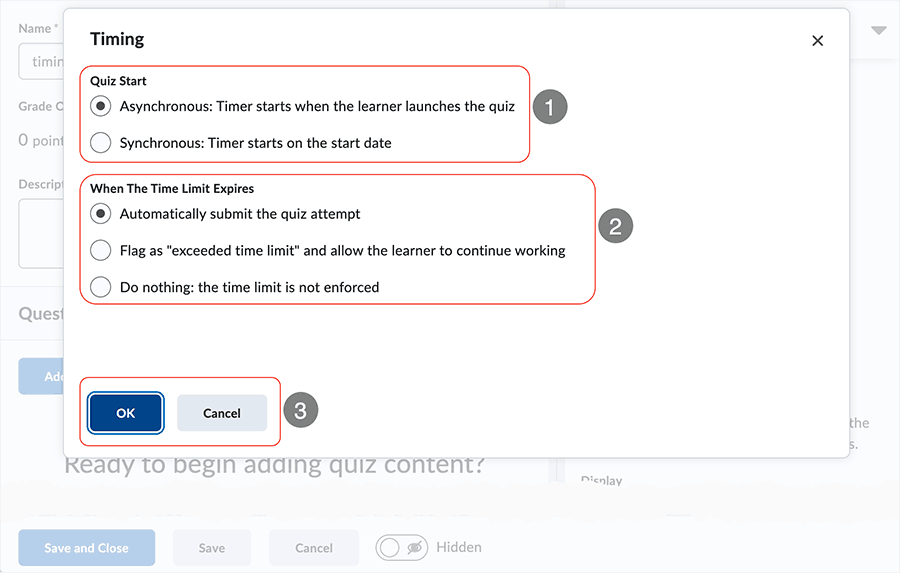
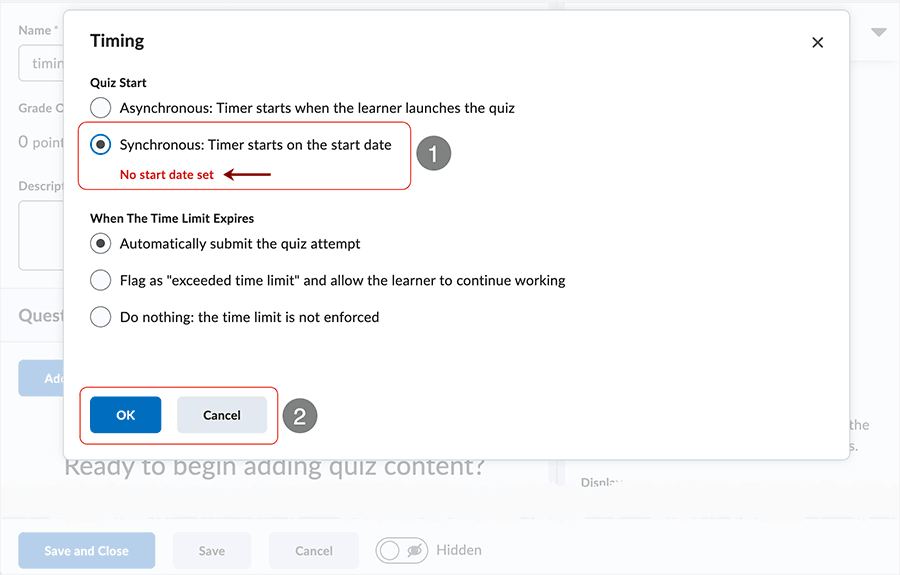
Selecting "Timer Settings" causes a "Timing" dialog box to display containing options related to a quiz.
- In the "Quiz Start" area, "Asynchronous" or "Synchronous" choices are available.
- Select the radio button related to the preferred option.
- "Asynchronous" quiz: quiz can be started by learner anytime between start and end dates of the quiz.
- "Synchronous" quiz: quiz timer starts on the start date for all learners rather than when the learner launches the quiz.
- In the "When The Time Limit Expires" area, quiz behavior options designate time limit
behavior.
- Select the radio button related to the preferred option.
- Choose from: automatic quiz submission; flag and allow to continue; no enforcement of time limit
- Select "OK" to save the settings. Select "Cancel" to exit the dialog box.
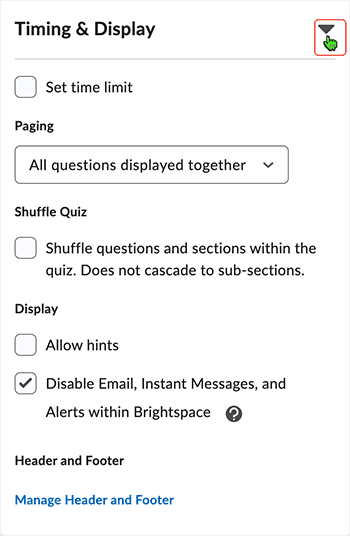
When in editing mode for a quiz, the "Timing & Display" area displays current choices associated with the quiz:
Timing is placed on a quiz when the "Set time limit" checkbox is selected.
The actual "Time Limit" of the quiz displays in minutes. Select the minute(s) text box to set quiz time.
Three choices control quiz behavior after allotted time passes and only one of the choices will display at a time:
- "Auto-submit when time is up" indicates that once the clock stops the quiz will be submitted.
- "Flag attempts when time is up" will allow the user to continue working and then submit the quiz and the quiz attempt will be flagged as having exceeded the limit.
- "Not enforced" places no time clock on the quiz.
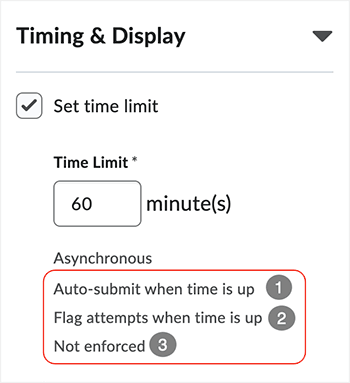
For the purposes of visualization, all 3 choices display in the image above.
Synchronous quiz needs a start date
A start date needs to be set when creating a "Synchronous" quiz
- If there is no start date placed on a "Synchronous" quiz, then the quiz type will not work.
- Select "Cancel" to send away the dialog box and set a start date for the quiz.
- And, optionally, an end date as needed.
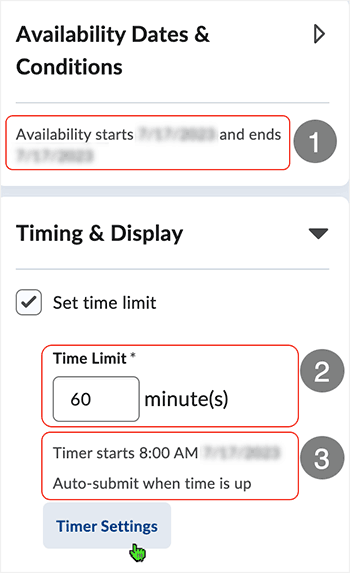
When setting up a "Synchronous" quiz, use the "Availability Dates & Conditions" area of the quiz edit page to set a start and (optionally) end date.
- In the "Availability Dates & Conditions" area, set the start and (optionally) end date.
- In this example, under the "Timing & Display" area, the "Time Limit" is set at sixty minutes.
- "Timing & Display" area shows the settings on the quiz.
Confirm set up by selecting the "Timer Settings" button.
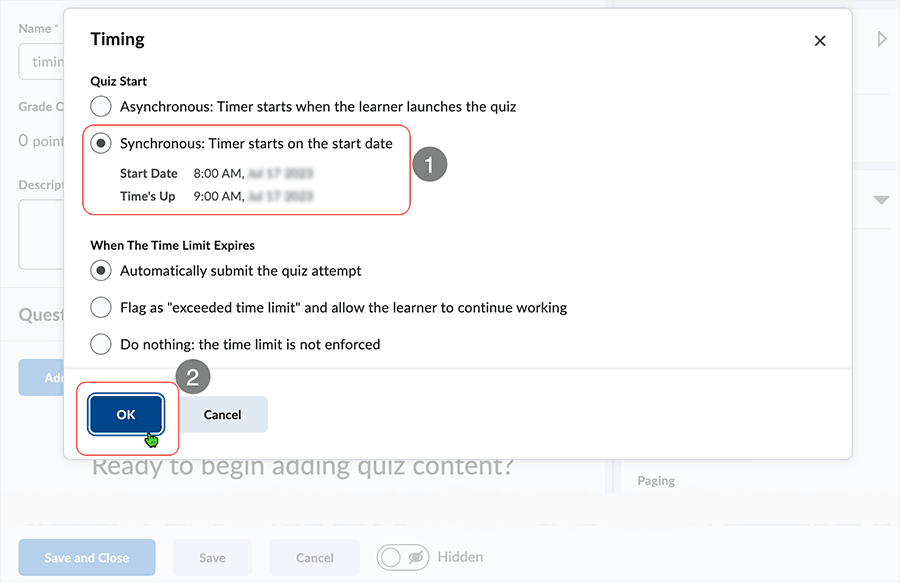
In a "Synchronous" quiz type, the "Timing" dialog box shows the current settings for the quiz.
- In this example, the quiz is set to be a "Synchronous" quiz and displays accordingly.
- Timer starts on the "Start Date" at 8:00 AM, Month Day, Year
- An end date has been set and displays as "Time's Up" at 9:00 AM, Month Day, Year
- Select the "OK" button to establish the chosen option(s) and send the dialog box away.
back to top
back to top of Timing & Display
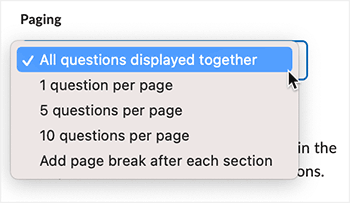
Paging
Users set the paging options for quiz presentation to users.
Paging controls how many questions are displayed on a quiz page as users are taking the quiz.
Paging options display in a drop menu. Selecting an option highlights the option and, when selected, displays a checkmark to the left of the option being applied to the quiz.
back to top
back to top of Timing & Display
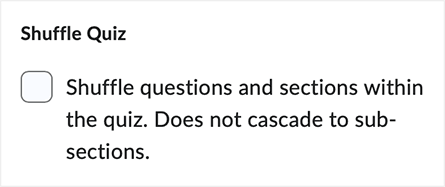
Shuffle Quiz
Users set the shuffle functionality for the main quiz level.
Checking the "Shuffle Quiz" checkbox enables shuffling of questions at the main level of the quiz.
Shuffling questions mixes the questions up, so that no quizzes are the same.
Sub-sections can be shuffled at the section level as necessary when handling questions related to the quiz.
back to top
back to top of Timing & Display
Display
Users set parameters related to quiz display.
Select/deselect the appropriate checkboxes related to showing hints (created inside individual questions) and/or disabling internal Brightspace communications while the quiz is in process.
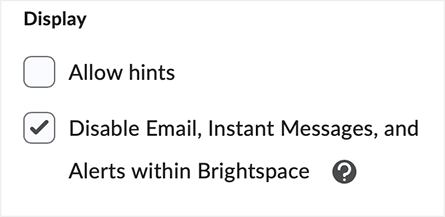
The "Disable Email..." option is selected by default. Having it selected means that quiz takers cannot access the Brightspace Email, Instant Messages, or their alerts if they have a quiz attempt in progress.
back to top
back to top of Timing & Display
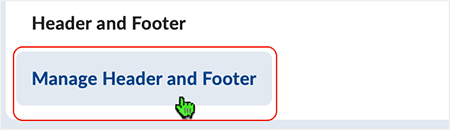
Header and Footer
Users can add header and/or footer information related to the quiz from this area.
Select the "Manage Header and Footer" link to access editing capabilities.
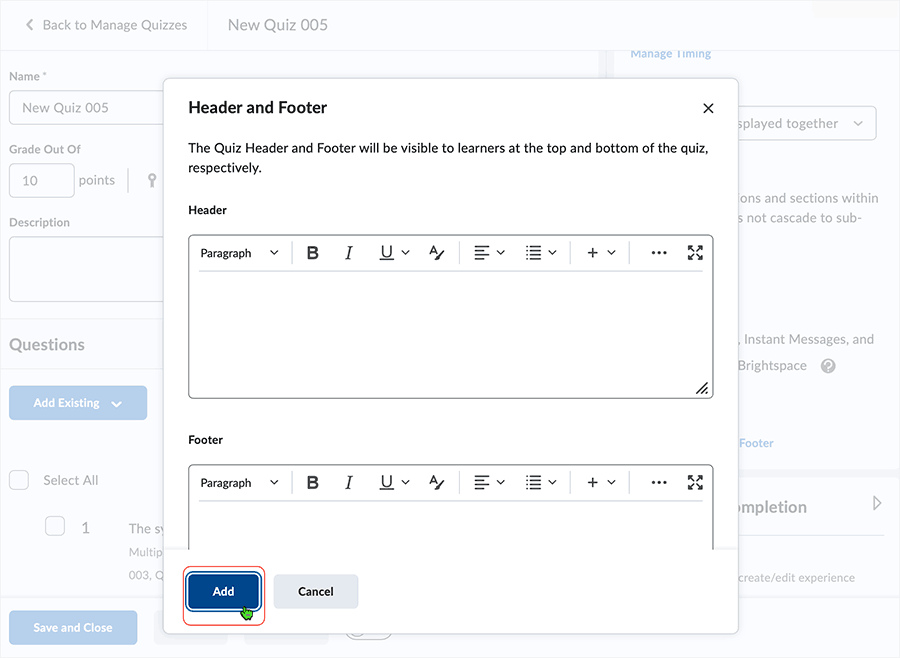
A "Header and Footer" dialog box displays. Enter information as necessary in the available text areas.
Select the "Add" button to add the header and/or footer information to the quiz start page.
back to top
back to top of Timing & Display
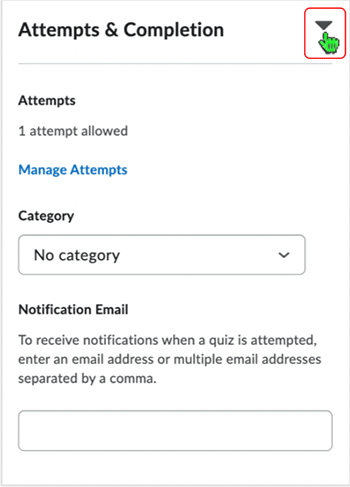
Attempts & Completion
Located 3rd down from the top of the right hand nav bar, users set attempts, associate the quiz with a category, and enter an email address for a notification email if desired.
Manage Attempts
Users set the number of attempts available to quiz takers.
Select "Manage Attempts" to access the management area.
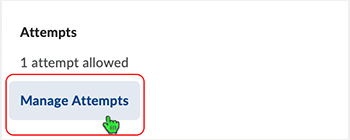
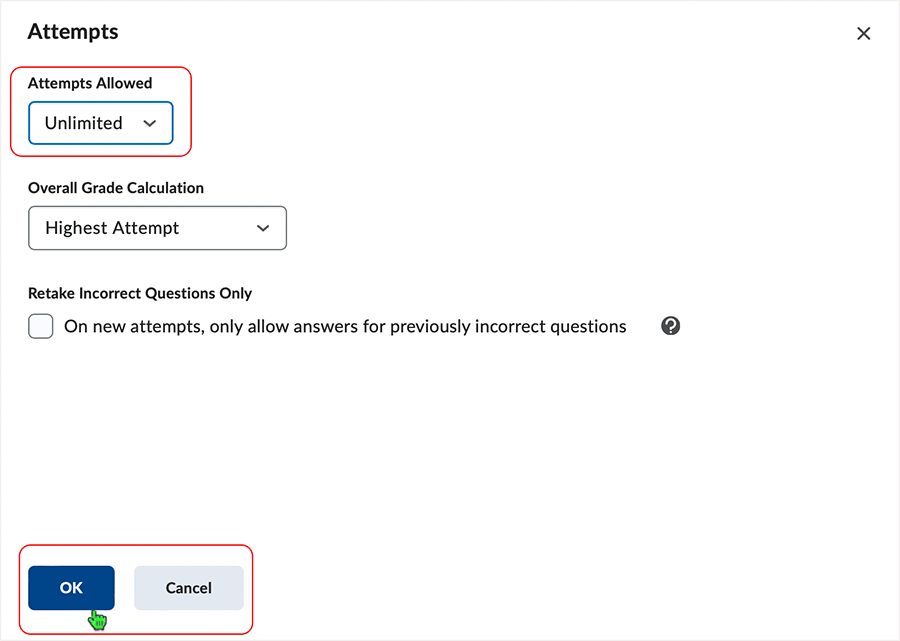
Default value is set at '1' attempt.
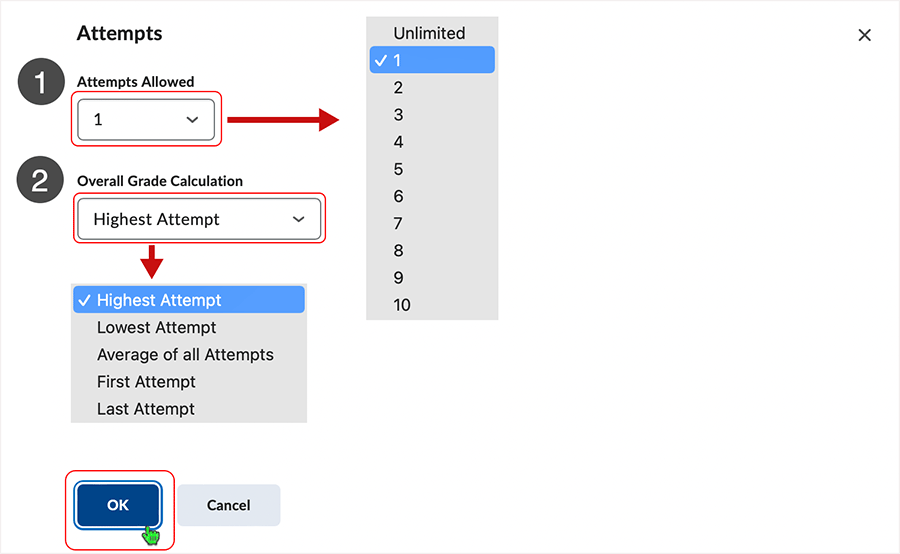
- Use the "Attempts Allowed" contextual drop menu to set the appropriate parameter.
- "Highest Attempt" is the "Overall Grade Calculation" default.
- When allowing multiple attempts, select the appropriate calculation to apply to the quizzes taken.
Select "OK" to save the settings made.
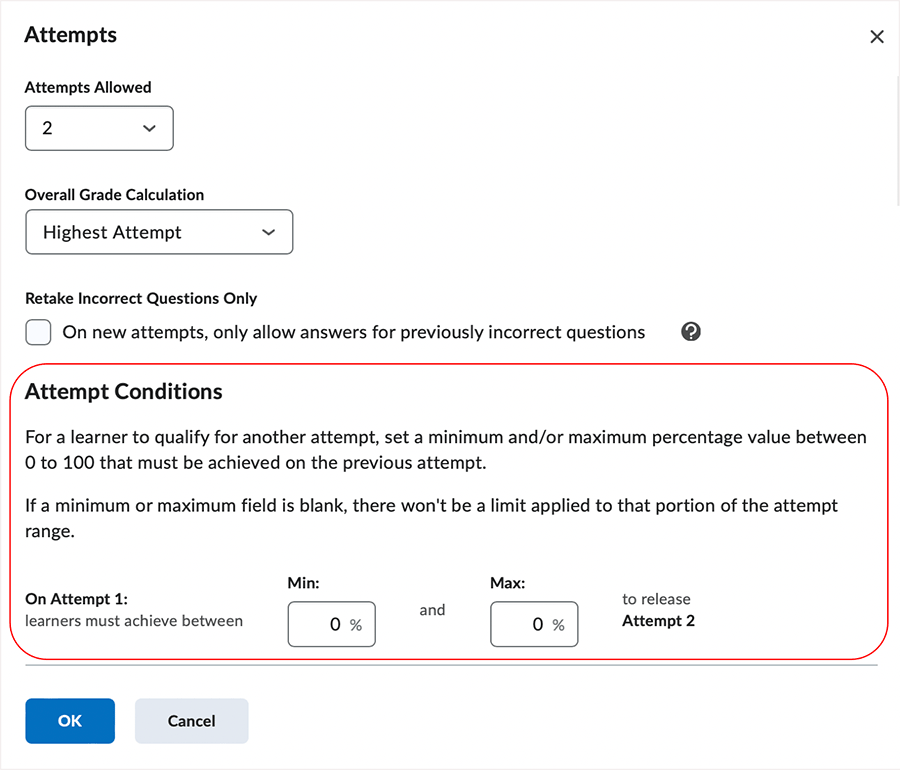
When multiple "Attempts Allowed" are set (greater than 1 and less than unlimited), new variables are made available.
- Image below shows "Attempts Allowed" is set to '2' attempts.
- Selecting multiple attempts makes the "+Attempt Conditions" button display.
-
About Retake Incorrect Questions Only
-
When this setting is selected, learners who attempt a quiz more than once can only answer questions that were incorrect on the previous attempt.
-
If you are using Auto-publishing, Written Response questions will be marked as 0 and included in future attempts until they are graded manually.
-
- Select the "+Attempt Conditions" button to access further variables.

"Attempt Conditions" allows set-up of qualifications which allow another attempt on the quiz to be made. Leaving the fields blank leads to no limits being placed.
When the "Attempts Allowed" are set to "Unlimited" attempts, no "Attempt Conditions" are made available.
back to top
back to top of Attempts and Completion
Category
Associate the quiz with no category, an existing category, or a new category.
Default is "No Category" - select to access contextual drop menu.
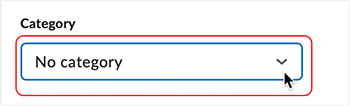
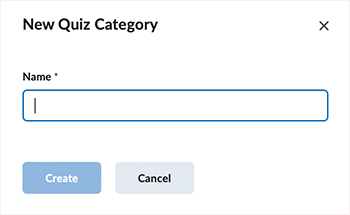
If other categories exist, display of contextual drop menu shows other available categories. User can also select to create a new category by selecting "New category" link.

Enter a name for the new category and select "Create" button.
Selecting "Save" or Save and Close" at the quiz level will put this (and other selections) into effect.
back to top
back to top of Attempts and Completion
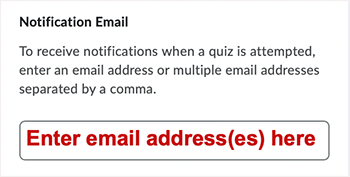
Notification Email
Users can enter an email address for a notification email to be sent.
Enter an email address(es) to be alerted by quiz attempts.
back to top
back to top of Attempts and Completion
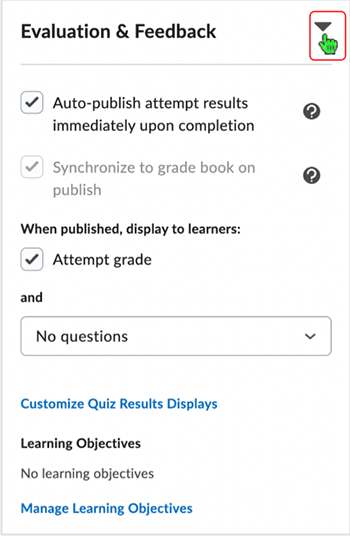
Evaluation & Feedback
Located 4th down from the top of the right hand nav bar, users set attempt publish parameters, grades area synchronization parameters, quiz results display settings for a submitted/published quiz, and associate learning objectives as necessary.
Auto-publish and Synchronize
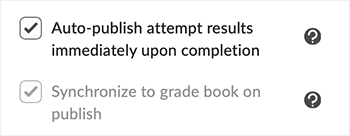
Auto-publish and Synchronize are the default selections in the "Evaluation & Feedback" area.
Auto-publish attempt results immediately upon completion (selected by default)
- With this feature turned on, the auto-evaluated attempt results will be published and appear to learners.
- Note: If questions cannot be evaluated by the system (e.g. written response questions), those questions will be automatically scored with a zero until manual evaluation
Synchronize to grade book on publish (selected by default; grayed out by default until grade item associated)
- With this feature turned on, the learner's grade will be automatically published to the grade book once it has been evaluated.
- This requires the quiz to be connected to the grade book.
back to top
back to top of Evaluation & Feedback
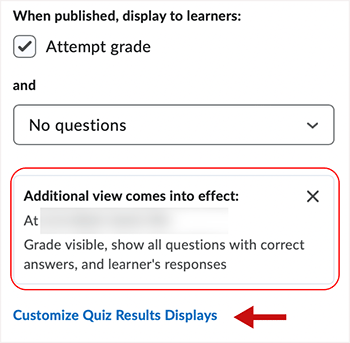
When published, display to learners:
Variations are available when setting up the learner view when a quiz grade is published.
This area controls what is initially shown to users when the quiz attempt grades are published. "Attempt grade" and "No questions" are the default settings.
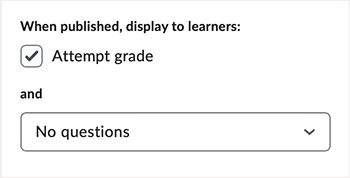
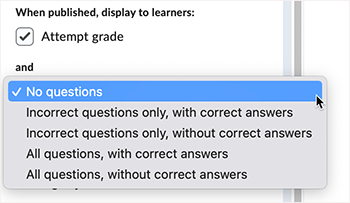
After selecting the contextual drop menu the selections related to question display when quiz attempt grade is published are shown. Select an item to apply it to the display that appears after an "Attempt grade" is published.
back to top
back to top of Evaluation & Feedback
Customize Quiz Results Displays
Customizing the "Quiz Results Display" allows control over learner view related to published quiz attempts.
Select the "Customize Quiz Results Displays" button to access the primary display area that governs how the user sees the results of the quiz attempt. By default, the primary display only shows information related to the quiz score earned.

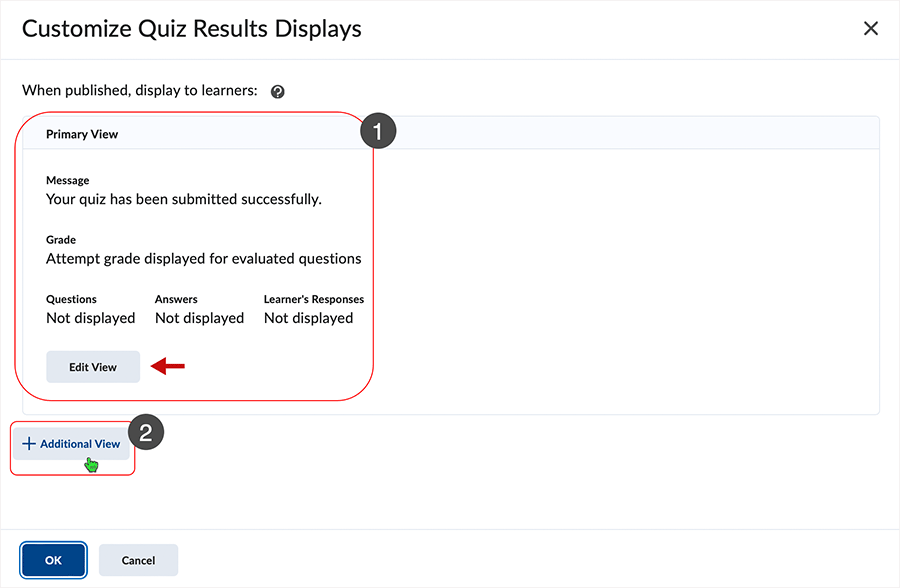
The "Customize Quiz Results Displays" area shows the current "Primary View" display for a published quiz attempt.
- The unedited "Primary View" includes:
- Message - the standard default message.
- Grade - attempt grade from evaluated questions.
- "Not Displayed" status of questions, answers, and learner's responses.
- As necessary, select "Edit View" link to edit the default "Primary View" display.
- Select the "+Additional View" link to add another view.
"Primary View" displays for published attempts at all times.
If the "Primary View" hasn't been edited, then the default display (as shown in the image below) will show after a quiz attempt has been published.
After selecting "+Additional View" another view can be set up. The additional view can be made more or less expansive in scope when compared to the "Quiz Results Displays - Primary View" default display.
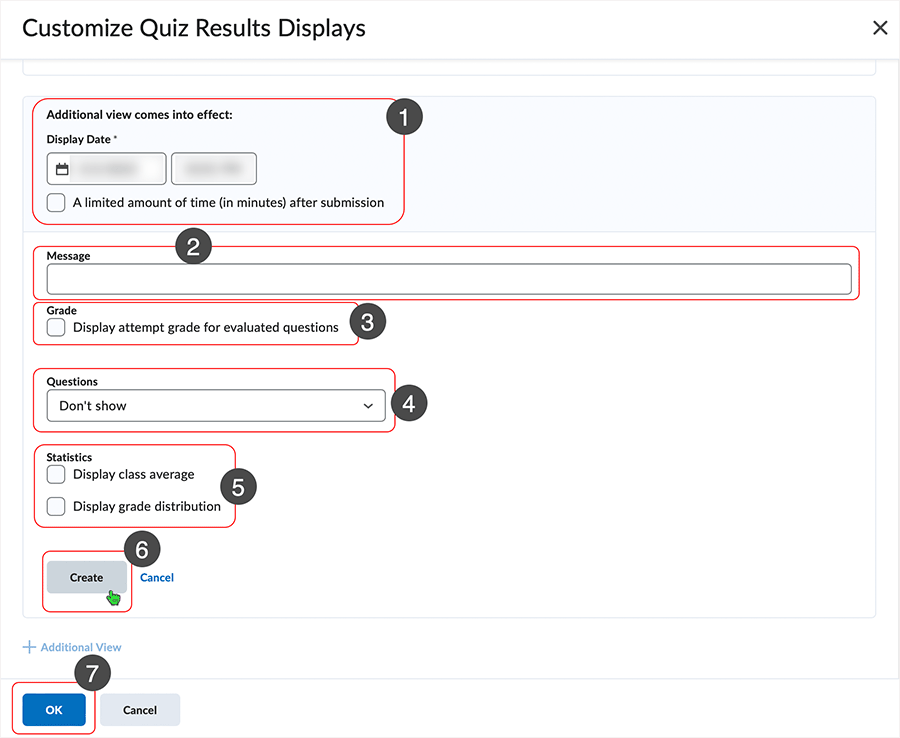
Creating an "Additional View" requires consideration of various variables.
- Select a date and time which will govern when the additional view will come into effect.
- Select the "A limited amount of time (in minutes) after submission" checkbox to limit
how long a "Quiz Results Displays" view is available to quiz takers immediately after
completing the assessment.
- Use limited duration to restrict learner access to the "Quiz Results Displays" view for a short period immediately after completing a quiz.
- A limited duration can be counter-productive if the purpose of the "Quiz Results Displays" view is to let learners review at a future date (e.g., at an in-class review a week later, after all other participants have submitted).
- Select the "A limited amount of time (in minutes) after submission" checkbox to limit
how long a "Quiz Results Displays" view is available to quiz takers immediately after
completing the assessment.
- Enter a message as necessary in the "Message" text box.
- Select the "Display attempt grade for evaluated questions" checkbox to display quiz grade.
- Use the contextual drop menu to see the selections related to question display when
quiz attempt grade is published.
- Select an item to apply it to the display that appears after an "Attempt grade" is published.
- Select to display quiz grade "Statistics" as desired.
- Select the "Create" button to create the additional view.
- Select the "OK" button to exit the area.
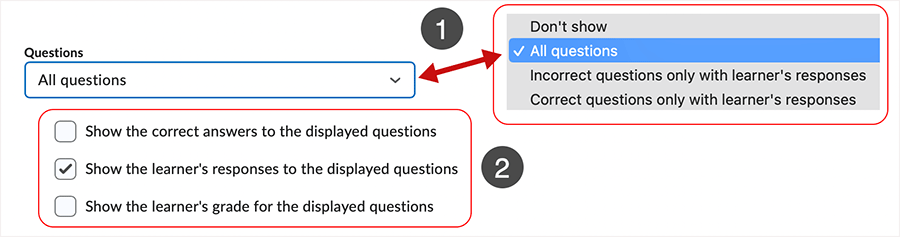
Additional variables in the "Questions" contextual drop menu.
- Selecting anything other than "Don't show" in the "Questions" contextual drop menu reveals additional variables that can be used to refine the "Quiz Results Display" for a published quiz.
- For example, with "All questions" displayed, three variations are then displayed.
- Each variation changes slightly dependent upon the "Questions" display that is selected.
- Selecting checkbox(es) related to the variations adjusts the "Quiz Results Display" accordingly.
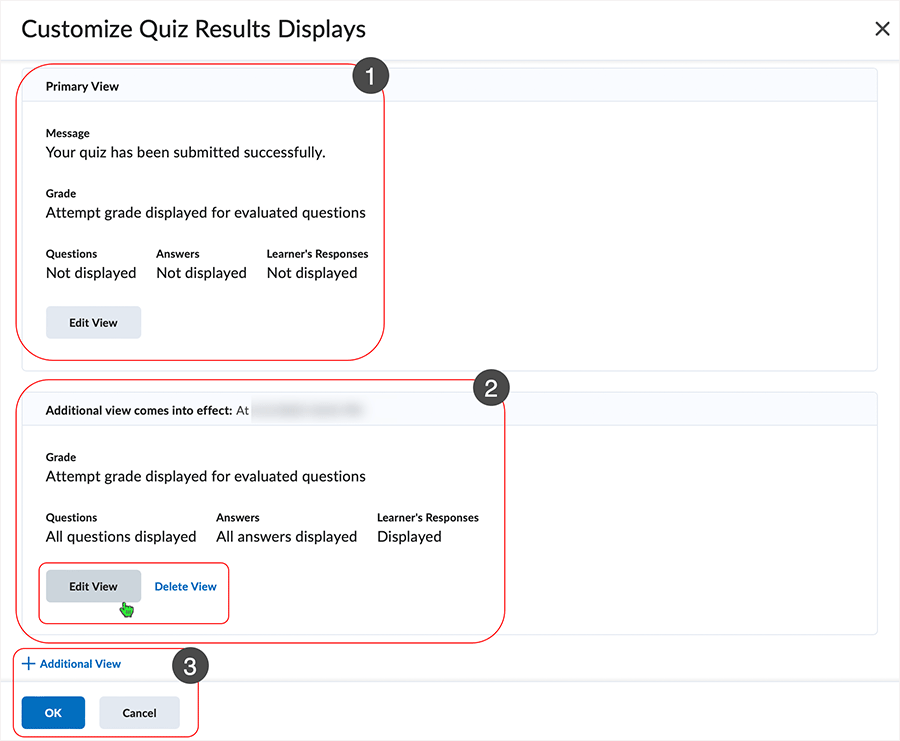
When adding an "Additional View" to a quiz.
- The "Primary View" always remains intact.
- An "Additional" View" is displayed on the page with specifics related to chosen variables.
- The "Additional View comes into effect:" statement shows time when the view will supplant the "Primary View" and display in its stead.
- "Edit View" can be selected to re-enter and adjust the "Additional View" as necessary.
- Use the "Delete" selection to remove the "Additional View" as necessary.
- Select "OK" to hold the created view in place.
- Select "+Additional View" to add another view in addition to the already established views.
- Select "Cancel" to exit the area.
After an "Additional View" has been added, the view displays in the "When published, display to learners:" area under the "Attempt Grade" and questions area.
The "Additional view comes into effect:" statement shows date of visibility and includes a statement related to the set-up of the "Additional View" that has been created.
Select "Customize Quiz Results Displays" to re-enter the view area for "Primary" and "Additional" views.
back to top
back to top of Evaluation & Feedback
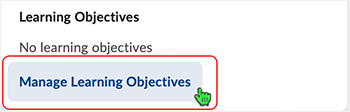
Learning Objectives
Select the "Manage Learning Objects" link to associate learning objects with a quiz.
back to top
back to top of Evaluation & Feedback
In all instances, when editing, selecting "Save and Close" or "Save" is necessary for changes to be applied to a quiz.
Links will open in a new tab or window dependent on browser/OS configuration.
What dialog box windows look like and how dialog box windows and browsers interact is dependent upon the operating system and browser being used. The screenshots in this tutorial may differ from the screen that the user is viewing when performing the actions described in this tutorial.
CD 202307