
Checklists in Brightspace
Checklists can be used as an organizational tool to highlight important or required assignments, readings, or other items to complete. Learners can use a checklist to keep track of where they are in relation to course work as outlined in checklist(s) developed by an instructor.
Create a checklist
Create checklists to highlight important or required assignments, readings, or other items to complete. Each checklist contains one or more categories, into which checklist items are organized.
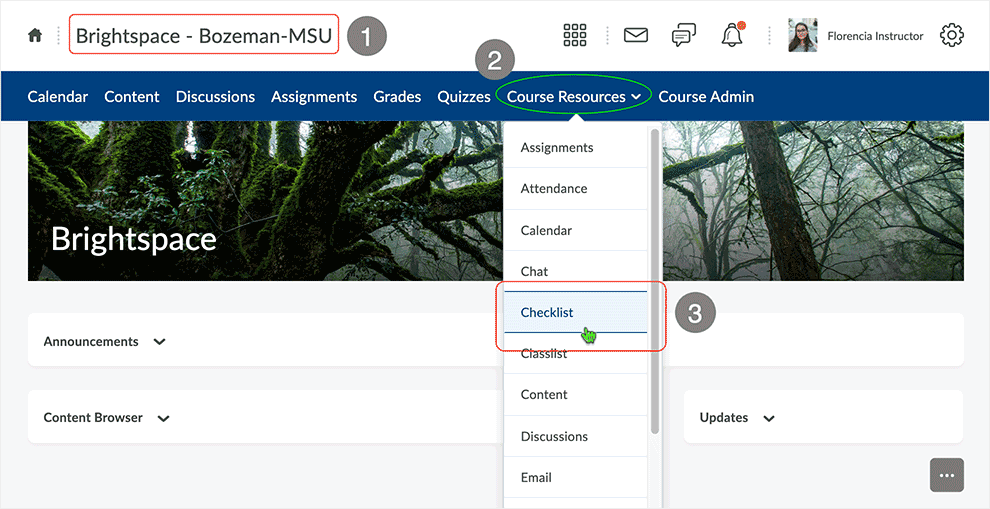
Access the Checklist area in a course.
- Inside of a course.
- in this case, "Brightspace - Bozeman-MSU" course
- Select the "Course Resources" drop menu.
- Select "Checklist" link from the menu.
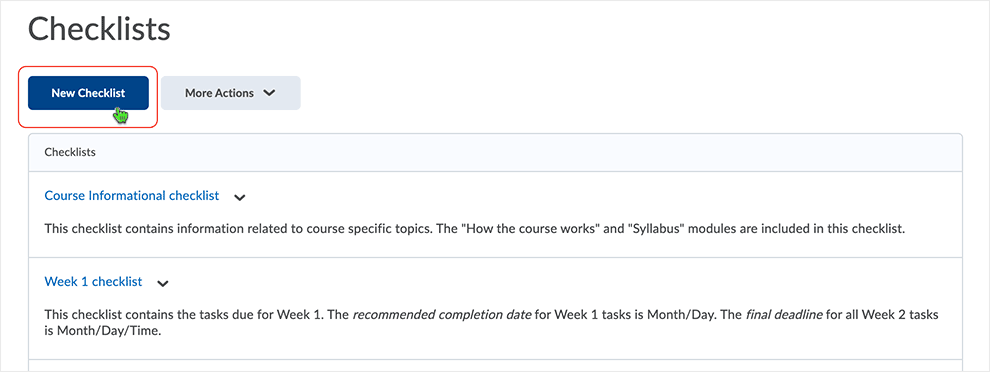
Create a new checklist.
When in the "Checklists" area, select "New Checklist" button.
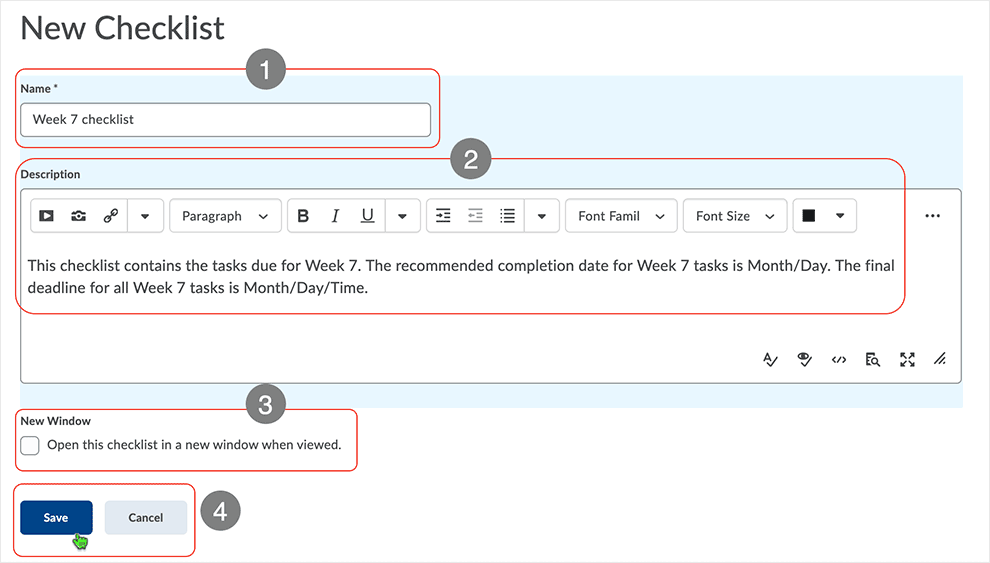
Set up the checklist.
- Enter a name in the "Name:" textbox.
- this new checklist is named "Week 7 checklist"
- Enter a description.
- optional
- Select the checkbox to open the checklist as an external link.
- optional
- Select "Save" to save the work.
- "Cancel" to back out.
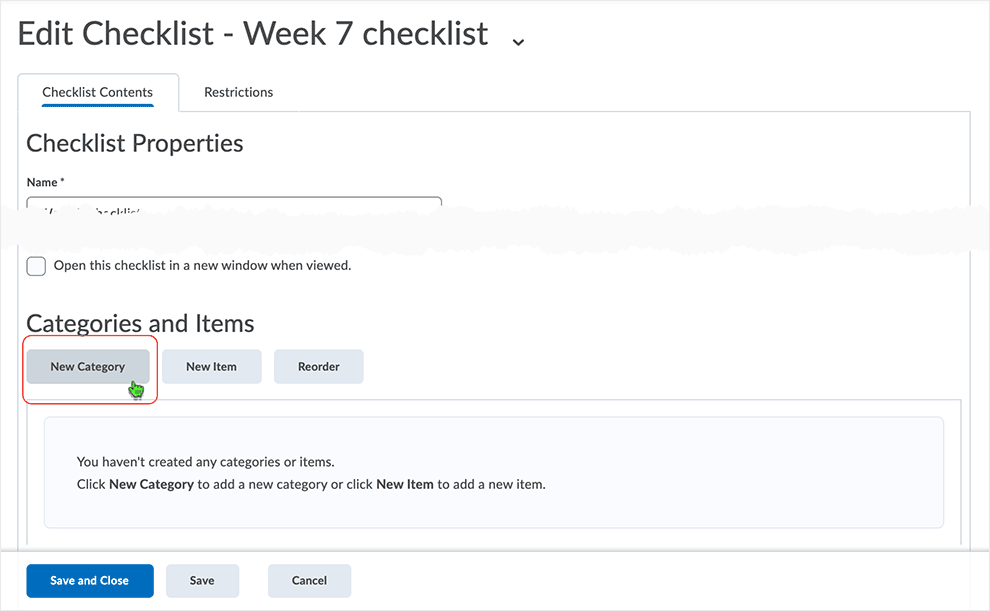
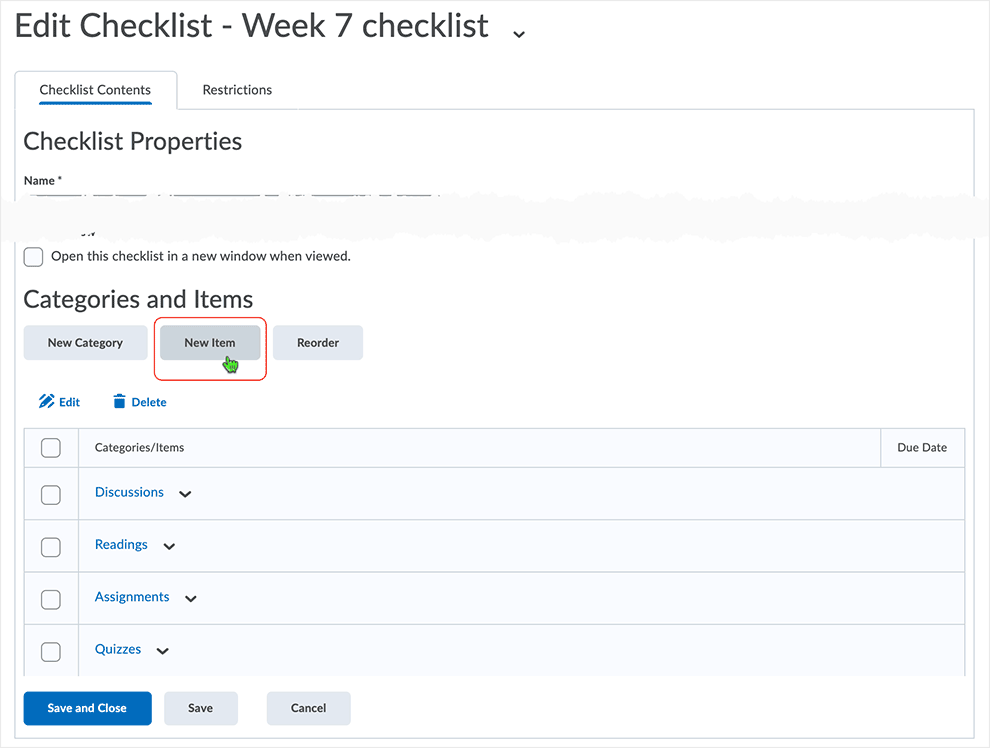
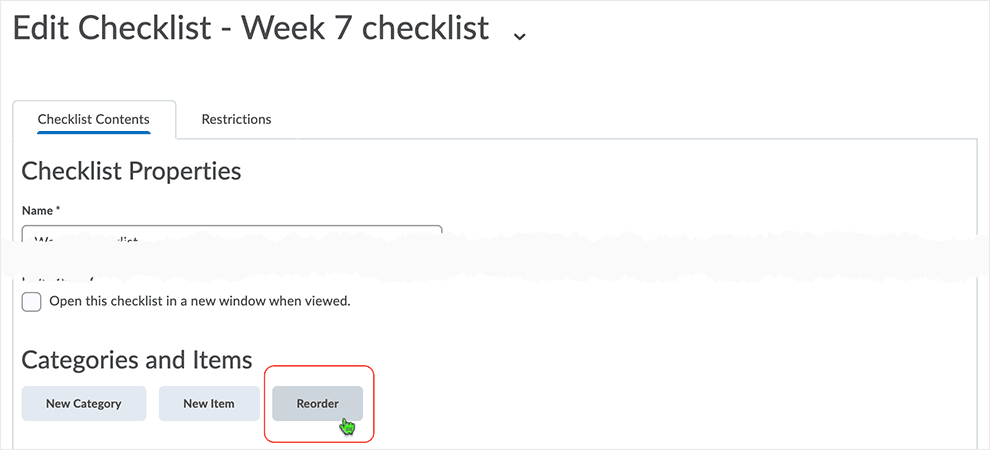
After the Checklist is created, edit the checklist.
When the checklist is created it will appear in the "Checklists" area.
Select a checklist name to edit the checklist.
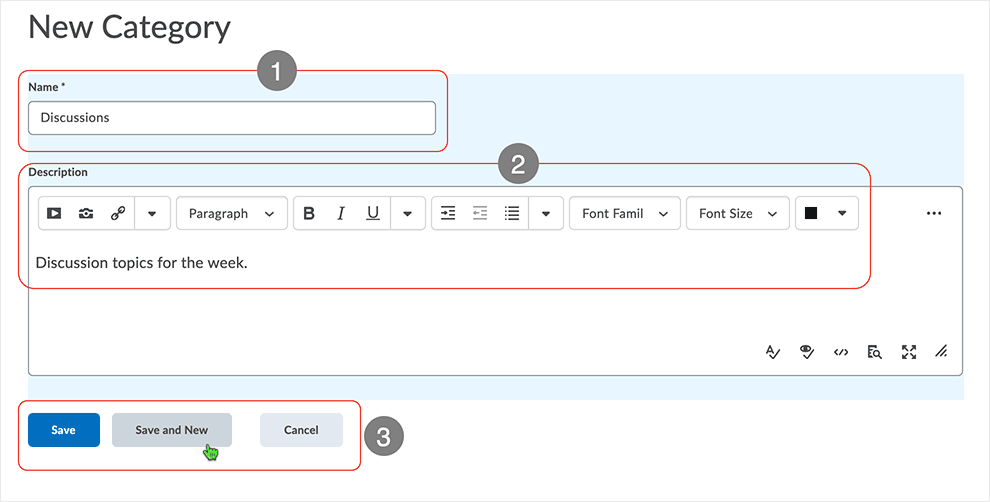
Select "New Category" button to create a category.
Checklist items must reside in a category. Create a category to hold items.
Set up the category.
- Enter a name in the "Name:" textbox.
- this new category is named "Discussions"
- Enter a description.
- optional
- Select "Save" or "Save and New" button.
- "Cancel" to back out
- "Save and New" allows easily creating multiple categories, one after another, if needed
To create multiple categories one after another, select the "Save and New" option.
Checklists contain categories (holders) that are used to organize checklist items. For example, an instructor might create the categories Week 1, Week 2, and Week 3, and place week-specific checklist items into the appropriate categories. Alternately, an instructor might use a checklist to organize steps of an assignment and assign due dates for checklist items.
After establishing a category (or categories), create an item in a category.
Select the "New Item" button to create an item.
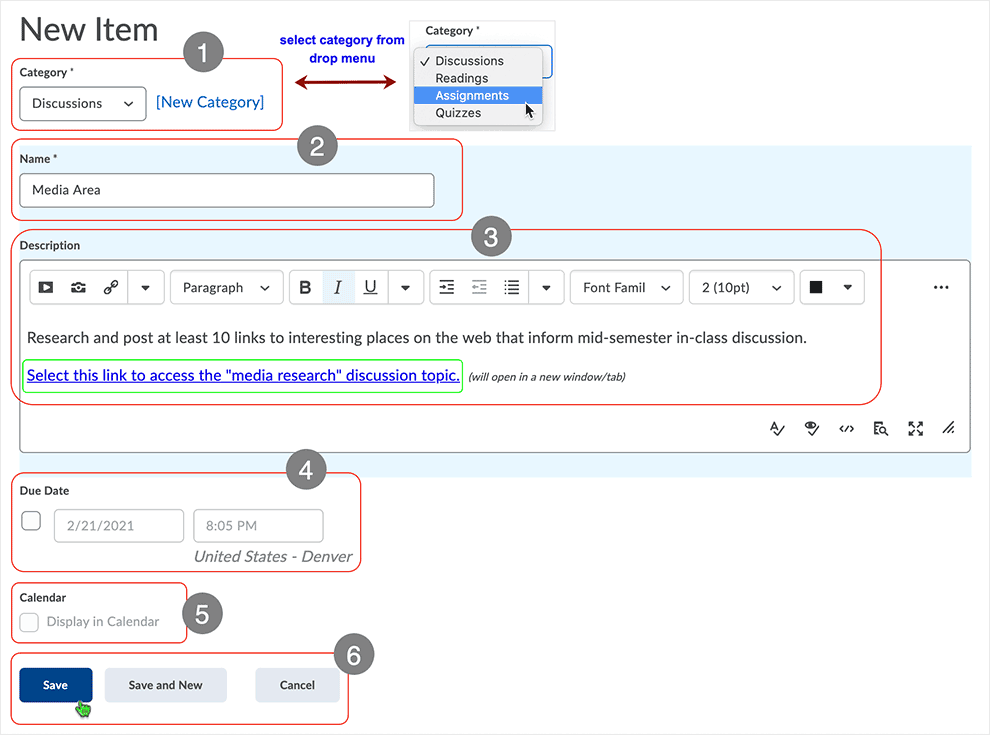
Set up the new item.
- Associate the new item with a category.
- in this case, "Discussions" category has been selected
- when more than one category is available, choose appropriate category from drop-menu
- Give the item a name.
- in this case, "Media Area" is the name of the item
- Give the item a description.
- optional
- in this case, directions are in the description as well as a "quicklink" that, when selected, will take the user to the topic
- the link has been set to open in a new window/tab
- user has chosen to insert an advisory statement: (will open in a new window/tab) for participants
- A "Due Date" for the task can be assigned.
- optional
- The "Due Date" can be displayed in the Calendar.
- optional
- Select "Save" or "Save and New" button.
- "Cancel" to back out
- "Save and New" allows easily creating multiple items, one after another, if needed
To create multiple items one after another, select the "Save and New" option.
Manage Checklists
Edit, Copy, Reorder in the Checklists area.
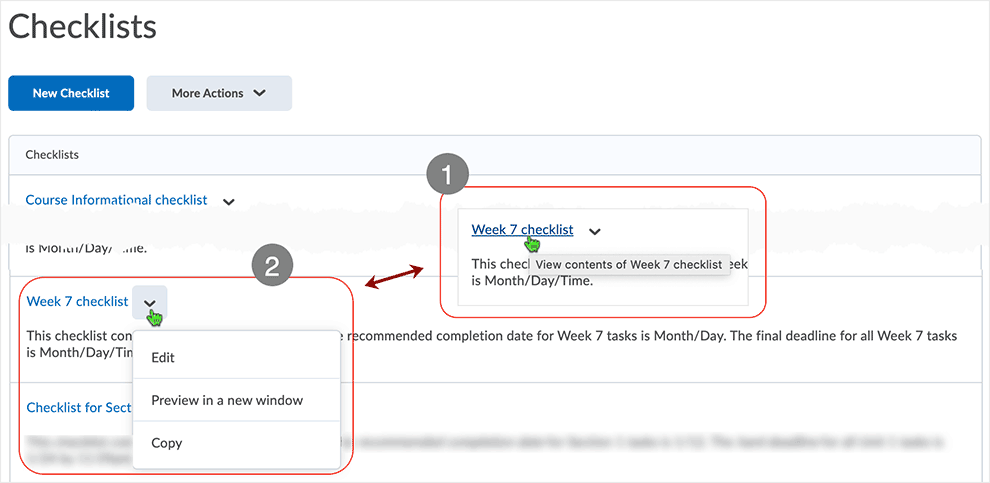
Editing Checklists
To Edit a checklist
1. Click the title of the checklist.
OR
2. Select the corresponding action caret and select "Edit" from the contextual drop-menu.
back to top
back to top of Manage Checklists
Copy Checklists; Categories and Items inside a checklist
When in the Checklists area, copy an entire checklist.
Select the action caret to to right of the checklist to be copied and select "Copy" from the contextual drop-menu.
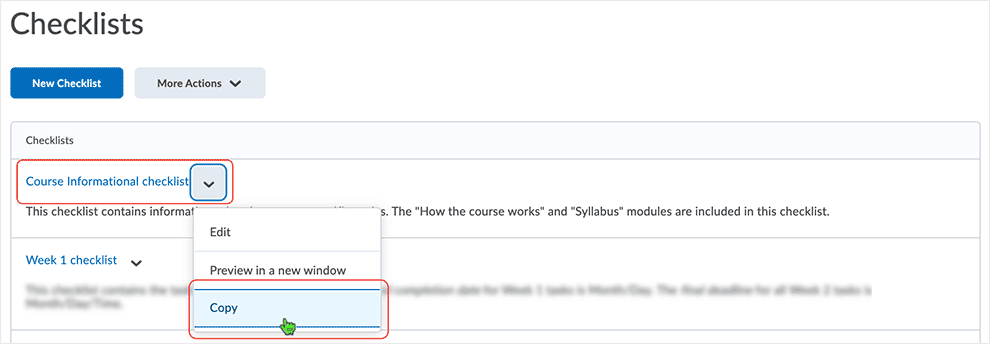
The selected checklist will be copied and display at the bottom of the Checklists area.
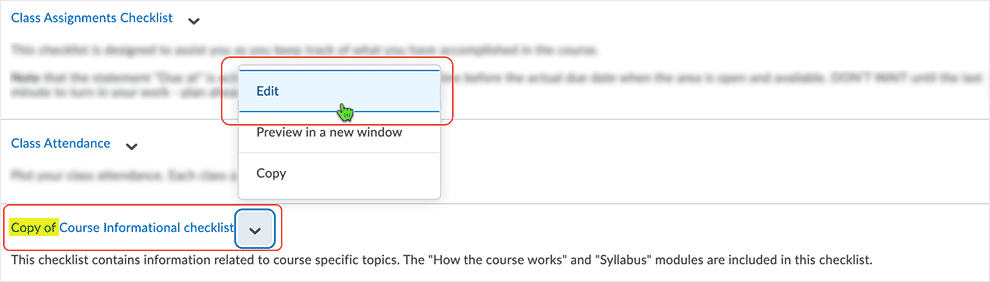
- "Copy of" is prepended to the checklist name.
- Select to edit the checklist to adjust as necessary.
back to top
back to top of Manage Checklists
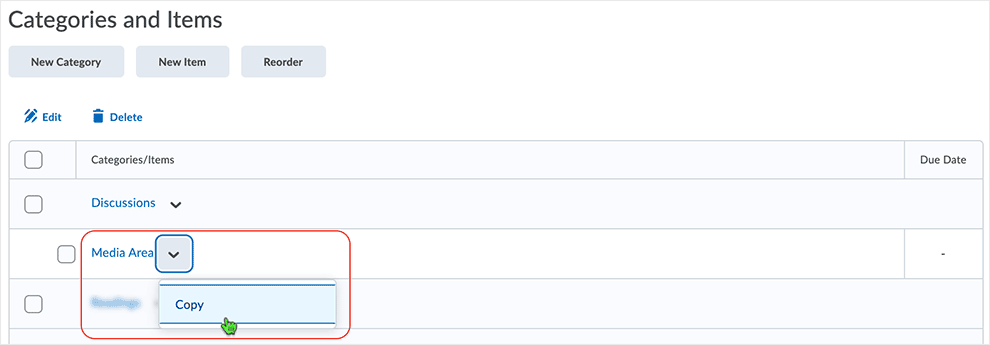
When in a checklist, in the Categories/Items area, select to copy a category.
Select the action caret to to right of the category to be copied and select "Copy" from the contextual drop-menu.
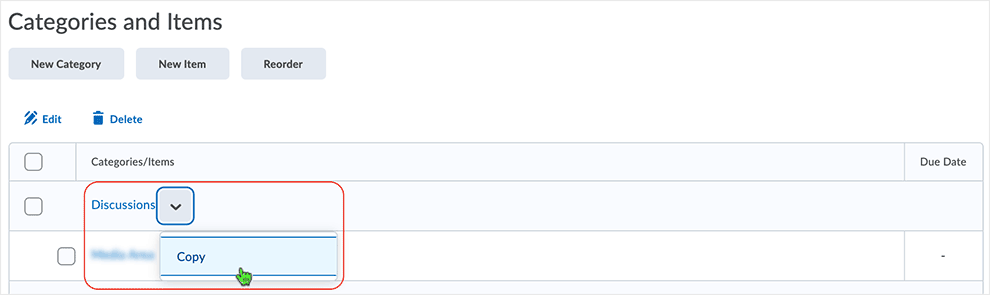
The selected category will be copied and display at the bottom of the Categories and Items area.
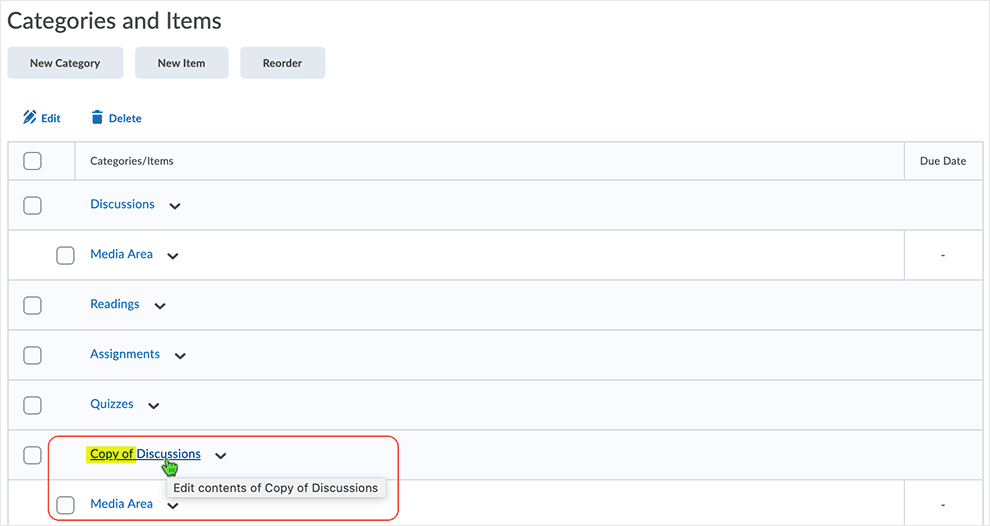
- "Copy of" is prepended to the category name.
- Select to edit the category and adjust as necessary.
back to top
back to top of Manage Checklists
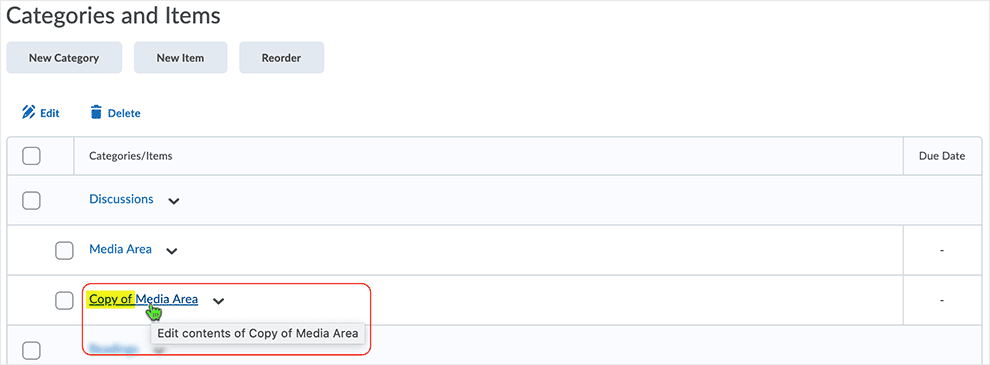
When in a checklist, in the Categories/Items area, select to copy an Item.
Select the action caret to to right of the item to be copied and select "Copy" from the contextual drop-menu.
The selected Item will be copied and display beneath the original item in the category area.
- "Copy of" is prepended to the item name.
- Select to edit the item to adjust as necessary.
back to top
back to top of Manage Checklists
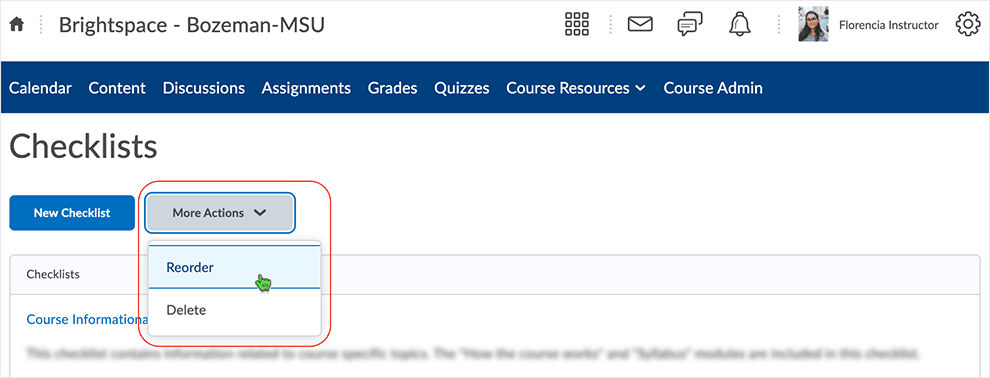
Reorder Checklists
Reorder checklists in the checklist area.
Select "Reorder" from the "More Actions" button when in the "Checklists" area.
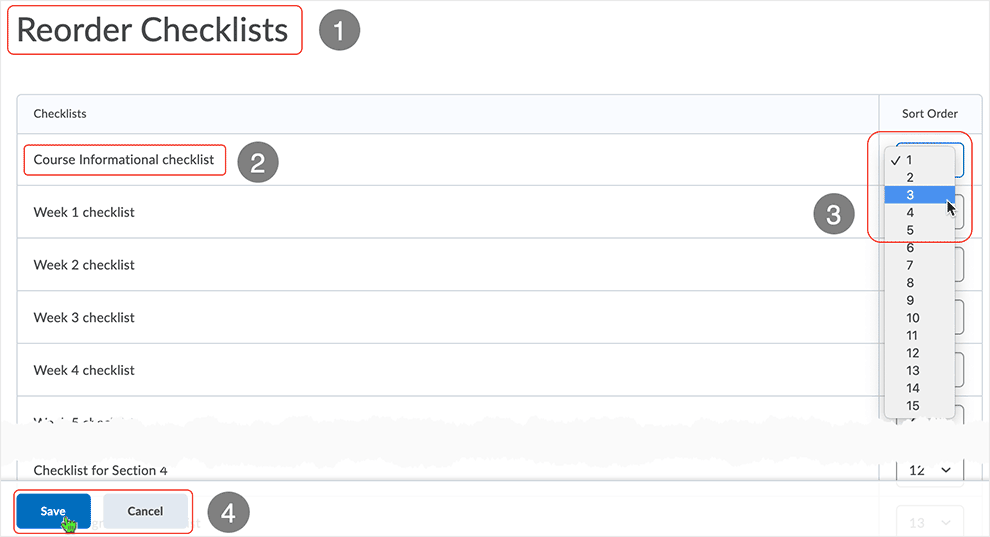
Select the order of the items using the reorder functionality.
- In the "Reorder Checklists" area.
- The "Course Informational checklist" is being worked on.
- Selecting to reorder the "Course Informational checklist" to the third position as opposed to the first position.
- Select "Save" to save the work.
- "Cancel" to back out.
back to top
back to top of Manage Checklists
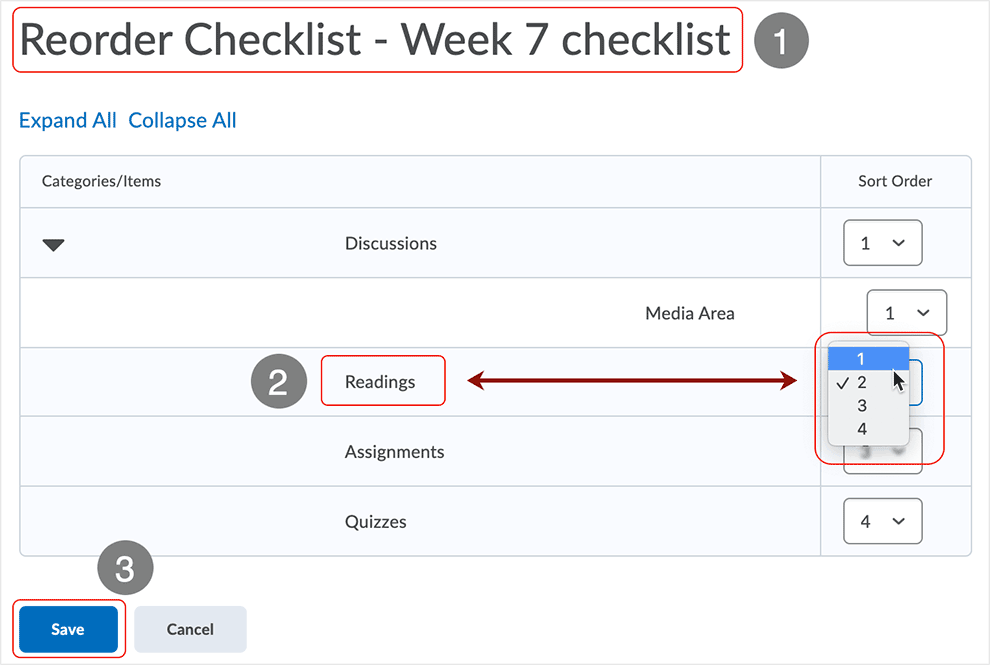
Reorder items within a checklist.
When editing a checklist, select the "Reorder" button from the "Categories and Items" area.
Select the order of the items using the reorder functionality.
- In the "Reorder Checklist" area.
- Selecting to reorder the "Readings" category to the first position as opposed to the second position.
- Select "Save" to save the work.
- "Cancel" to back out.
back to top
back to top of Manage Checklists
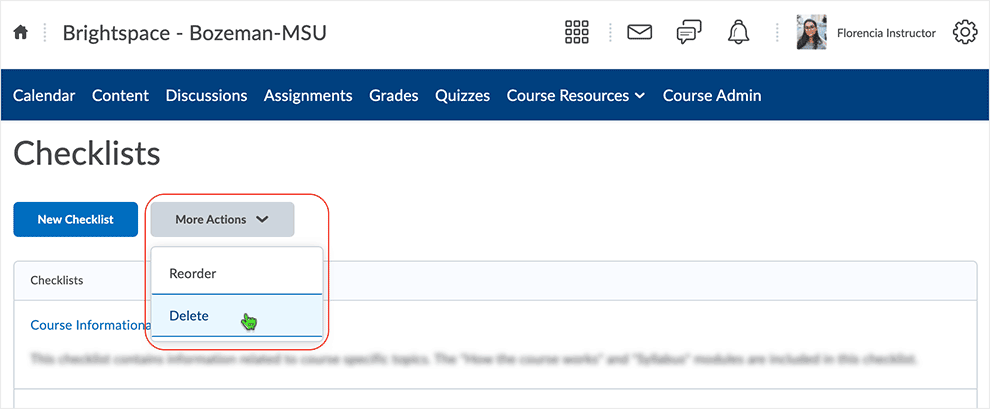
Delete Checklists
Delete checklists from the checklist area.
Select "Delete" from the "More Actions" button when in the "Checklists" area.
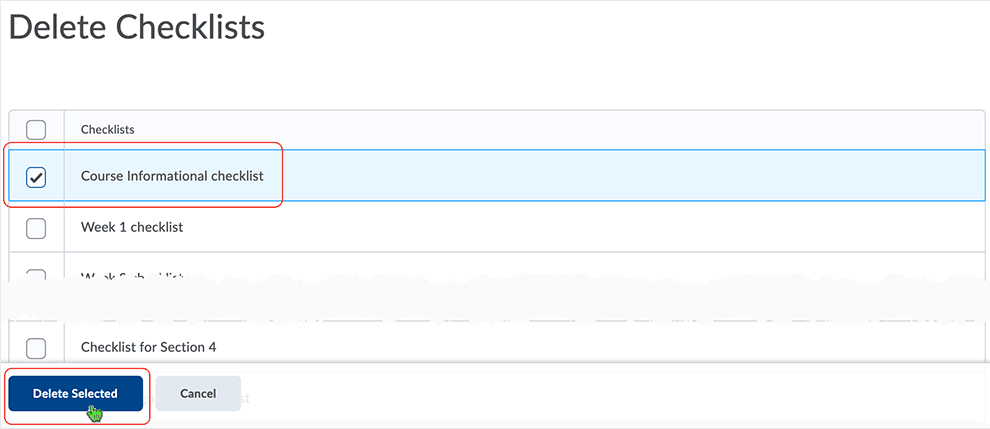
Select the checkbox correlating with the checklist(s) to be deleted and then select "Delete Selected" button.
back to top
back to top of Manage Checklists
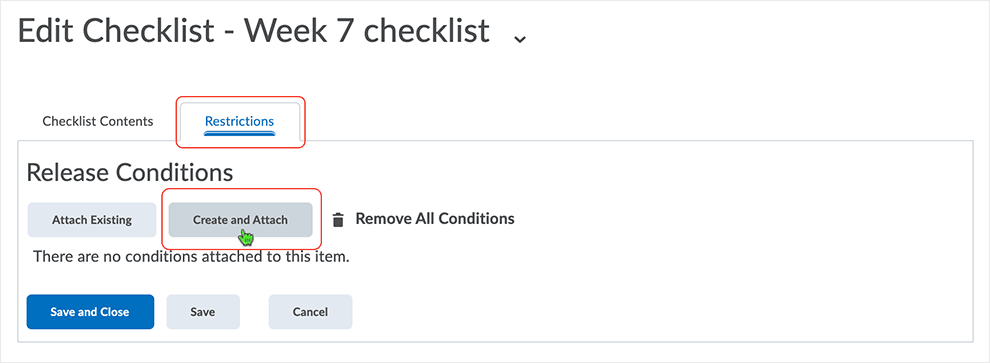
Release Conditions in Checklist
Set conditions for learners to gain access to a checklist.
Create a conditional release.
With the "Restrictions" tab active, select "Create and Attach" button if no existing conditions exist.
- if existing conditions are available, click "Attach Existing" button, then select the check box for any condition you want to attach
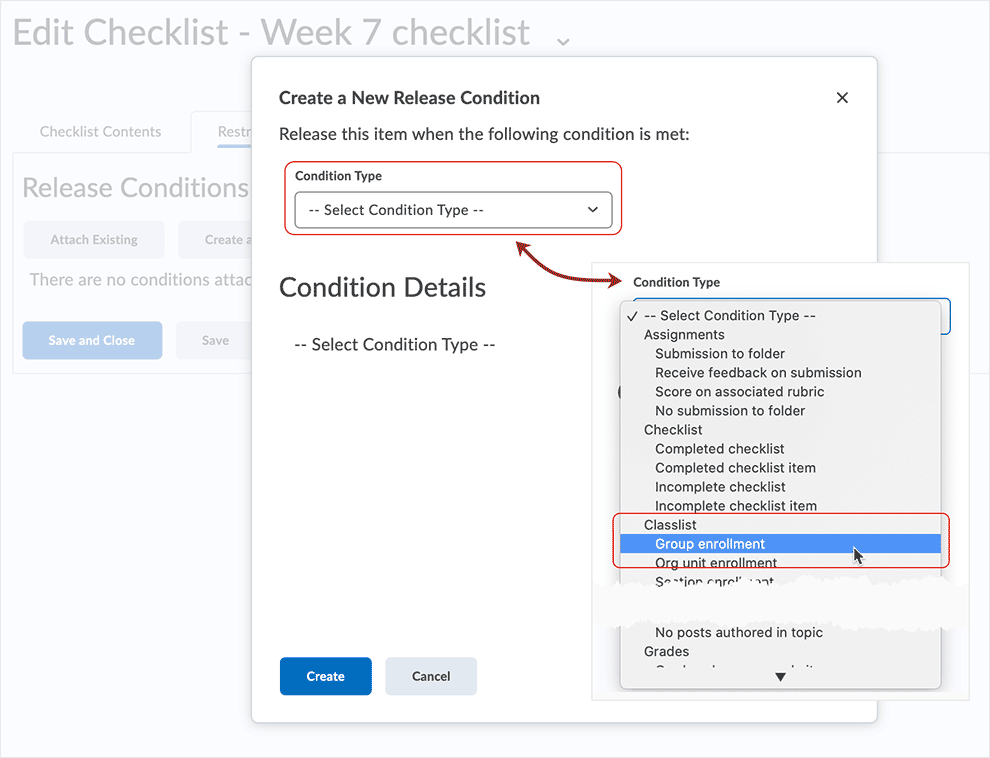
From the drop-menu under "Condition Type," select the type of condition from the list that you wish to apply.
- in this instance, the condtion is "Group Enrollment"
Select the condition details from the drop-menu.
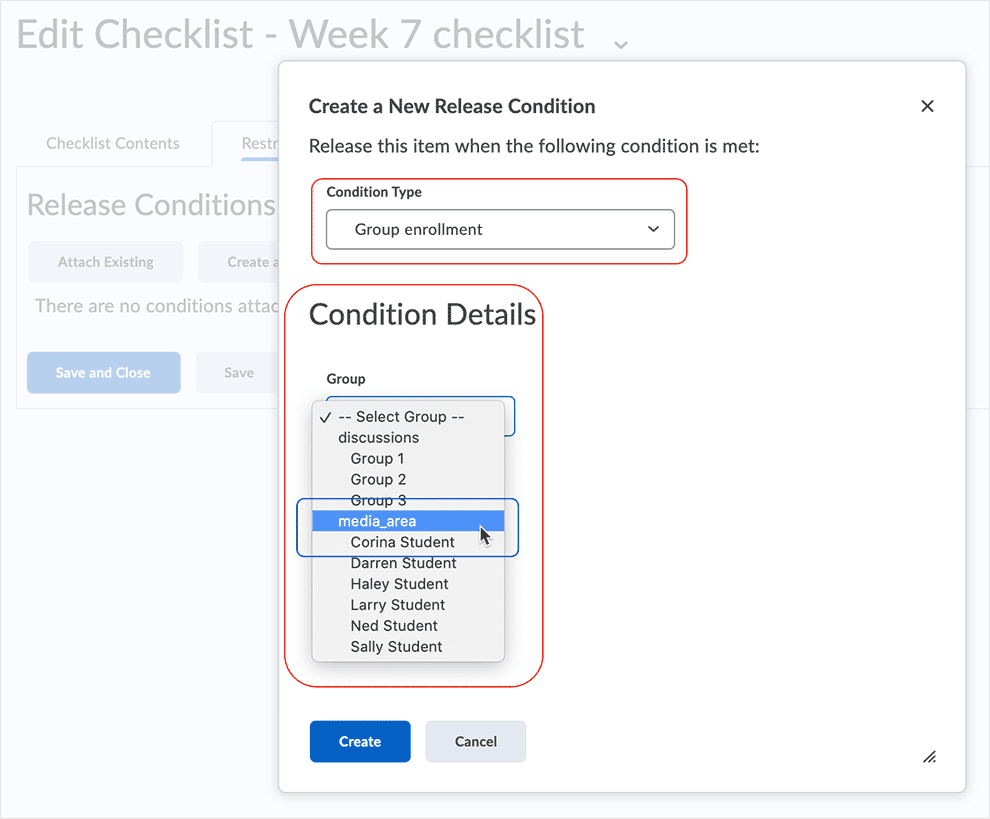
Select the "create" button to place the conditional release.

Select "Save" or "Save and Close" to finish associating the release condtion with the checklist.
To set how accessing the checklist is controlled, from the drop-down list, select if All conditions must be met or Any condition must be met.
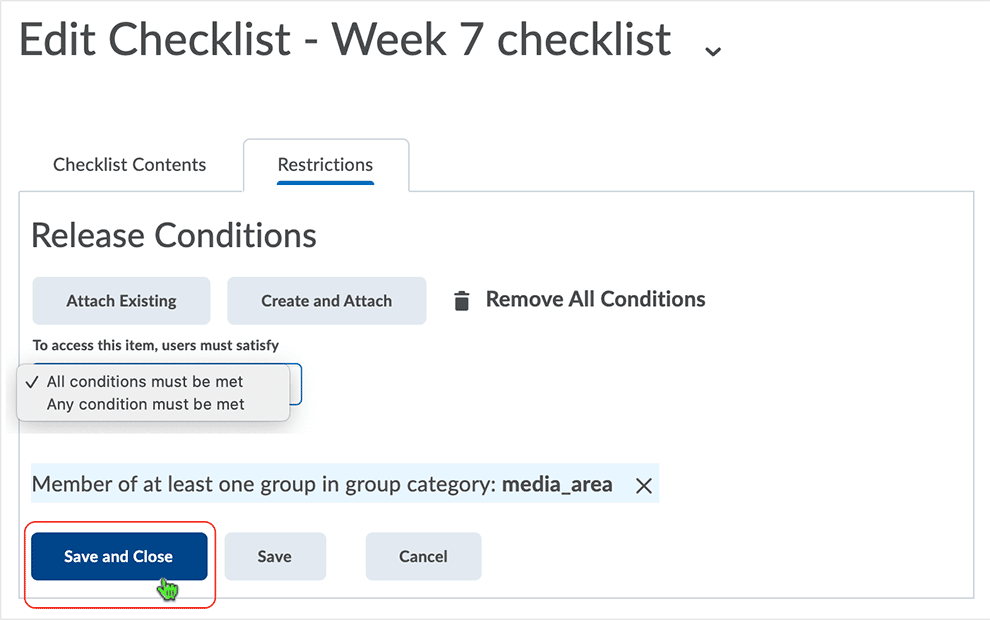
In the "Checklists" area, a checklist with a conditional release applied to it indicates this with an icon.

Links will open in a new tab or window dependent on browser/OS configuration.
What dialog boxes look like and how dialog boxes and browsers interact is dependent upon the operating system and browser being used. The screenshots in this tutorial may differ from the screen that the user is viewing when performing actions described.
CD 202102