
Manage Dates
Use the Manage Dates area to view, edit, offset date/hour availability and set calendar status of tools in Brightspace courses from one central location.
Manage Dates Overview
To access the "Manage Dates" page:
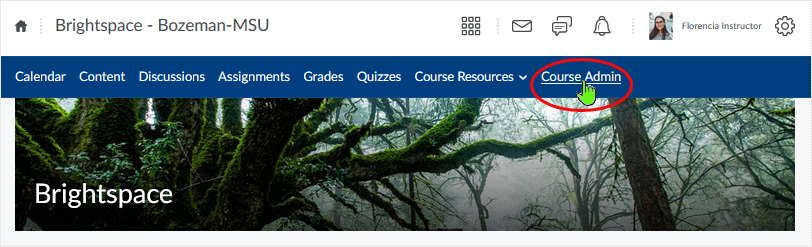
When in a course, select "Course Admin" from the course navigation (blue) bar.
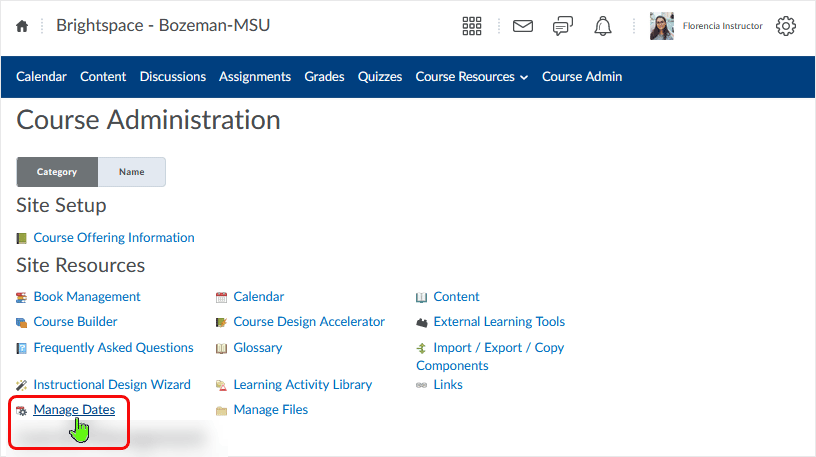
From the "Course Admin" area, select the "Manage Dates" link.
Course objects display in a grid that can be sorted using any of the column headings. Click on a column heading to designate that column as the sort column. Use the selectable "arrow" icon to determine whether the sort is displayed in ascending or descending order.
Users can sort on the 'Type' column to sort on tool-specific order (grouping all Assignments with Assignments, Content with Content etc. to fall out alphabetically).
The Manage Dates page:
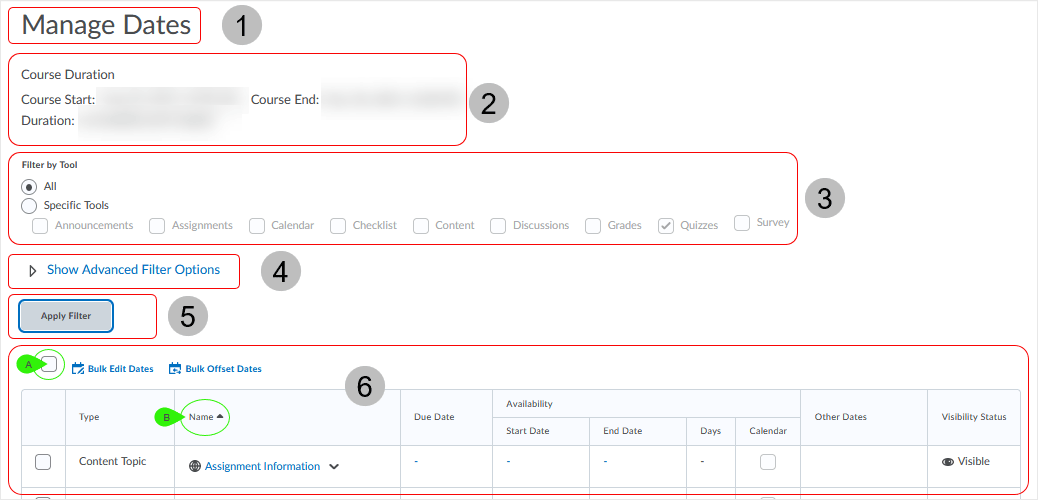
- On the Manage Dates page
- "Course Duration" dates (Start, End, Duration) are displayed
- "Filter by Tool" options are displayed ("All" or "Specific Tools")
- Expand the arrowhead to "Show Advanced Filter Options"
- Use the "Apply Filter" button to apply any filter selections
- The grid display shows column headings Type; Name; Due Date; Availability (Start and
End dates, Days between start and end, whether the object is displayed in the Calendar);
Other Dates (example: Submission Views related to Quizzes)
- shows the "Select All" function that can be utilized
- shows an example of a sortable column heading
- in this case, the "Name" column is the sort that is selected
- use the selectable "arrow" icon to determine whether the sort is displayed in ascending or descending order
"Bulk Edit Dates" and "Bulk Offset Dates" functions are located at the top of the grid as well.
Users can use filter options to work with smaller sets of objects ('All' versus 'Specific').
When filtering course objects, any bulk changes made apply only to the filtered results. This enables updating multiple availability dates based on criteria specified by the user.
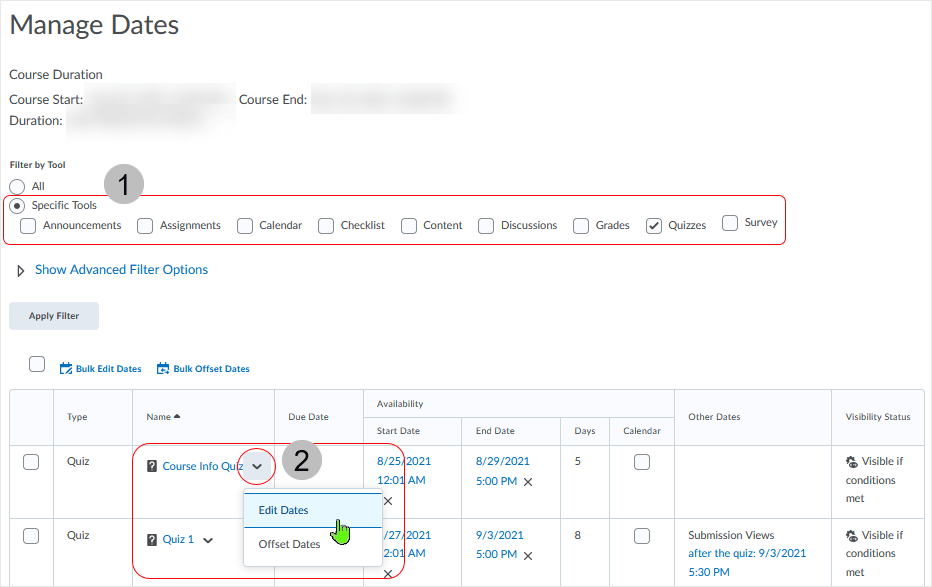
Selecting to use the "Specific Tools" filter option to work with a smaller set of objects.
- Using the "Filter by Tool" area
- select the radio button associated with "Specific Tools"
- select the checkbox (or multiple checkboxes) related to the tool(s) to filter by
- in this case, "Quizzes" is the selected tool
- Select the "Apply Filter" button to run the function
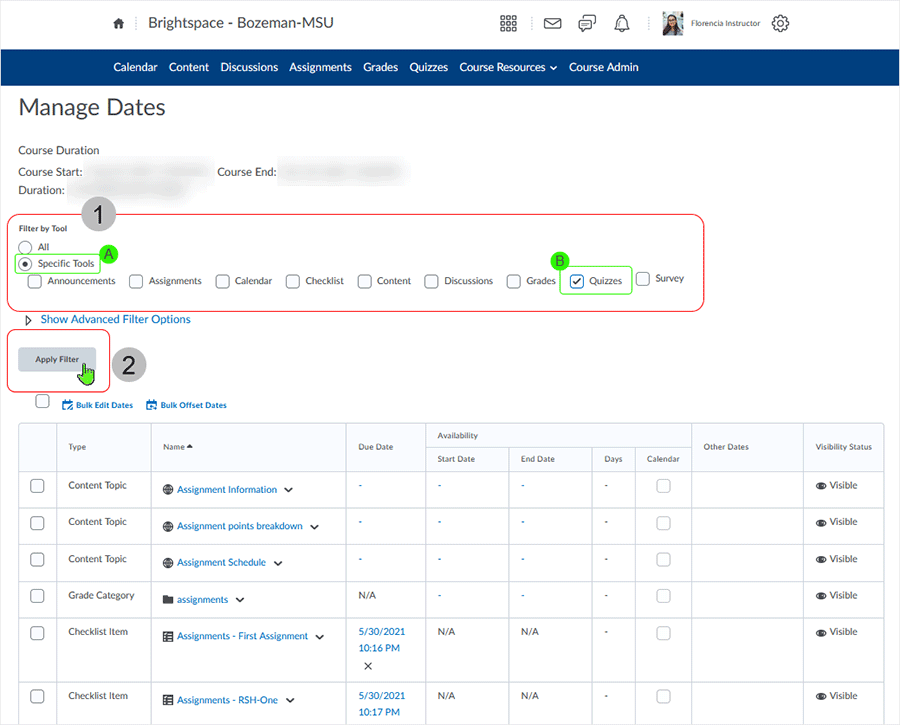
All quizzes in the course display in the grid.
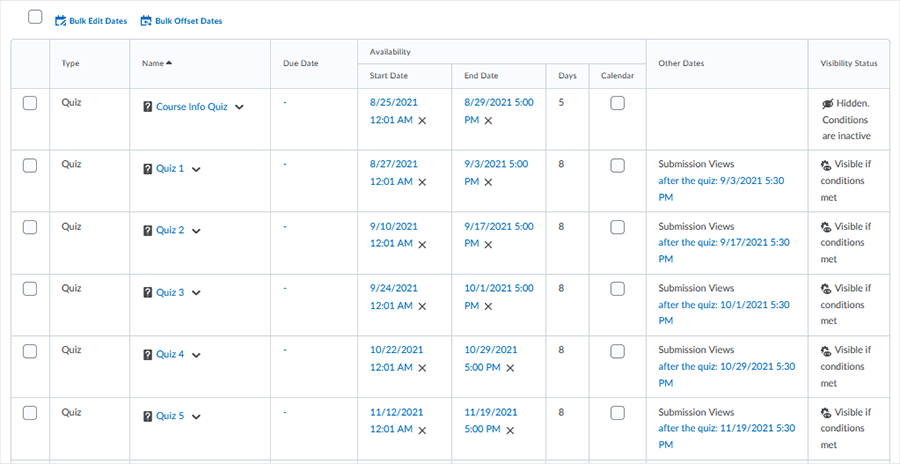
In addition to managing dates, users can open each course object in a new window or tab by clicking on an object's name. Doing this, dependent on tool, will launch an object's management/edit page. The "Manage Dates" tool remains available to the user in the original tab.
In this example, the Manage Dates area is isolating to the "Specific Tool - Quizzes."
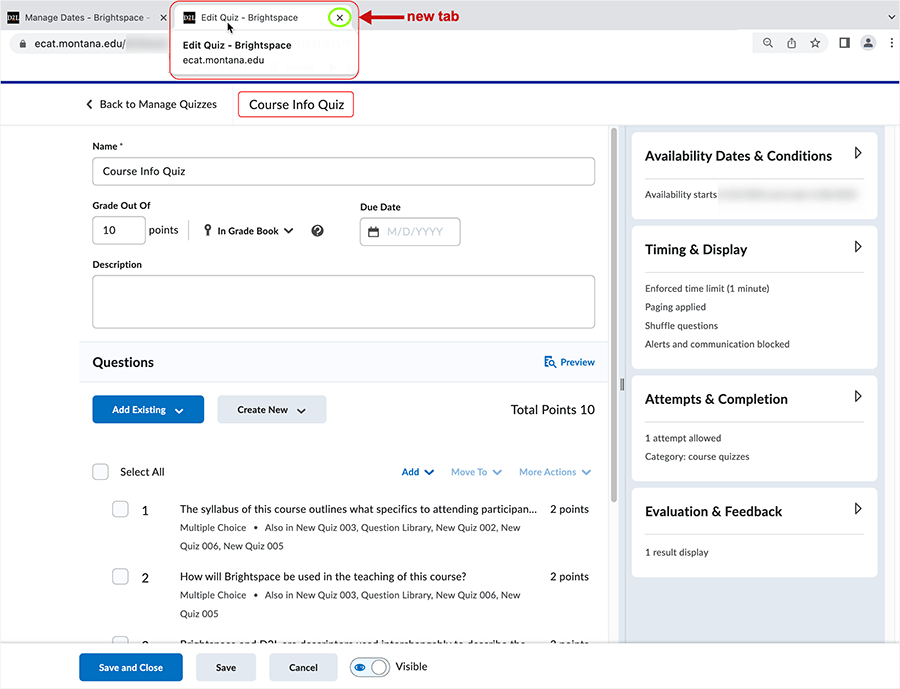
Selecting the "Course Info Quiz" link will open a new window/tab (dependent on browser settings).

In this case, choosing the link opens a new tab in the browser. Selecting the tab reveals the edit page for the "Course Info Quiz" quiz.
Closing the tab sends the editing page for the quiz away leaving the "Manage Dates" page still available via the "Manage Dates" tab.
Edit Dates
Dates/times can be added and/or adjusted using the Individual or Bulk Edit Dates function in the "Manage Dates" area.
Individual Edit Dates
Adjust dates specific to individual objects using this method of the "Edit Dates" function.
Add dates specific to individual objects via the "Enter Dates" function by entering dates/times in Due, Start, and End date availability areas where no dates/times currently display.
Go into the "Manage Dates" area of a course.
- Select to isolate to a specific tool (or not) as necessary
- the filter is set to display "Quizzes" in this example
- Select the caret to the right of the item to be adjusted and select "Edit Dates" from the contextual menu
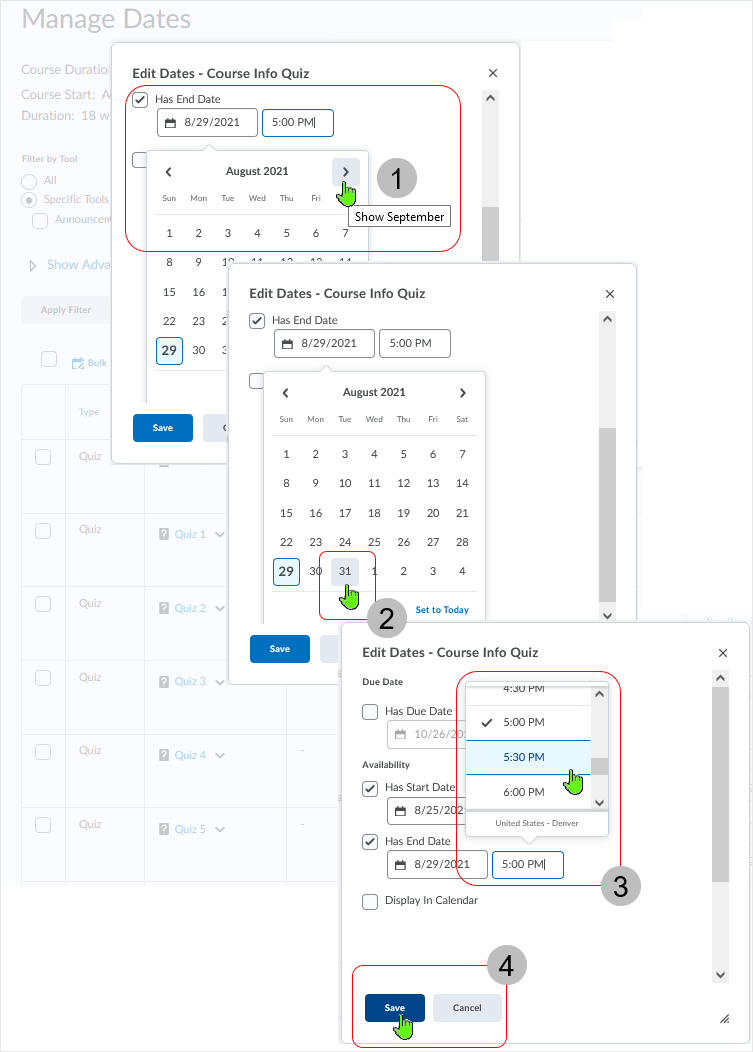
After "Edit Dates" is selected, a dialog box displays. Select to adjust Due Date, Start Date, and End Date as necessary.
- Adjust the calendar month that displays by using directional arrows as necessary
- Select individual dates on the monthly calendar display by clicking on one
- Choose the time from the contextual menu display
- Select "Save" to make the changes hold
Note: Typing directly into a text box will work as well to adjust date and time.
Note: User can also control Course Calendar visibility by selecting/deselecting the "Display in Calendar" checkbox.
back to top of Edit Dates
back to top
Edit existing dates directly
Adjust already established dates for individual objects by selecting the link associated with the object.
Select the displayed link that describes the current date parameters.
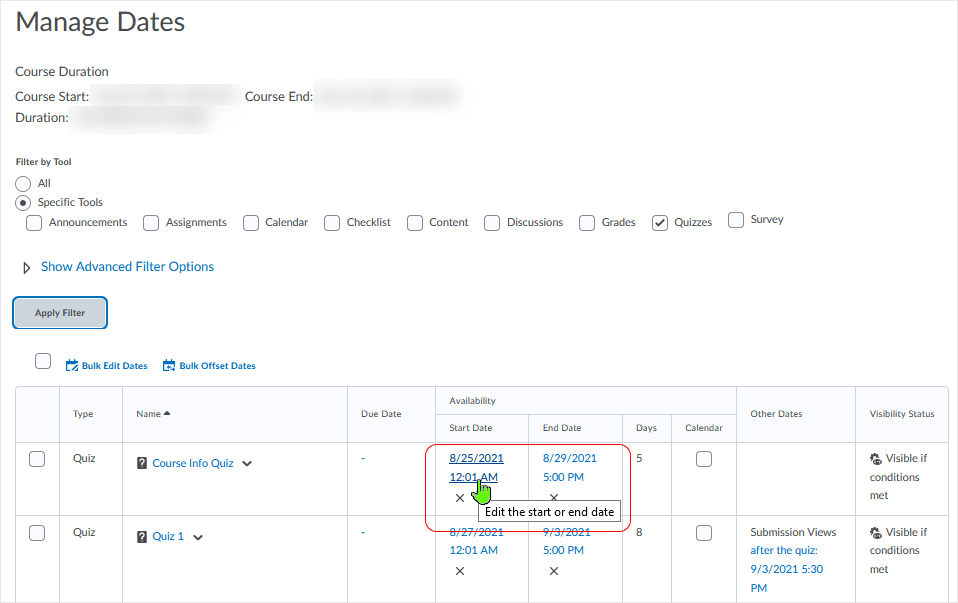
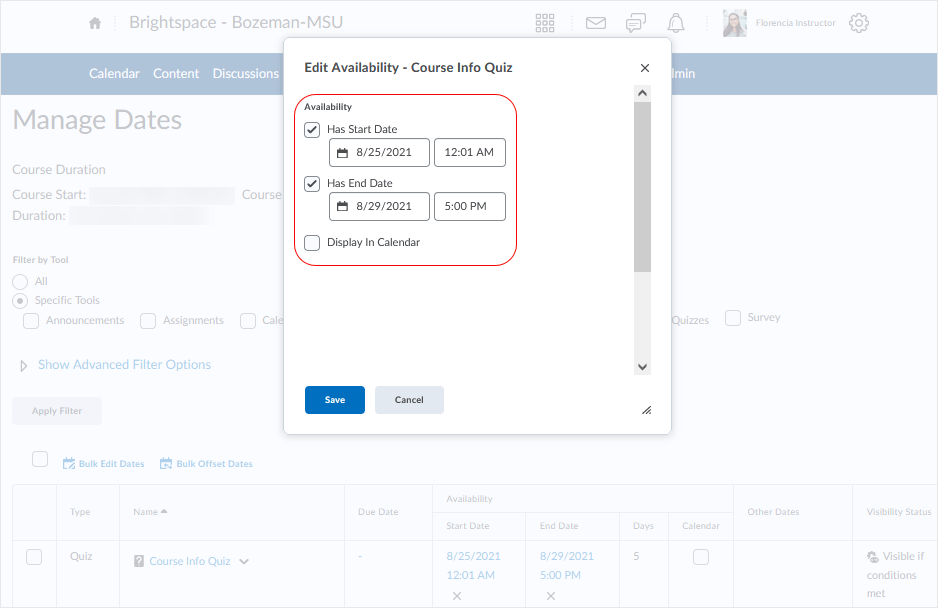
The "Edit Availability - XXXXXX" dialog box allows adjustment to the Start and End dates and Calendar visibility - select "Save" to apply the changes.
back to top of Edit Dates
back to top
Bulk Edit Dates
Dates can be adjusted for multiple objects by using the "Bulk Edit Dates" function.
Add dates specific to multiple objects via the "Enter Dates" function by entering dates/times in Due, Start, and End date availability areas where no dates/times currently display.
When using "Bulk Edit Dates" function, all selected objects will have the same created/adjusted date/time selections applied to all of the objects.
How to Bulk Edit Dates:
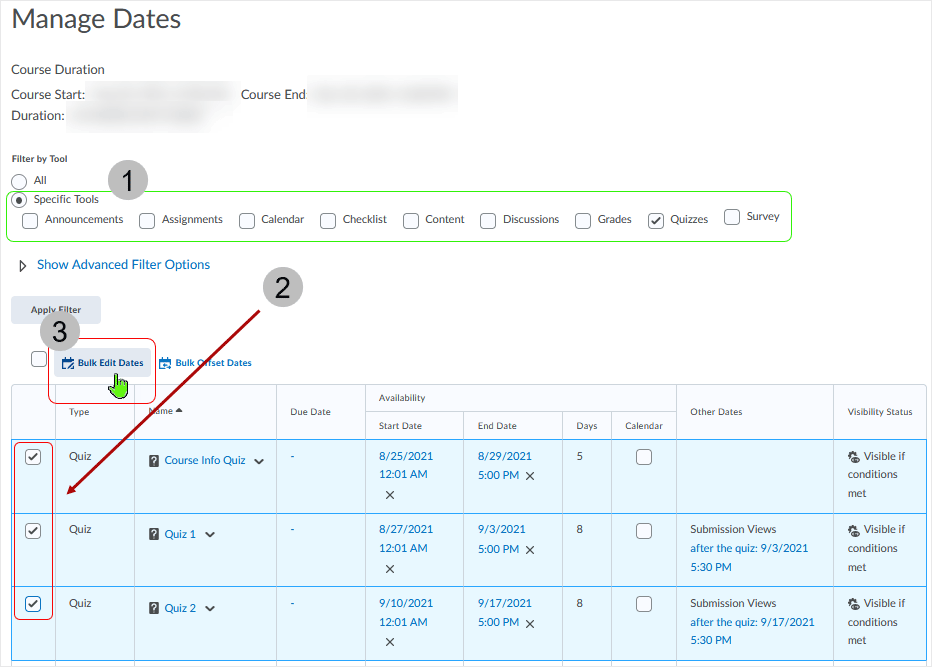
Selecting checkboxes associated with multiple items allows a date to be installed for all the items selected. Due Date, Start Date, and End Date can be adjusted.
- Select to isolate to a specific tool (or not) as necessary
- the filter is set to display "Quizzes" in this example
- Choose the objects to be adjusted by selecting the associated checkboxes
- Click on the "Bulk Edit Dates" button
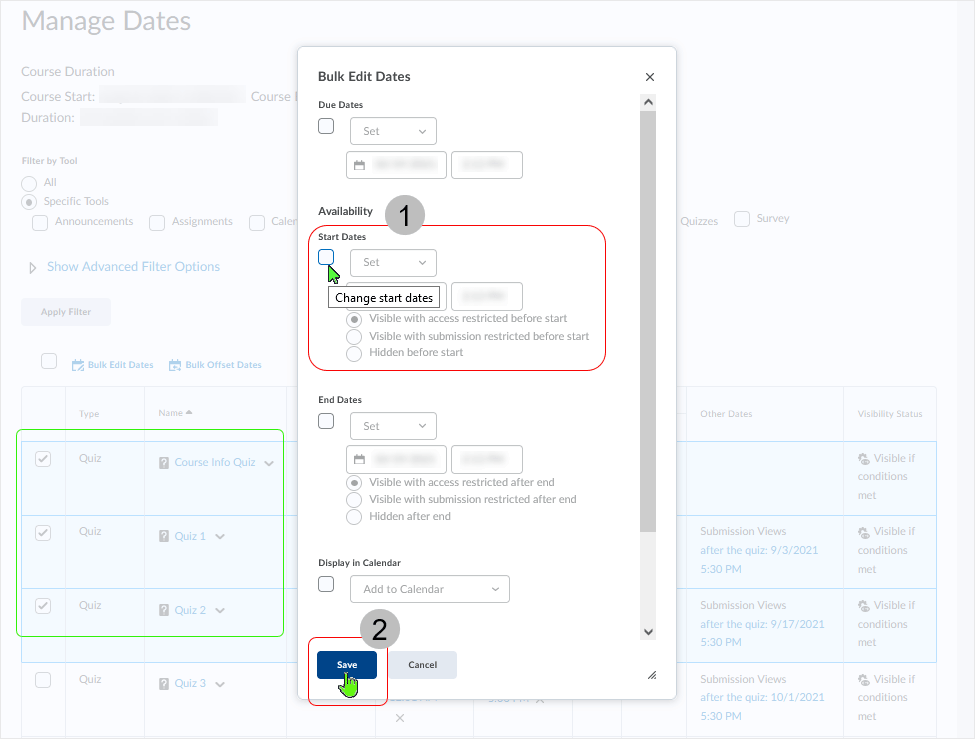
After selection of the "Bulk Edit Dates" button, the "Bulk Edit Dates" dialog box displays. Choose the date(s) to be adjusted.
- In this example, the "Start Dates" in the "Availability" area are to be changed
- After adjusting the date parameters, select "Save" to apply the changes
All selected objects will have the same created/adjusted date/time selections applied to all of the objects.
back to top of Edit Dates
back to top
Bulk Edit Dates: Availability Settings
Note that the availability settings visible when using the "Bulk Edit Dates" function display options for visibility and posting restrictions that are based on "Discussions" and "Assignments" restrictions settings.
These availability settings, when applied to something like a "Quizzes" object, do not actually function as described by the "Availability > Start Dates and End Dates" verbiage located on the "Bulk Edit Dates" dialog box. While the options are appropriate for "Discussions" and "Assignments" objects, the settings do not work for "Quizzes" objects.
For example, when working in the "Availability" area and adjusting "Start" and/or "End" dates, after selecting a range of quiz objects and selecting "Hidden before start" and/or "Hidden after end" specific to that series of quiz objects, the quizzes are not hidden/unhidden as described. The only object that these settings will function properly on is a "Discussions" or an "Assignments" object.
For most types of objects, "Availability" settings only reflect Due, Start, and End date general properties when selected.
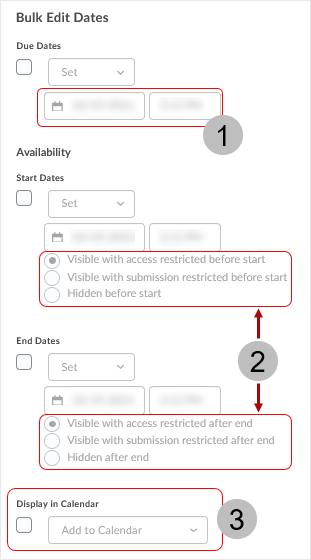
The "Bulk Edit Dates" dialog box display:
- The "Due Dates" section features a standard calendar and time selection method
- The "Availability" section features an enhanced selection area display control for
both the "Start Dates" and "End Dates" options
- "Visible with access restricted before start/after end"
- "Visible with submission restricted before start/after end"
- "Hidden Before start/after end"
- The "Display in Calendar" features "Add to Calendar" and "Remove from Calendar" selection drop menu
back to top of Edit Dates
back to top
Offset Dates
Existing dates/times can be adjusted for individual and/or multiple objects with the "Offset Dates" function.
"Offset Dates" can be used to move due, start, end and other dates/times forward or backward by a specified number of days/hours. This can be used to move course content forward to a new term.
Individual Offset Dates
Existing dates/times can be offset for individual objects.
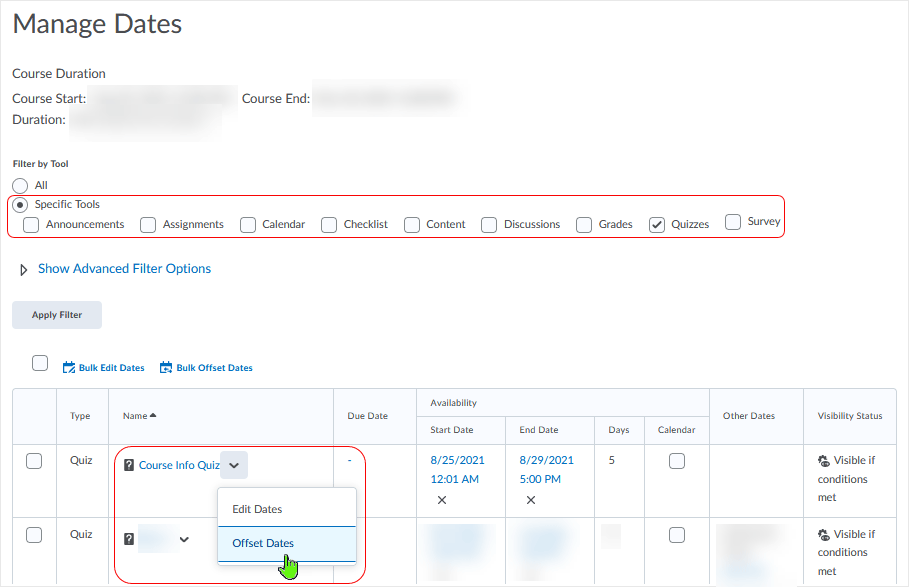
Selecting to individually offset dates for an object
Go into the "Manage Dates" area of a course.
Select to isolate to a specific tool (or not) as necessary. (The filter is set to display "Quizzes" in this example.)
Select the caret to the right of the item to be adjusted and select "Offset Dates" from the contextual menu.
- The "Bulk Offset Dates" dialog box displays.
- Select the "Dates to Offset" - all or individual.
- Choose the radio button associated with the type of offset to be performed.
- selecting the radio button expands the dialog box
- display of available variables is dependent on which radio button is selected
- "Save" is used to apply changes after variables are declared; "Cancel" to exit the area.

back to top of Individual Offset Dates
back to top
Offset date/hour ranges can be adjusted forward or backward as needed.
"Offset by direction and range" example:
- The "Course Info Quiz" is being adjusted
- via the contextual drop menu "Offset Dates" selection
- All date types are selected to be offset
- "Offset by direction and range" is the type of offset being applied - radio button selected
- The adjustment to the existing dates will be to move the dates "Forward" by 147 days
- "Forward" or "Backward" options available in the "Direction" drop menu
- no "Hours" adjustment is being made
- "Save" is selected

back to top of Individual Offset Dates
back to top
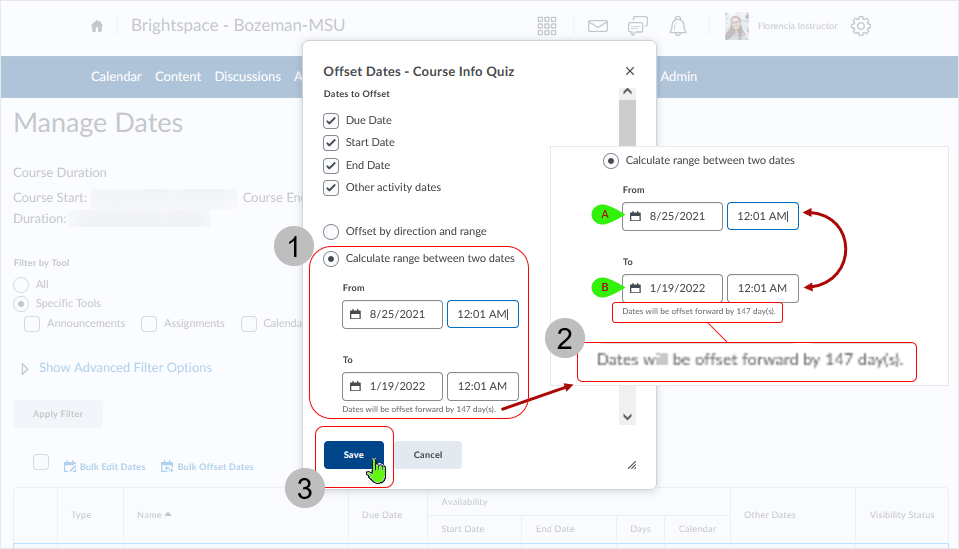
Automatically calculate the range between two dates.
"Calculate range between two dates" example - offset FORWARD:
- Select the "Calculate the range between two dates" radio button
- Enter the "From" and "To" dates and the system displays the amount of days/hours and
direction of offset
- EXAMPLE: first day of a Fall semester
- EXAMPLE: first day of a following Spring semester
- "Save" to apply the settings
- "Cancel" to exit the area
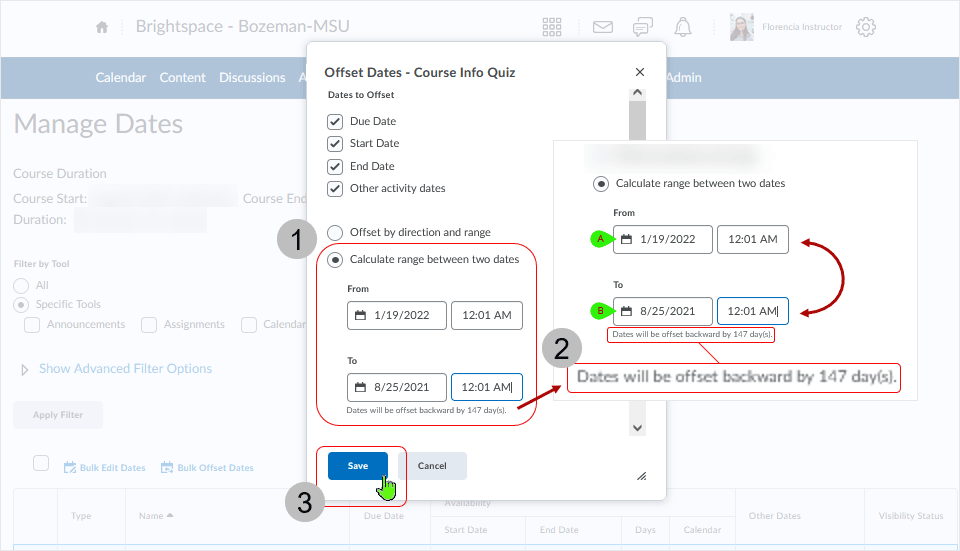
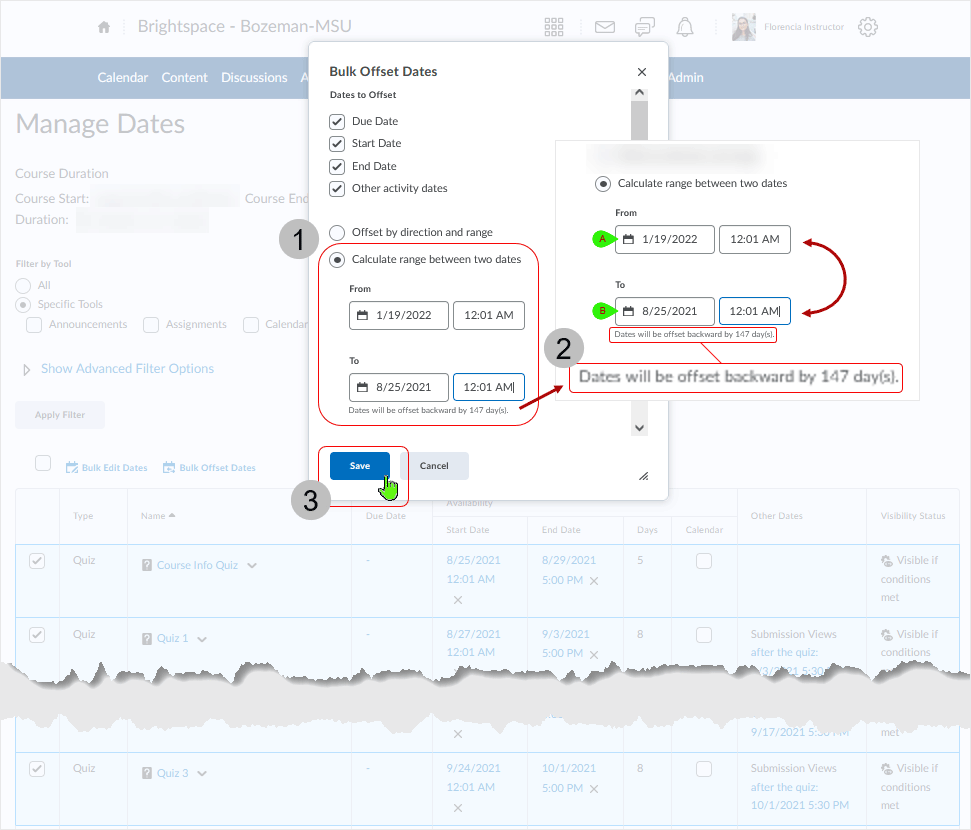
"Calculate range between two dates" example - offset BACKWARD:
- Select the "Calculate the range between two dates" radio button
- Enter the "From" and "To" dates and the system displays the amount of days/hours and
direction of offset
- enter date that is AFTER date B
- enter date that is BEFORE date A
- "Save" to apply the settings
- "Cancel" to exit the area
back to top of Individual Offset Dates
back to top
Individual Offset Dates Results
Dates have been adjusted. (Forward example displayed)
- "Course Info Quiz" is being adjusted
- Start and End Dates have been moved forward 147 days
back to top of Individual Offset Dates
back to top
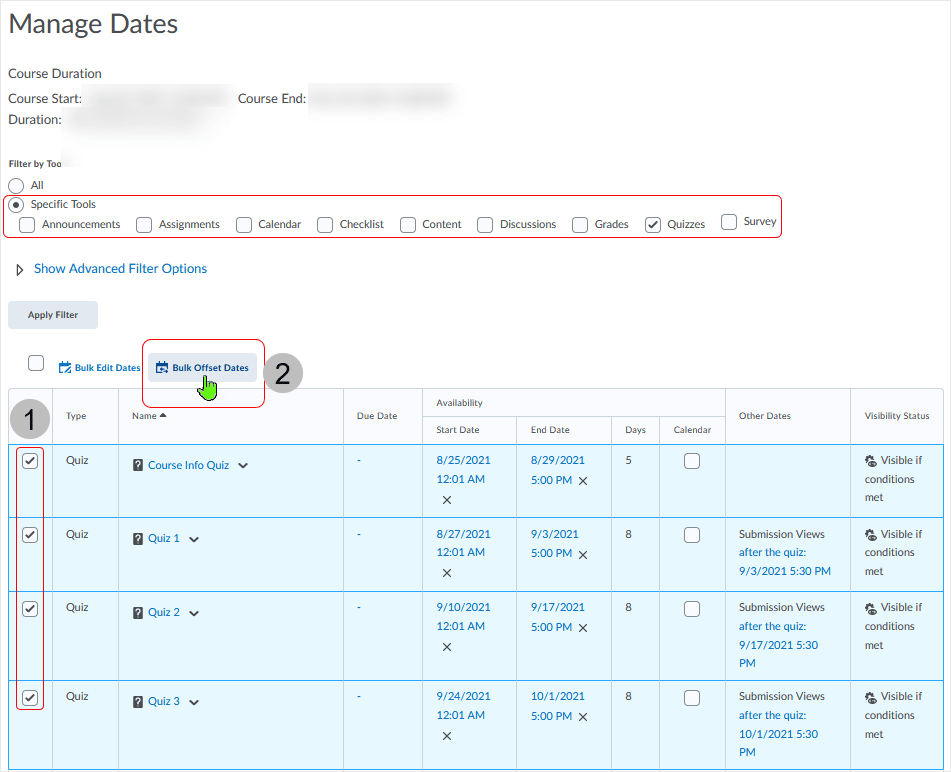
Bulk Offset Dates
Existing dates can be adjusted for multiple items by using the "Bulk Offset Dates" function.
"Offset by direction and range" option
In this example the Specific Tools" filter has been applied to show Quizzes.
- Select range of objects
- Select "Bulk Offset Dates" button
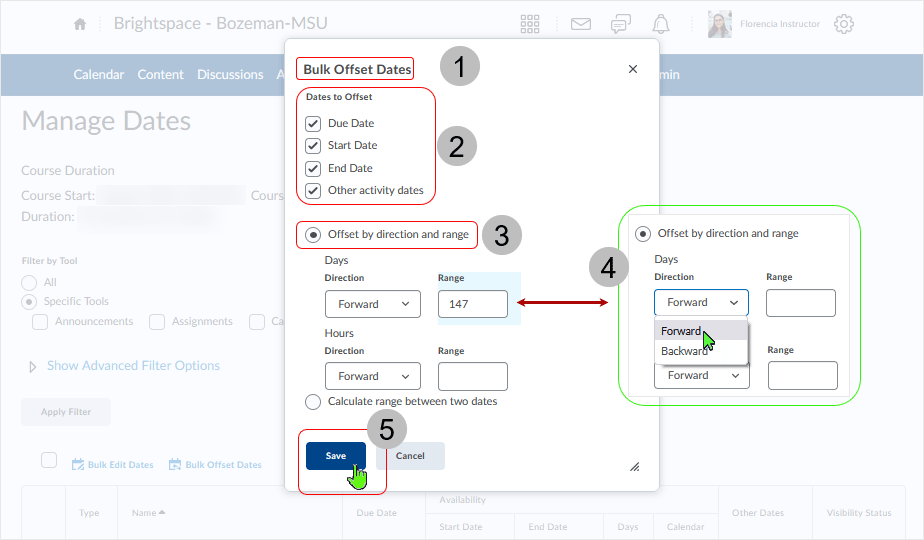
- The "Bulk Offset Dates" dialog box displays
- Select the "Dates to Offset" by clicking on a selection box to enable or disable the dates as desired
- Select the radio button for "Offset by direction and range"
- The adjustment to the existing dates will be to move the dates "Forward" by 147 days
- "Forward" or "Backward" options available in the "Direction" drop menu
- no "Hours" adjustment is being made
- "Save" to apply the settings
- "Cancel" to exit the area
back to top of Bulk Offset Dates
back to top
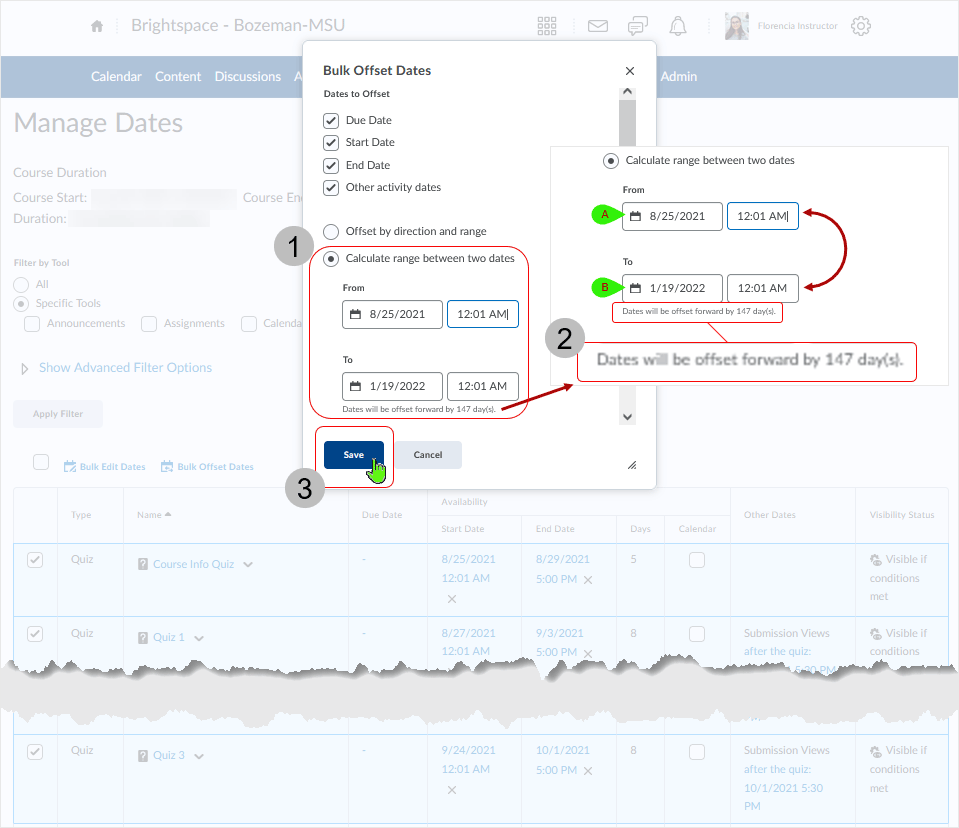
"Calculate range between two dates" option
The "Calculate range between two dates" option figures the offset range automatically.
After selecting checkboxes associated with multiple objects - offset FORWARD:
- Select the "Calculate the range between two dates" radio button
- Enter the "From" and "To" dates and the system displays the amount of days/hours and
direction of offset
- EXAMPLE: first day of a Fall semester
- EXAMPLE: first day of a following Spring semester
- "Save" to apply the settings
- "Cancel" to exit the area
After selecting checkboxes associated with multiple objects - offset BACKWARD:
- Select the "Calculate the range between two dates" radio button
- Enter the "From" and "To" dates and the system displays the amount of days/hours and
direction of offset
- enter date that is AFTER date B
- enter date that is BEFORE date A
- "Save" to apply the settings
- "Cancel" to exit the area
back to top of Bulk Offset Dates
back to top
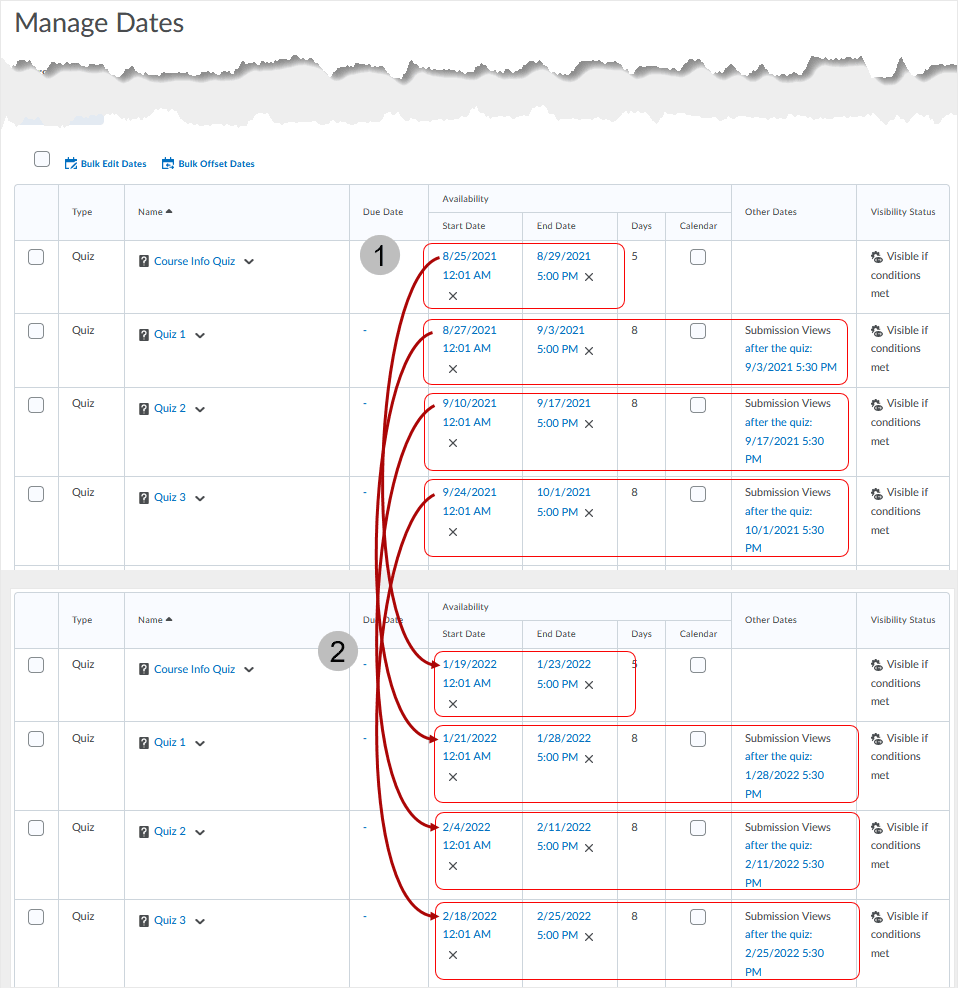
Results from "Bulk Offset Dates" function
- Multiple quiz objects have Start, End, Other Dates dates and times displayed
- After a "Bulk Offset Dates" function has been used ALL the related dates/times have
been adjusted to reflect new Start, End, and Other dates/times
- in this case dates have been moved forward 147 days
back to top of Bulk Offset Dates
back to top
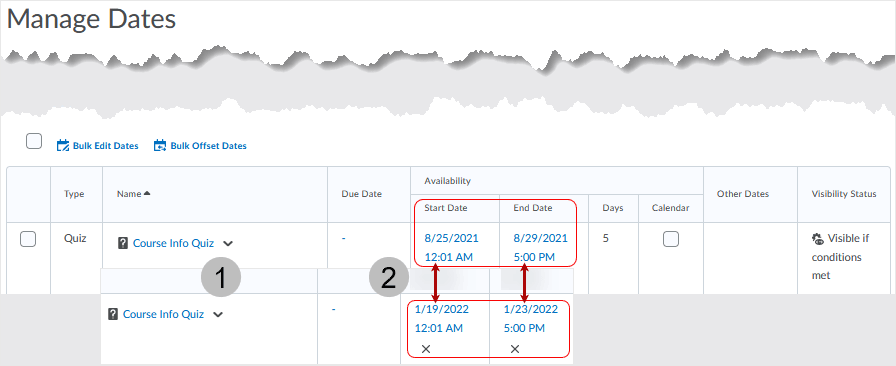
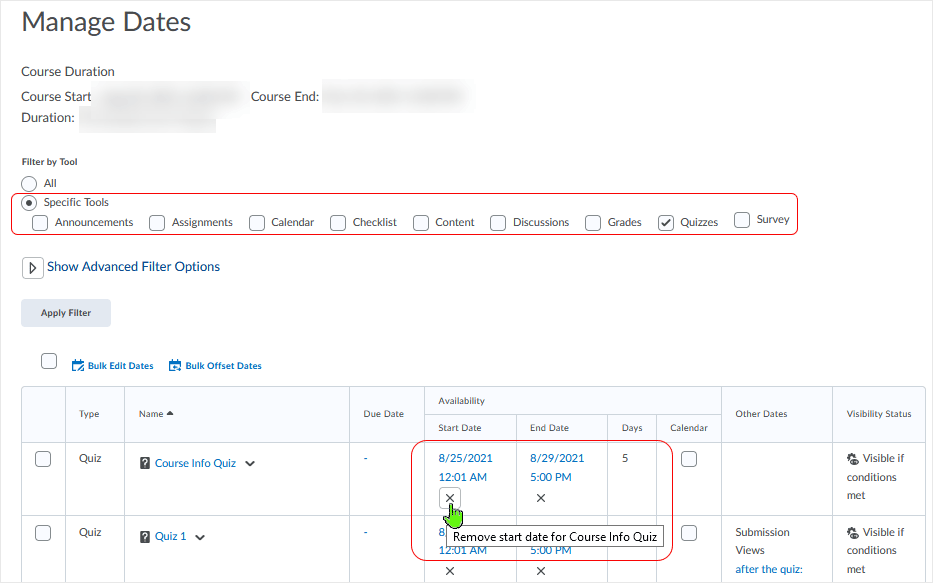
Remove Dates
Dates can be removed for individual items in the "Manage Dates" area.
Select the 'x' associated with an item's Due, Start, End, or Other date display and the date will immediately be removed.
back to top of Remove Dates
back to top
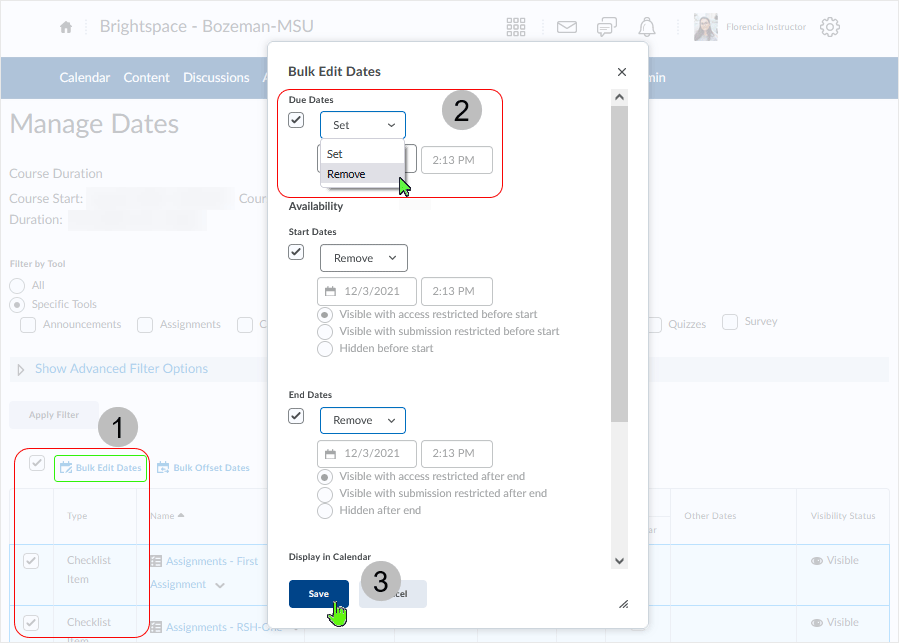
Dates can be removed for multiple items in the "Manage Dates" area.
Use "Bulk Edit Dates" to remove dates from a range of objects.
- Select checkboxes associated with the objects that need the date removed and select the "Bulk Edit Dates" button
- From the "Bulk Edit Dates" dialog box, select "Remove" from the "Set" drop menu
- do this for all dates that are to be removed
- Select "Save" to apply the adjustment
back to top of Remove Dates
back to top
Other Access
The "Manage Dates" functionality is also accessible when using the "Copy Components from another Org Unit" to copy content from one course to another. This functionality is available during the "Confirm Components to Copy" portion of the process.
Example:
When in a course, select "Import/Export/Copy Components" from the "Admin Tools" located in the upper right of a course homepage.
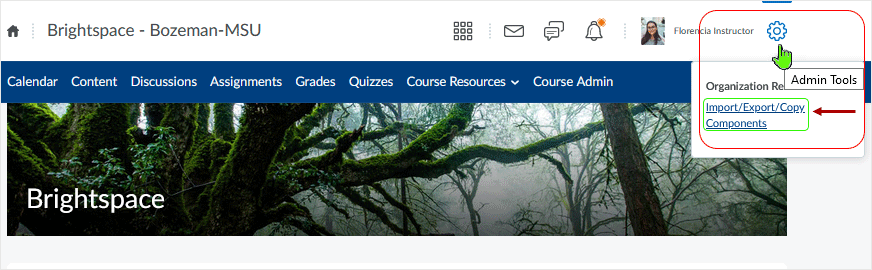
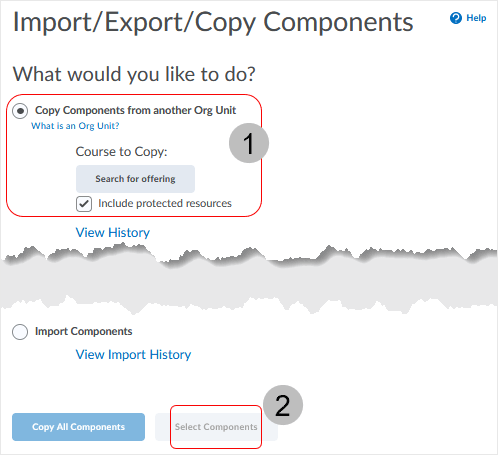
- Select the "Copy Components from another Org Unit" radio button
- use "Search for offering" to put the course in place from which to transfer components
- Use the "Select Components" functionality by selecting the button after the course to be copied from is in place
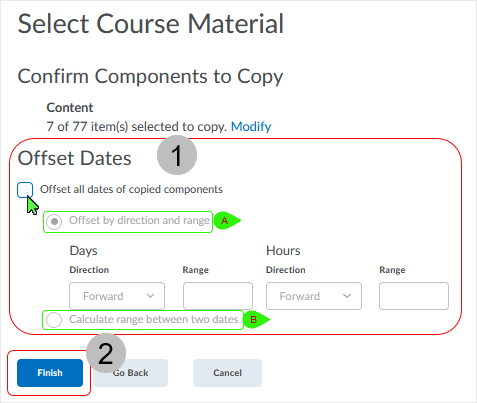
At the "Select Course Material > Confirm Components to Copy" area:
- Select to "Offset Dates"
- offset by direction and range
- calculate range between two dates
- Select "Finish" to copy the components and apply any offset as necessary
Links will open in a new tab or window dependent on browser/OS configuration.What dialog boxes look like and how dialog boxes and browsers interact is dependent upon the operating system and browser being used. The screenshots in this tutorial may differ from the screen that the user is viewing when performing actions described.
CD 202303