
Media Library
Media Library holds all media files that have been uploaded as topics (Content area) or created in the Brightspace system (Video Notes and/or audio recordings). The media is then available for use as content topics or quicklinks via the Media Library.
Using Media Library
Media Library is accessible by navigating to "Content > Module > Existing Activities > Media Library" or by inserting Quicklink(s) when working in the HTML Editor.
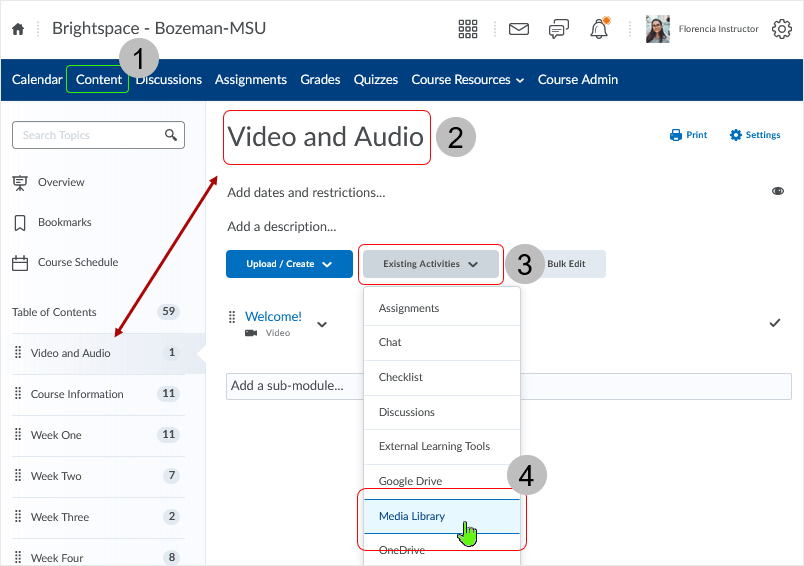
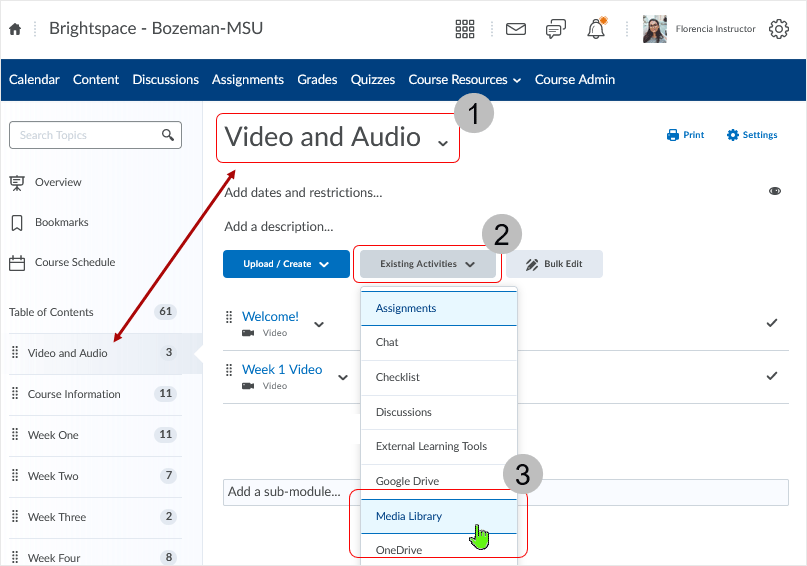
Content area: use Media Library to access and place available media.
- In a course, select to access the "Content" area.
- Select a module to work in.
- In this example, "Video and Audio" is the module's title.
- Select the "Existing Activities" drop menu.
- Select "Media Library" option.
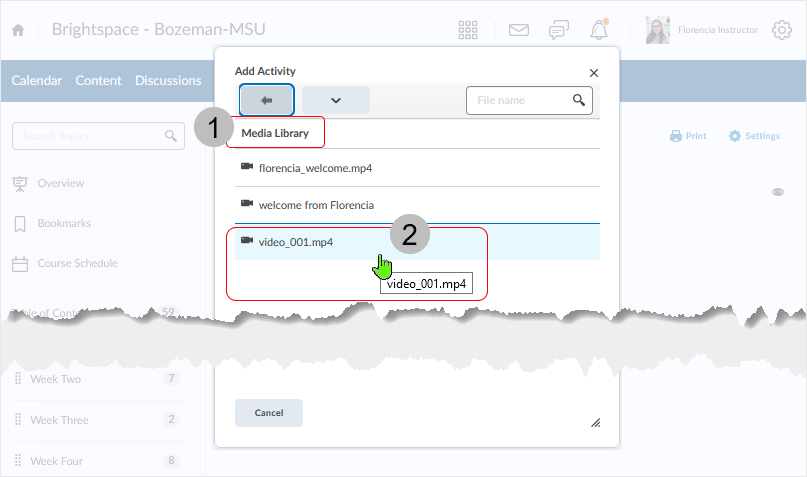
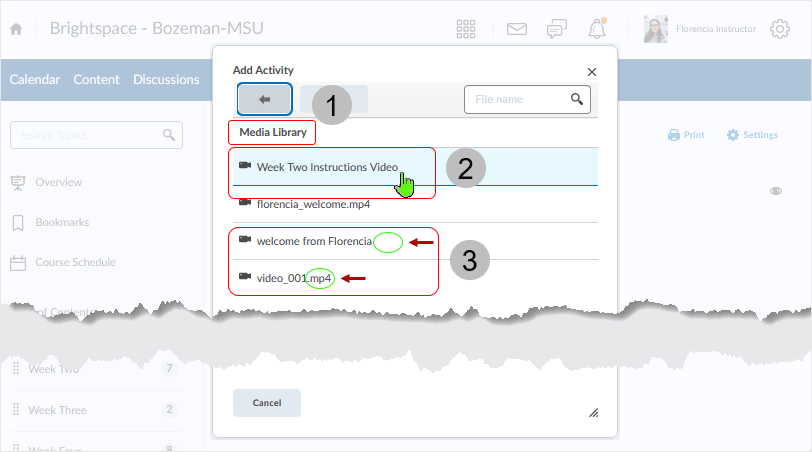
Select the media to add as a topic into the content module.
- The "Add Activity > Media Library" dialog box displays.
- A media file is chosen from available media.
- In this example, "video_001.mp4" is a file that exists in the course.
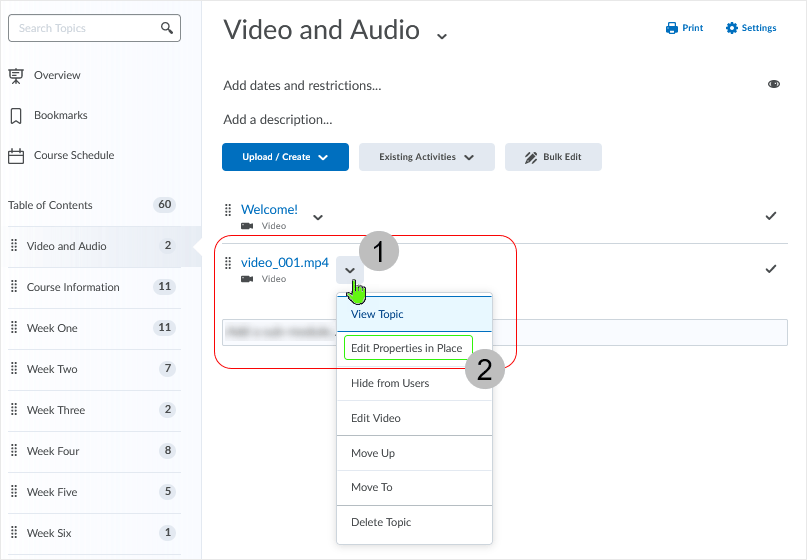
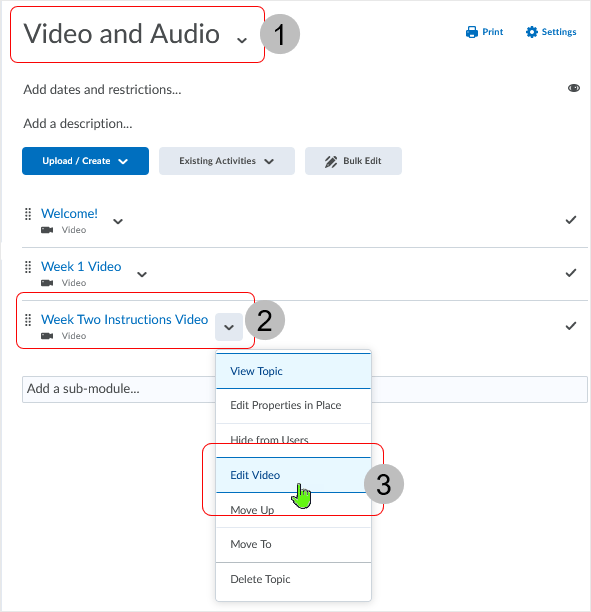
After placement of the topic, adjust as necessary.
- Select the action caret to the right of the media to access topic editing functions.
- The name of a media file displays as topic title.
- In this example, "Edit Properties in Place" is selected to allow the changes to the title of the topic.
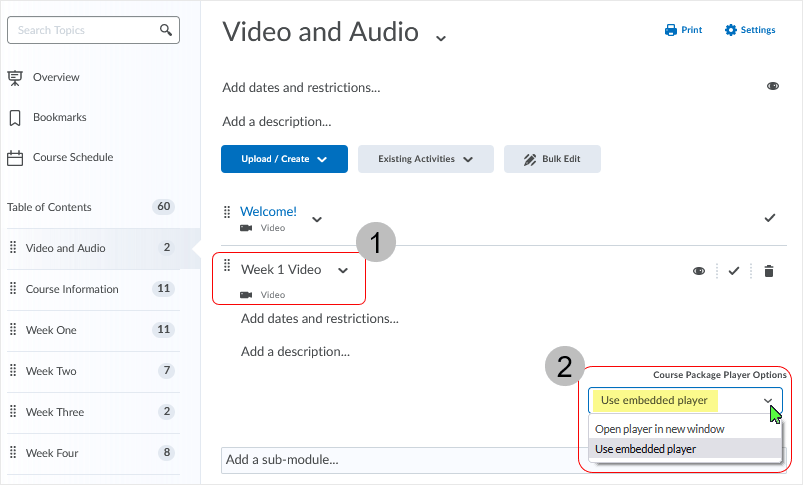
After title has been edited. Use the "Use embedded player" selection.
- After editing, "Week 1 Video" is now the title for the topic.
- Select "Use embedded player" from the "Course Package Player Options" area.
Note: The "Open player in a new window" option is only meant for SCORM objects and will not work with a video or audio topic.
back to top
back to top of using Media Library
Quicklink: use Media Library to access and place available media.
Use the HTML Editor in the system to access the "Insert Quicklink" function. The HTML Editor is available anywhere that written communication occurs in the system.
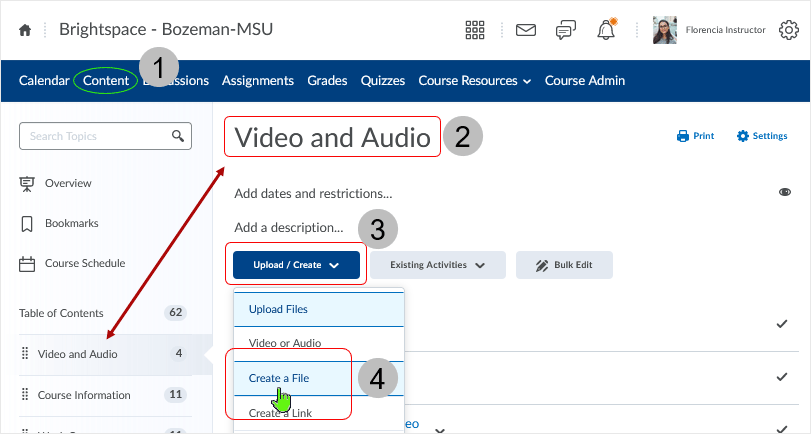
In this example, an html file is created as a topic in a content module.
- In a course, select to access the "Content" area.
- Select a module to work in.
- In this example, "Video and Audio" is the module's title.
- Select the "Upload/Create" button to access the drop menu.
- Select "Create a File" option from the contextual menu.
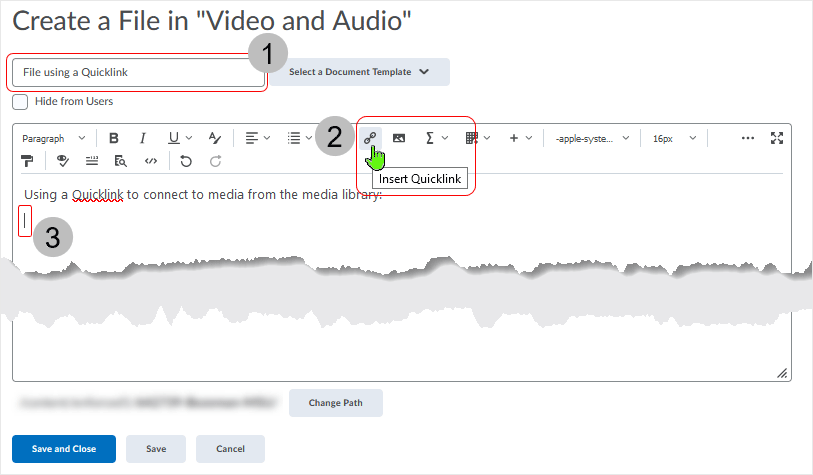
Create a file as a topic in a module.
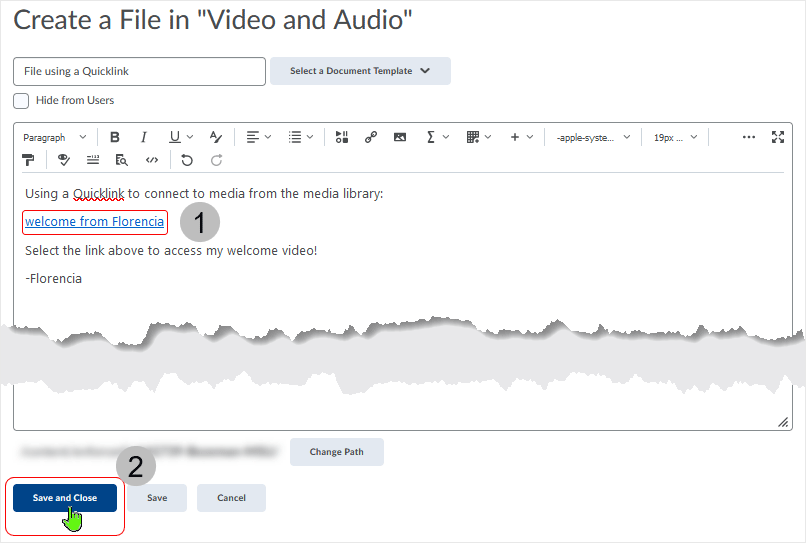
- Give the file a title.
- "File using a Quicklink" is the title of this file.
- Select the "Insert Quicklink" icon when ready to insert a quicklink.
- Wherever the cursor is located, the quicklink will be automatically inserted.
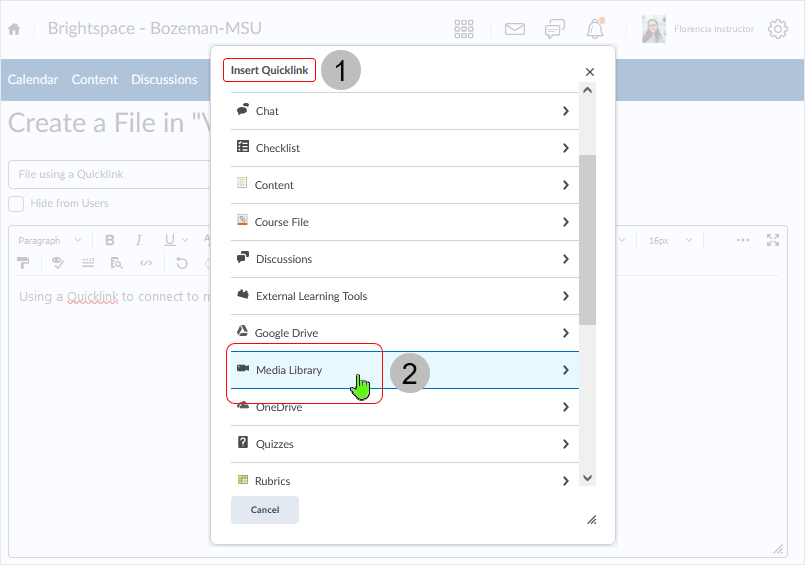
After selecting the "Insert Quicklink" icon, select the quicklink type to be inserted.
- The "Insert Quicklink" dialog page displays.
- Select "Media Library" to insert media from the Media Library.
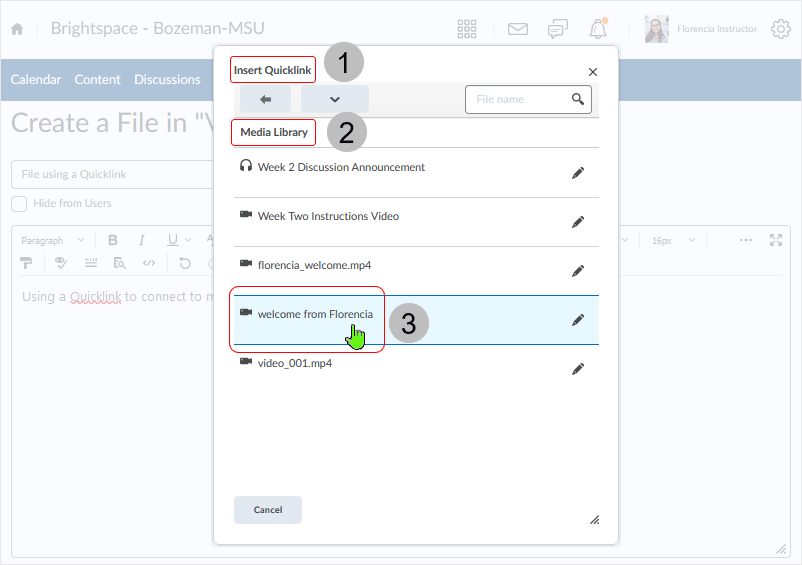
Select the media to add as a Quicklink to the html document.
- The "Insert Quicklink" dialog box continues to display.
- Selectable "Media Library" files are visible.
- A media file is chosen from available media.
- In this example, a Video Note video "welcome from Florencia" is selected.
- "Target: Same Frame" is the default media display if no other "Options" are selected.
- Note: Selecting the pencil to the right of the media title gives "Options" related
to the media:
- adjust the "Title" of the media
- adjust the "Target" of media display
- Whole Window; Same Frame; New Window
The Quicklink displays in the html document after it has been inserted successfully.
- The media title displays in the body of the html document.
- "welcome from Florencia" is the media's title.
- The file link displays at the point of insertion which is determined by cursor positioning.
- Note that adjustments can be made to the link title both by editing the media's title and/or adjusting "Options" related to the title and display during the "Insert Quicklink" process.
- Select "Save and Close" to create the file.
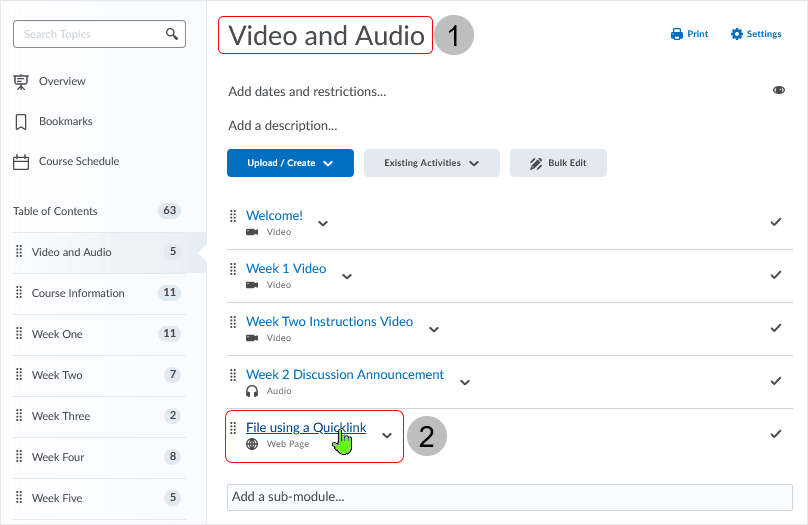
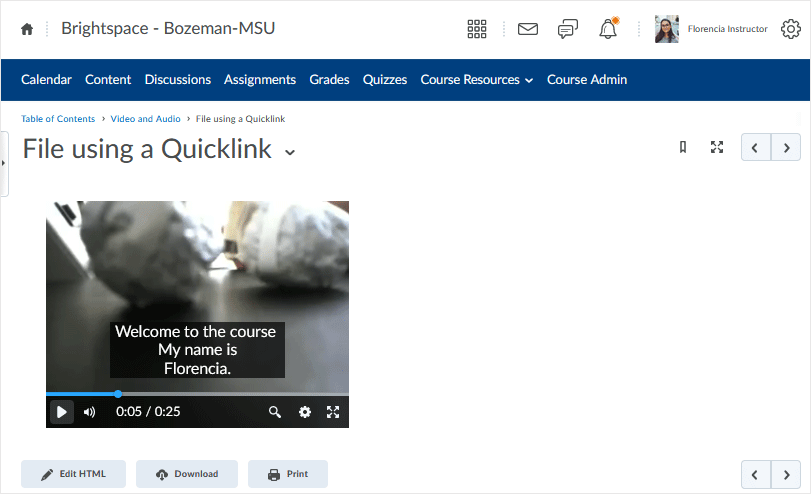
The file appears as a topic in the content module.
- In this example, "Video and Audio" is the content module.
- Select the topic.
- In this example, "File using a Quicklink" is the topic's title.
- Note: The topic is identified as a "Web Page" and displays the corresponding icon.
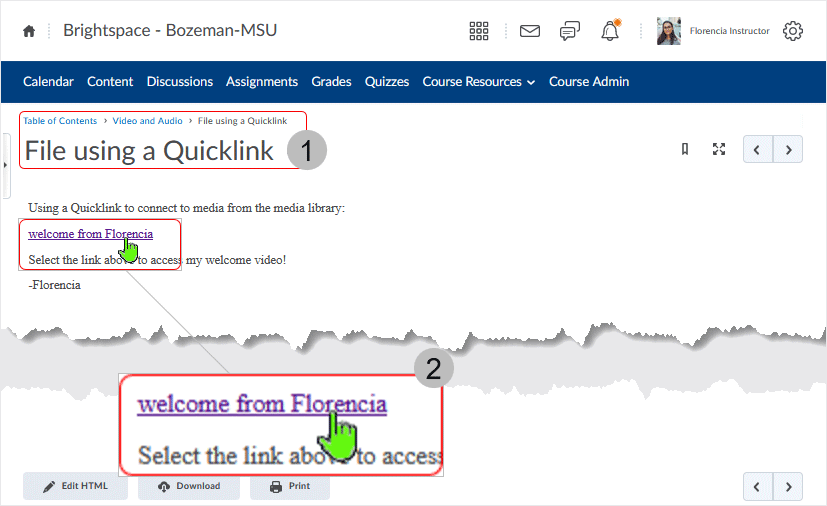
After selecting the topic from within the module.
- The topic displays.
- In this example, "File using a Quicklink" is the topic title.
- Breadcrumbs listed above the title show the path.
- The quicklink can be selected from the file.
- In this example, "welcome from Florencia" is the link title.
After selecting the quicklink from within the topic web page the media displays.
How the media displays (same page or new tab) is determined by any "Options" selected when the Quicklink is inserted.
"Target: Same Frame" is the default media display if no other "Options" are selected.
A play button is selectable to play the video media.
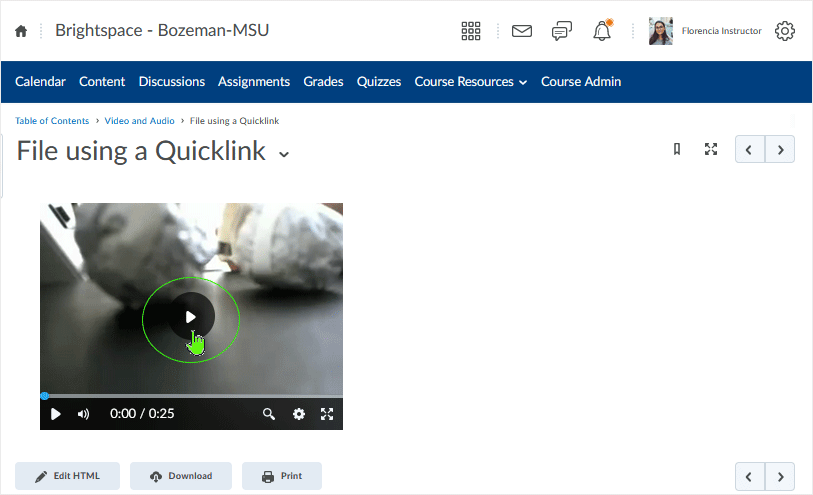
After selecting the play button the video plays.
The "gear" icon (lower right) gives access to various media play functionality such as 'cc' functions and media playback speed.
back to top
back to top of using Media Library
Video Note, Audio and Media Library
When Video Note videos and/or audio recordings are created in the system, the video/audio media appear in the Media Library as well as in the area where the video or audio media is initially created.
Video editing and limited audio editing capabilities are available. Video editing includes captioning/auto-captioning, clipping, and chapter creation. Audio editing includes captioning/auto-captioning.
Video Note
Video Note is available in the system to record videos. After a video is recorded using Video Note, the recorded video appears in the Media Library as well as in the area where the video was recorded.
Go to a content module to access a Video Note recording from the Media Library.
- Select a Content module from the left navigation area. The content module is then
displayed in the middle of the page.
- In this case, "Video and Audio" is the name of the content module.
- Select the "Existing Activities" button.
- Select "Media Library" from the contextual menu.
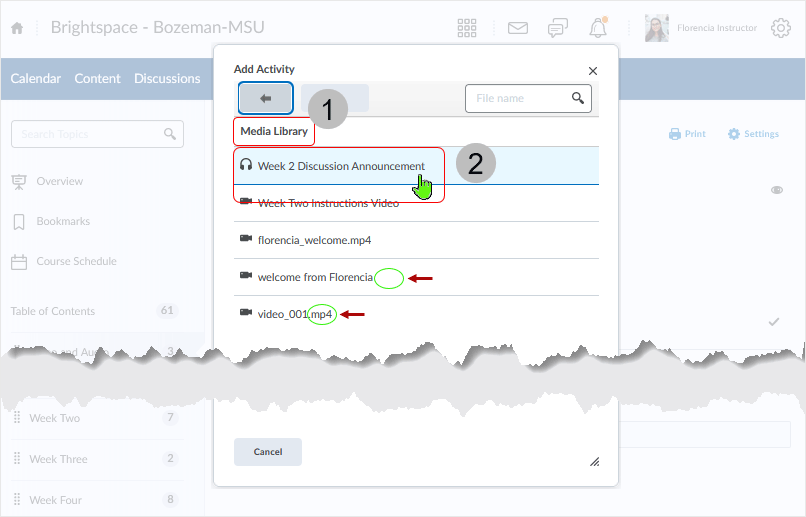
Access and select a file from the Media Library.
Video Note media does not have an extension associated with the video file name. Uploaded video media does have an extension associated with it, typically an .mp4 extension is visible.
- In the "Media Library" section of the "Add Activity" area.
- A Video Note named "Week Two Instructions Video" is selected.
- About media identification in "Media Library" area.
- Video media is identified with a "camera" icon.
- Video Note media is identified in "Media Library" with no extension ("welcome from Florencia" - below).
- Video media that has been uploaded will have an extension (video_001.mp4 - below).
The media added from the Media Library is visible as a topic in the content module.
- In the content module.
- In this case, "Video and Audio" is the name of the content module.
- If editing the media is to take place, select the action caret to the right of the media title.
- Select "Edit Video" to access the video.
Use "Advanced Edit" to edit the media.
- In the "Update Video or Audio" dialogue box, the title displays.
- Select "Advanced Editing" to access the advanced editing area.
- After editing has occurred, select the "Update" button to update the edited media.
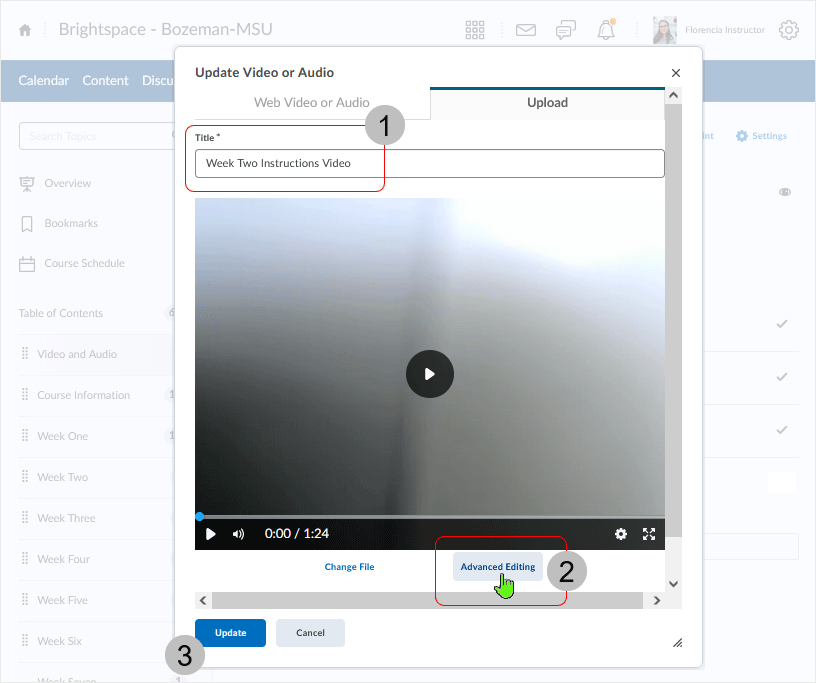
Select this link to access information about the "Advanced Editing" tools dialog box. (will open in a new window or tab dependent on browser settings)
back to top
back to top of Video Note and Audio
Audio
Audio recording is available in the system. After audio is recorded using the audio recorder, the recorded audio appears in the Media Library as well as in the area where the audio was recorded.
Access an audio file from the Media Library.
- In the "Media Library" section of the "Add Activity" area.
- An audio file named "Week Two Discussion Announcement" is selected.
- Audio media is identified with a "headphone" icon.
Audio media does not have an extension associated with the recording's file name.
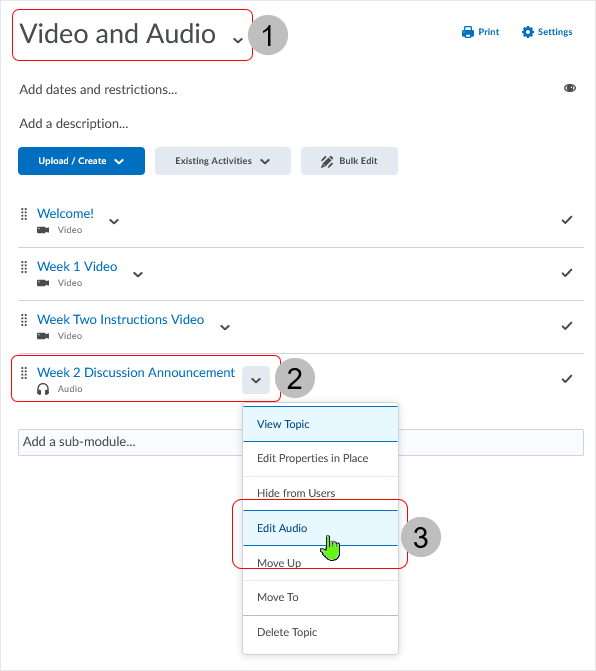
The media added from the Media Library is visible as a topic in the content module.
- In the content module.
- In this case, "Video and Audio" is the name of the content module.
- If editing the media is to take place, select the action caret to the right of the media title.
- Select "Edit Audio" to access the audio recording.
After "Edit Audio" is selected, users edit after accessing the "Advanced Editing" area via the "Update Video or Audio" page.
- The title of the audio recording displays.
- In this example, "Week 2 Discussion Announcement" title is visible.
- Select the "Advanced Editing" button at the bottom of the audio image to get to the "Advanced Editing" controls.

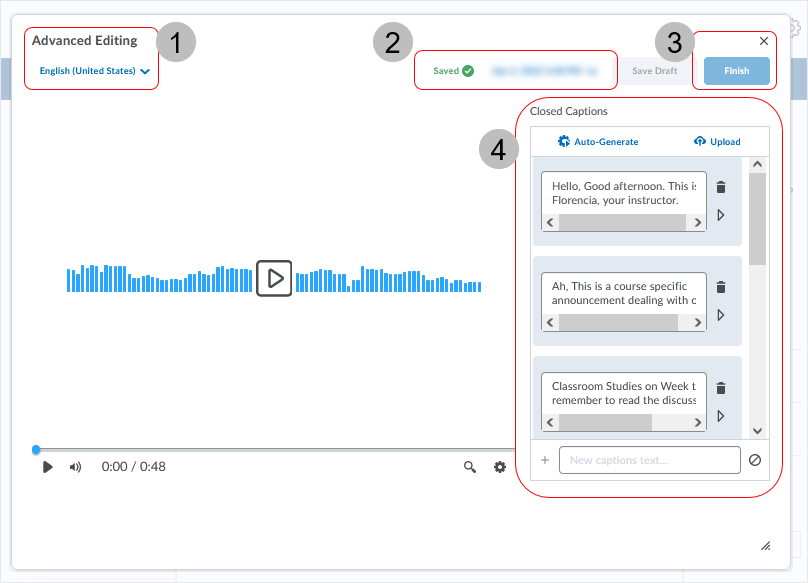
The "Advanced Editing" dialog box contains the available editing tools.
- "Advanced Editing" name displays. Under the name, a drop menu contains language selections.
- The "Saved" status is followed by the date of the save.
- From the "date of the save" area:
- Utilize Versions and Drafts to roll back to earlier versions and revisit previous edits.
- The latest Saved version appears wherever the file is used within Brightspace.
- From the "date of the save" area:
- "Save Draft" and "Finish" buttons are actionable only after editing has been initiated.
- Use the "X" to close the page if editing has been completed or if no editing has occurred.
- The "Closed Captions" tab displays closed caption information related to the audio.
- Can be adjusted as necessary.
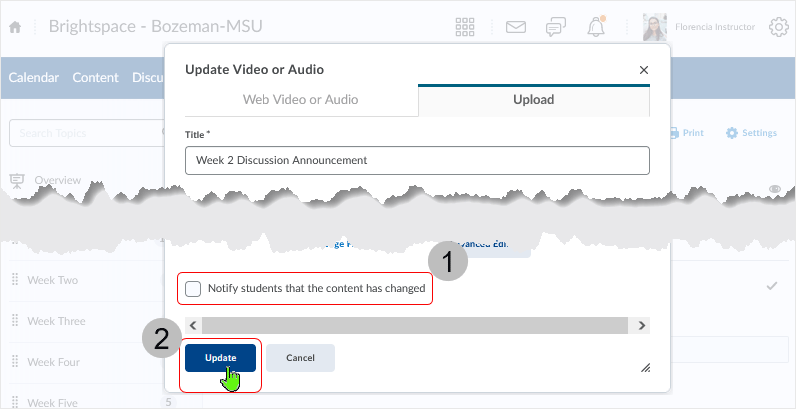
After the audio has been edited.
- If the audio has changed substantially, users can select the "Notify students that the content has changed" checkbox to notify students of the change.
- Select "Update" to save the changes to the topic.
back to top
back to top of Video Note and Audio
Video Note and Audio recording access points in the system
There are various areas in Brightspace where the ability to record Video Note media and Audio media is available. There are different looks dependent on the area that the user is in.
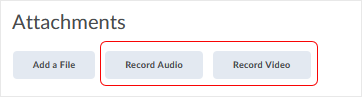
Announcements
Found in the Attachments area. Select either the "Record Audio" or "Record Video" button.
Assignments
When creating a new assignment, the "Record Audio" or "Record Video" display below the main edit page.
This same panel displays below the "Overall Feedback" area when evaluating a submission.

Discussions
Found in the Attachments area. Selecting the "Record" button makes available a Video or Audio contextual menu. Click on the selection to get into the recording phase related to the selection.

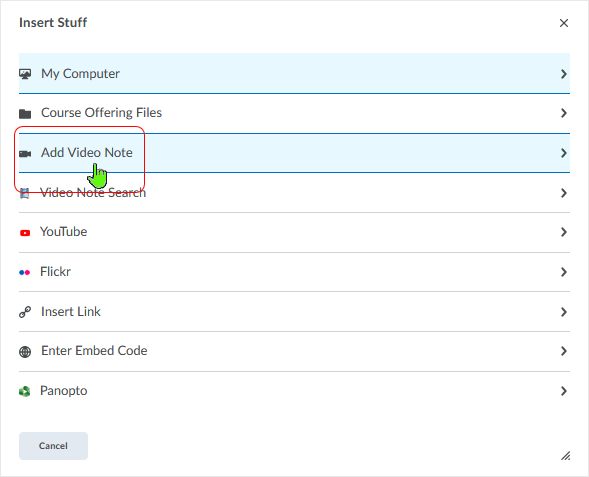
Insert Stuff
"Insert Stuff" is an icon available in the HTML Editor wherever it appears in the system
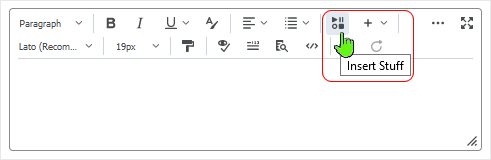
Use "Add Video Note" to record Video Note media inside a communication or created file inside Brightspace.
back to top
back to top of Video Note and Audio
Upload and Edit a Video
Videos can be uploaded and edited in a course when using the Content area, Video editing capabilities include auto-captioning, clipping, chapters, and caption editing.
Note: Videos store and play similarly to Video Note. Videos are automatically converted to playable formats by the system and streamed.
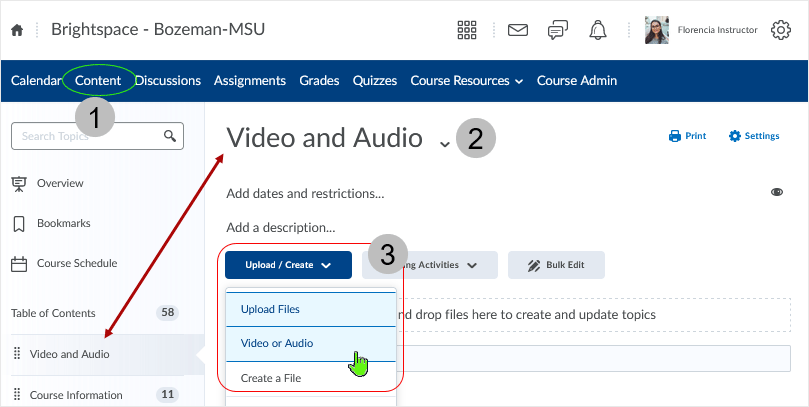
Select "Video or Audio" from the "Upload/Create" area in a module.
- In the Content area of a course.
- While working in a module.
- Select the module from the left navigation bar to work in it.
- "Video and Audio" is the name of this example module.
- Selecting the "Upload/Create" button gives a drop menu - select "Video or Audio" from the menu to add media to the module.
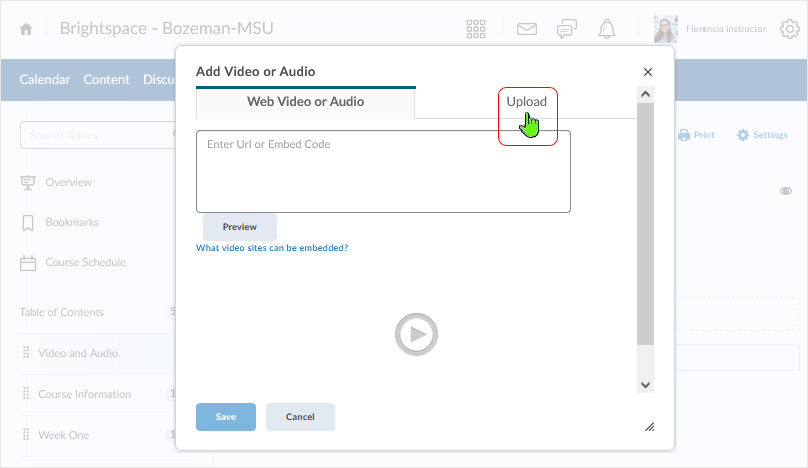
When choosing to work with previously created media.
To create a topic in a module using previously created media that exists on a local device, select the "Upload" tab to make it active.
- The "Web Video or Audio" tab allows users to Enter URL or Embed Code to associate media in a topic.
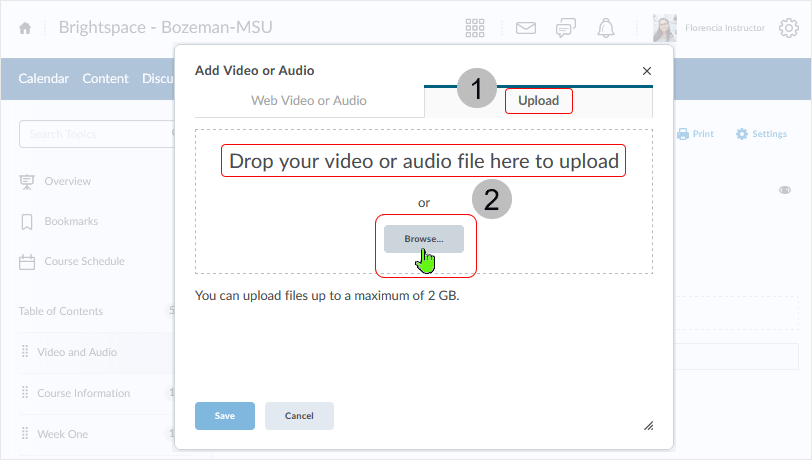
Uploading previously created media into a content module.
- The "Upload" tab is active after it has been selected.
- Select "Drop your video..." or "Browse" to put the media in place.
- In this example, "Browse" is being used.
- Selecting "Browse" opens a dialog box to facilitate navigating to and selecting media.
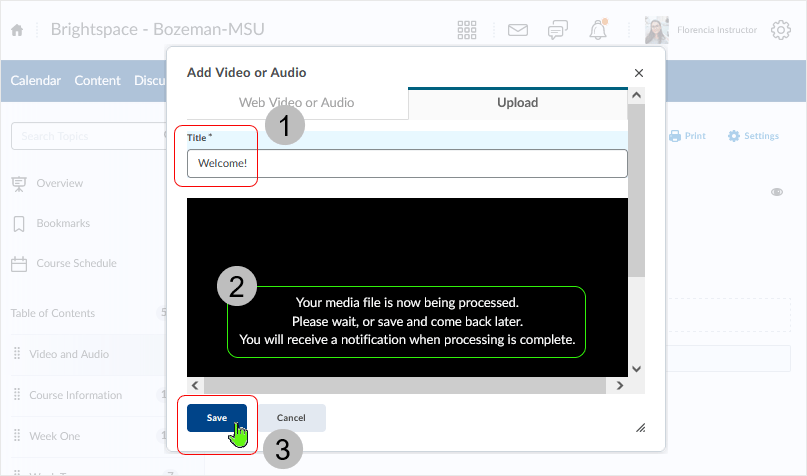
Title and Save the uploaded media.
- After the media has been uploaded, enter a title for the media.
- The media will be processed by the system.
- Wait for processing to complete or move on.
- Larger files equal longer processing times.
- Select "Save" for the media to be associated in the content module.
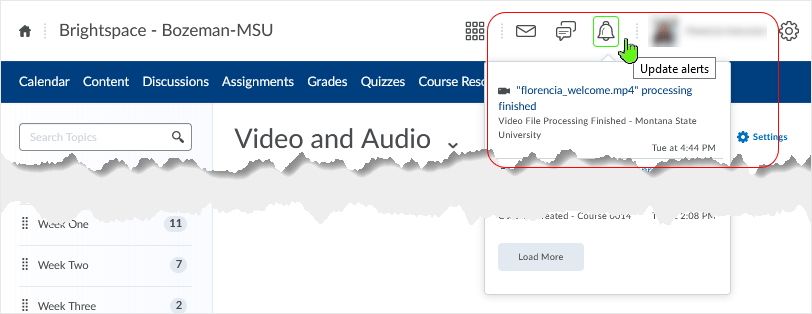
The system alerts after processing completes.
After processing has completed, the "Update alerts" area indicates with a time-stamped message.
- An orange dot associated with the bell icon indicates at a glance when an alert is available.
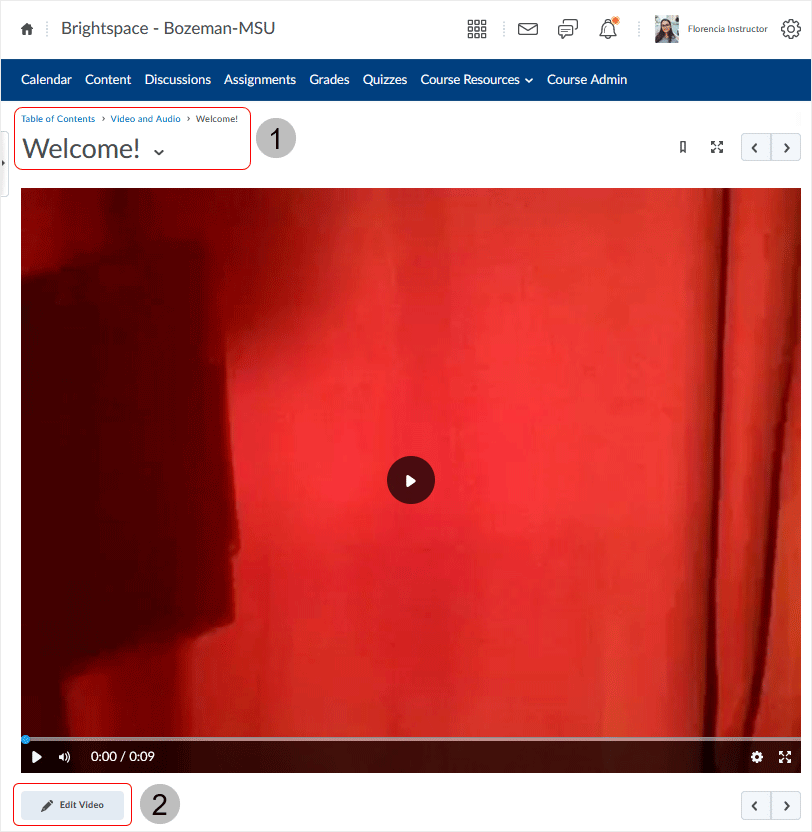
The processed media appears in the module in the "Table of Contents" area.
- The title of the media appears and, after processing is complete, the media appears.
- Breadcrumbs display above the media title and video display.
- An action caret associated with the topic is visible to the right of the media title.
- The video has a "play" button accessible.
- An "Edit Video" button appears at the bottom of the display.
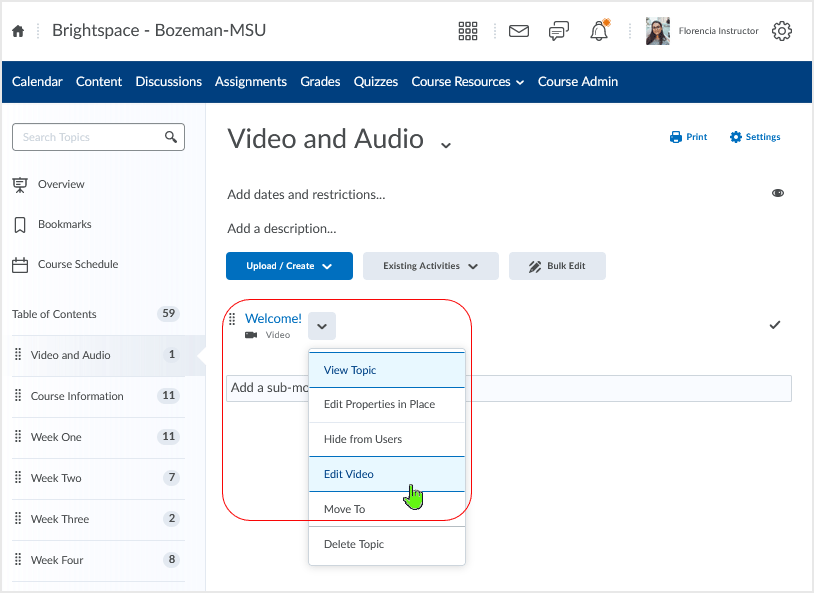
Users can also use the action caret associated with the topic to access "Edit Video" controls.
To the right of the title of the media, a contextual menu with "Edit Video" selection displays after selecting the action caret.
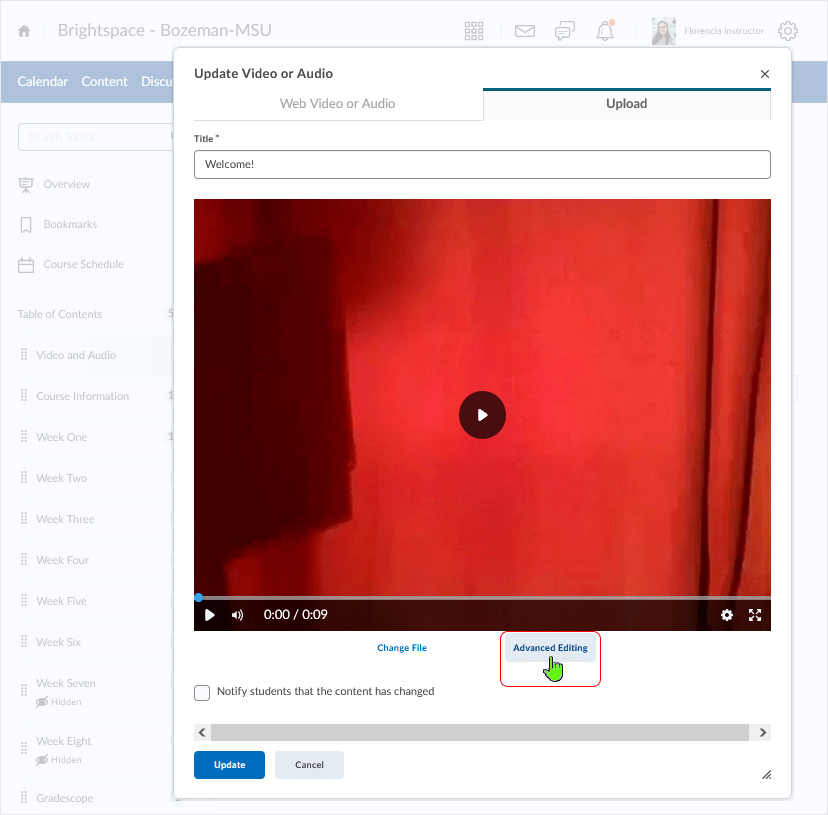
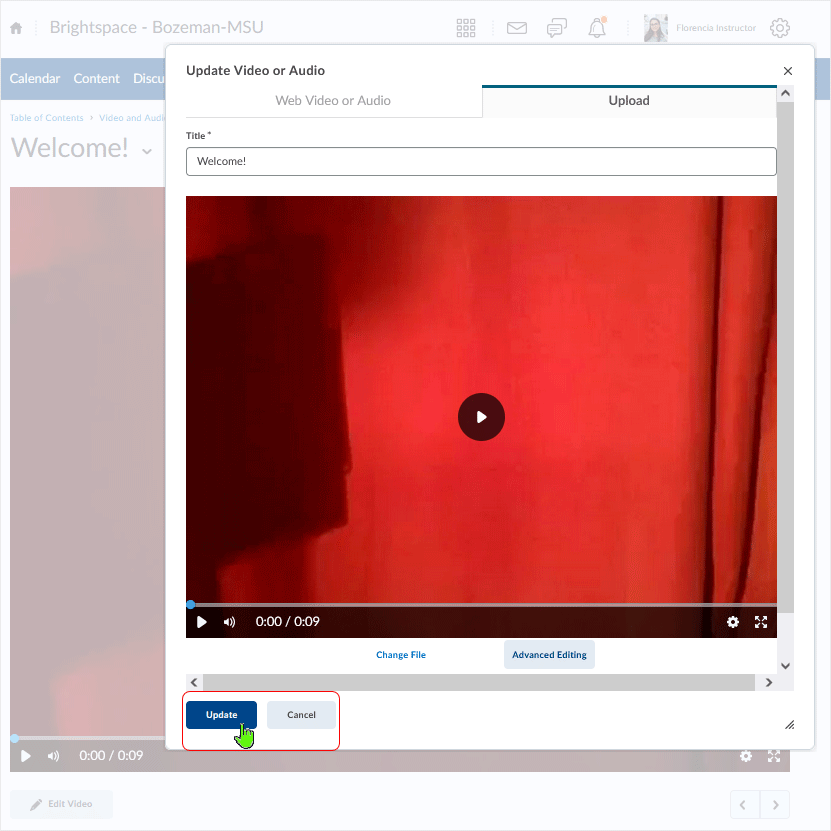
After selecting the "Edit Video" (in any instance) an "Update Video or Audio" page displays.
Select the "Advanced Editing" button at the bottom of the image to get to the "Advanced Editing" controls.
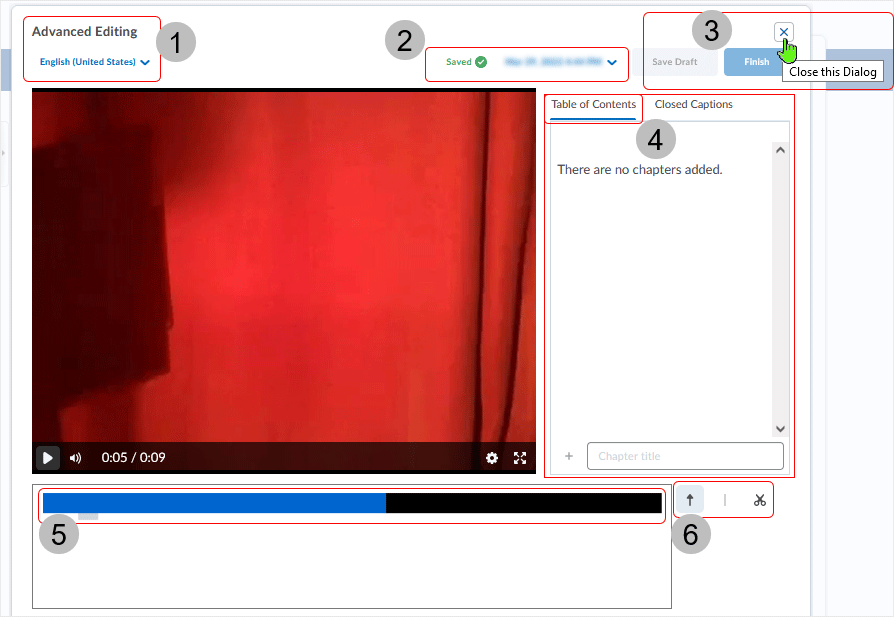
"Advanced Editing" dialog box related to Video editing
The "Advanced Editing" dialog box contains the available editing tools.
- "Advanced Editing" name displays. Under the name, a drop menu contains language selections.
- The "Saved" status is followed by the date of the save.
- From the "date of the save" area:
- Utilize Versions and Drafts to roll back to earlier versions and revisit previous edits.
- The latest Saved version appears wherever the file is used within Brightspace.
- From the "date of the save" area:
- "Save Draft" and "Finish" buttons are actionable only after editing has been initiated.
- Use the "X" to close the page after editing has been completed.
- The "Table of Contents" tab displays chapter information related to the video.
- When chapters are added, the titles and timings display in this area.
- The bar that represents the timeline of the video displays.
- The "blue" portion indicates where the video is paused at.
- "Seek"; "Mark"; and "Cut" are available timeline operation tools.
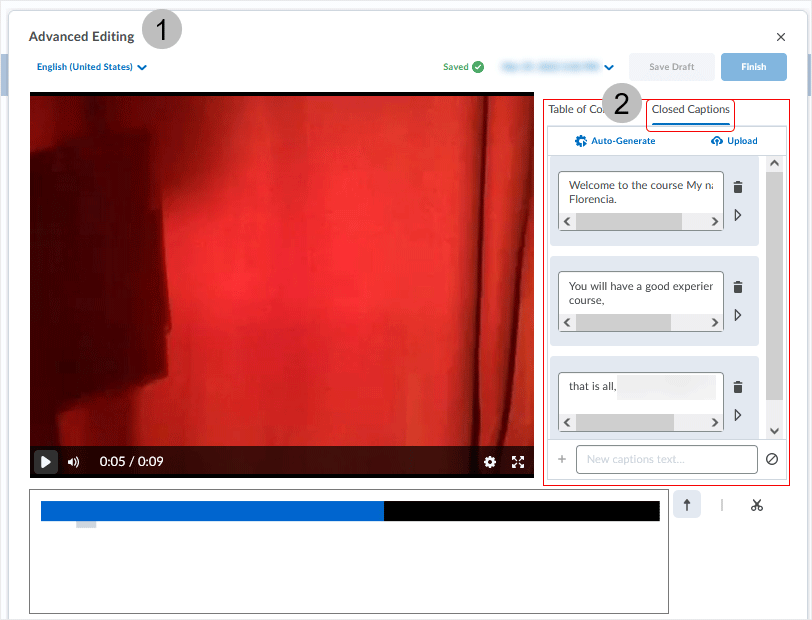
The "Closed Captions" tab displays closed captions related to the video.
- In the "Advanced Editing" area.
- "Closed Captions" tab is active.
- Tools are available to assist with proper closed captioning for the video.
Select to "Update" after editing concludes.
For the editing changes to be reflected in the video when viewed from a module, "Update" must be selected.
Audio/Video Files that were uploaded pre-January 2022 and are located in Manage Files, will not see the Advanced Edit workflow. Migrating these videos is currently a manual migration involving downloading and re-uploading of the affected media files. When copying courses, the video references will copy - pointing to the same, original video file (reducing duplication and overall storage footprint for your institution).
Links will open in a new tab or window dependent on browser/OS configuration.
What dialog boxes look like and how dialog boxes and browsers interact is dependent upon the operating system and browser being used. The screenshots in this tutorial may differ from the screen that the user is viewing when performing actions described.
CD 202203