
Merged Courses
When multiple courses/sections are combined into one course offering it is called a merged course.
Instructors should request a merge as soon as possible after courses are made visible for upcoming semesters. Always request a merge prior to making adjustments to courses/sections to be used in a merge when planning for delivery in an upcoming semester.
About merges and merge requests:
To get a merged course created, instructors request a merge.
To request a merge: Instructors send an email to [email protected] detailing the courses/sections that will comprise the merged course.
Information to include when making a request for a merge:
- course title (example: Leadership Dev For Agriculture)
- course rubric (example: AGED 140US)
- course sections to be included (example 001, 002, 003 etc.)
- semester information (example: Spring Semester YYYY)
- If multiple merged courses are being requested in one ticket, users should make it clear what belongs with what.
Specifics related to the merge process:
- Users should allow up to 72 hours for processing a merge request.
- Instructors who are listed as "Instructor of Record" by the Registrar for the courses/sections which comprise the merge will typically request the merge.
- Merges are created on a first come first served basis. Received merge requests are entered into a queue.
- When a merge request is received, support staff remove the links associated with existing
separate courses/sections and create a new link associated with the new course offering.
- the separate sections are combined into a Merged (aka Cross-Listed) course - a 'CL' is appended to title and course offering code to identify the cross-listed course at a glance
- any work that has been done prior to the merge in any of the existing courses/sections
that are to be included in the merge is rendered less accessible to the user
- Note: If course work has been placed in a course/section prior to the merge request, users can export the contents to a local computer and then import the contents into the cross-listed course after the merge has been processed
- Select this link to access information related to the "Export" and "Import" routines.
- The merged (CL) course offering is made accessible to the requesting instructor's account immediately after the physical work of building the merge is completed.
- Once the courses appear as merged, the title and course code of the new merged course will include "CL" ("cross-listed). Instructors can then begin to put content into the merged course offering.
- An incorrectly formed merge can be undone, but it is best to avoid this if at all possible.
Note that different combinations can be requested (course title to be determined by user):
-
- Example: From the same department - no multiple sections - NASX courses 491 and 591 section 001 are being combined resulting in a cross-listed course with this code: NASX_491_591_801_201750_CL
- Example: From the same department - yes multiple sections - Nursing courses NRSG 550 and 601 sections 088 and 089 are being combined resulting in a cross-listed course with this code: NRSG_550_601_088089_201470_CL
- Example: Two courses from separate departments - no multiple sections - CS_145 (Computer Science) and MART_145 (Media Arts) section 001 are being combined resulting in a cross-listed course with this code: CS_MART_145RA_001_201730_CL
Prior to requesting a merge:
-
Request a merged course BEFORE adding content and/or setting up common tool areas (Assignments, Discussions etc.) in a course/section that will be used in a merge. When work has been done in a course/section that is to be used in a merge, the completed work is not easily accessed after the merge is built.
-
Avoid using Import/Export/Copy Components to copy course content into a course/section that will be used in a merge. When a copy of content from one course to another has occurred in a course/section that is to be used in a merge, the copied content, and any changes made to the copied content, is not easily accessed after the merge is built.
-
Prior to a requested merge build, if student data has been generated in a course/section involved in the merge, the student data will be lost.
Timing related to merge requests:
Specifics:
- Requests for merged courses can only be made after an upcoming semester’s courses are made available in the system for instructors to start working in them.
- Upcoming semester’s courses are made available to individuals a short time after registration for an upcoming semester(s) begins.
- Course availability times in the Brightspace system typically occur as follows:
- Fall and Summer semesters: courses available early/mid April of the same semester year
- Spring semester: courses available early/mid November of the preceding semester year
- If a merge request contains complete and accurate information then the request can be built directly. Merge requests that contain information that is unclear or inaccurate will be delayed as confirmation takes place regarding the specifics related to the merge.
- Due to time constraints, staff cannot research the specifics related to a merge beyond a reasonable level. For instance, requesting that "all my sections be merged" will generate a reply back to the requestor asking for detail regarding the courses that need to be merged together.
- After a merge request is received by support staff, it can take up to 72 hours to process the request.
Important points to remember:
The earlier a merge is requested, the sooner the user can begin working in the merged course. Merges are created on a first come first served basis. Received merge requests are entered into a queue.
The front end of any semester is a busy time as the number of requests for all manner of Brightspace assistance increase rapidly. Due to this reality, merge requests that are not made prior to 10 business days before the first day of class will end up further down the queue. Support staff will make every effort to make sure a request is completed directly, but there is a chance that a last minute merge request may not be processed in time for the first day of class.
Note that successful merge requests and resultant merge course builds are dependent on the requested courses/sections having been made available in the Brightspace system. Time frames for course availability related to upcoming semesters are determined by MSU registration timetables. See "Specifics" above.
Important: Merges must be requested and built before learner data is generated in courses/sections involved in a merge. Once a merge is built and updated via Banner-to-D2L update, if learner data exists in one or more of the courses/sections that make up the merge, the data will be lost.
Course information from Banner to Brightspace
Course information is always passed from Banner into Brightspace.
The "Instructor of Record" (IOR) information determines who is responsible for teaching a course.
- IOR information is determined by Colleges/Departments.
- IOR information is passed to the registrar from Colleges/Departments.
- Course information, including IOR information, is held in Banner.
- Banner updates Brightspace regularly.
- Instructors who are listed as “Instructor of Record” by the registrar will see their courses appear automatically in Brightspace after update(s) process.
Note:
- multiple instructors can be assigned as Instructor of Record for any course
- Schedule of Classes can assist to find out lead IOR for a course
Recommendations for faculty seeking to merge courses
The most efficient time to request a merge is as soon as courses for upcoming semesters are made available to instructors in the Brightspace system. When this type of time-sensitive request is made earlier in a new semester, the merged course can be built and made available to instructors in a consistently timely fashion. Instructors who make their requests earlier can receive the finished build quickly and begin to make necessary upcoming semester adjustments to their merged course immediately.
- It is understood that departmental determined course assignments can take place very close to the first day of classes in an upcoming semester. Every effort will be made by staff to meet the needs of instructors who have received late assignments.
- The timing when the merge request is made has effect on when the merge work can be
created and processed so that the merged course is ready in time for the first day
of classes in a new semester.
- Note: Merge requests that are not made prior to 10 business days before the first day of class in an upcoming semester may not be created in time for the first day of class due to volume of support demands typical of the front end of a semester.
- A merge request should always be made before instructors begin adding content and/or setting up common tool areas (Assignments, Discussions etc.) or copying course content into a course/section to be included in a merge.
- A merge request should always be made before student data is generated in a course/section to be included in a merge.
- Get familiar with existing functions available in a merged course that can be leveraged to make workflows related to handling separate sections in the merged course more manageable.
Working within merged courses
Some basic functions inside of a merged course offering can help to more effectively manage the course.
"View By:" functionality is available in many areas of a Brightspace course. It allows the user to view the names of class participants by all user names, groups of users, or specific sections of users.
"View By:" functionality
The "View By:" area is found throughout the interface when in a Brightspace course.
The statement "View By:" is followed by a selectable drop menu. Select the downward pointing caret to display selections.
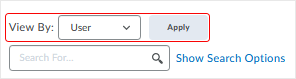
After selecting the caret, dependent on what is available in the course, users can select "User" (shows all participants); "Groups" (if groups have been made available in a course, this selection shows groups from which to select); and "Sections" (shows sections to select).
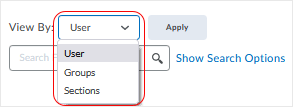
Select the "Apply" button after choosing the mode.
Common areas that use the "View By:" functionality include Assignments, Classlist, Grades, and Quizzes.
When exporting grade items (Grades > Enter Grades > Export), users can utilize "Export Grade Items For" and select as needed to All Users, Groups, and Sections.
back to top of working in merged courses
back to top
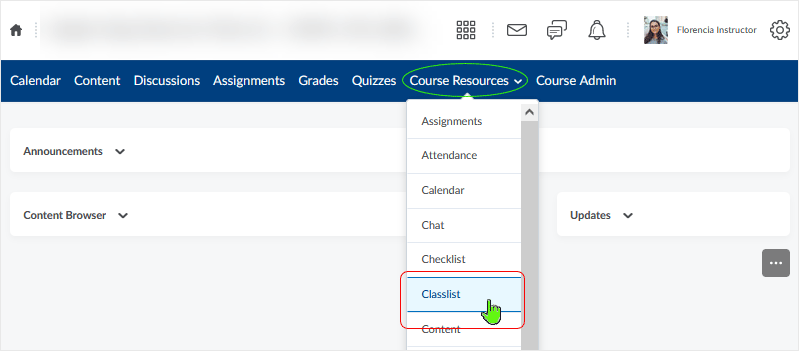
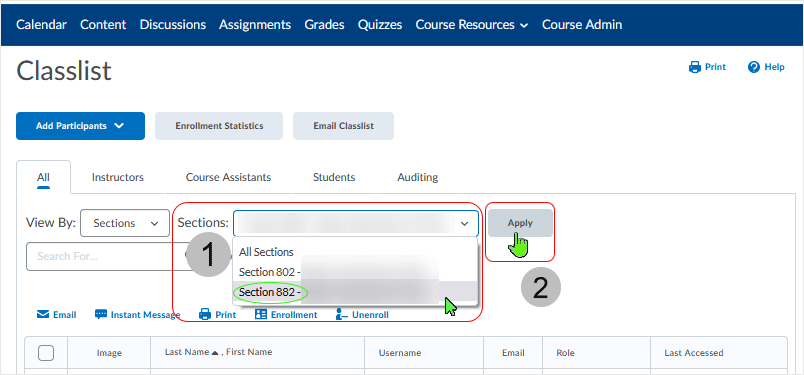
Example: Using "View By" to select sections in a cross-listed course:
Navigate to the "Classlist" via the "Course Resources" drop menu.
In the "Classlist" area:
- Select "Sections" via the "View By:" drop menu.
- Select "Apply" button to view available sections.
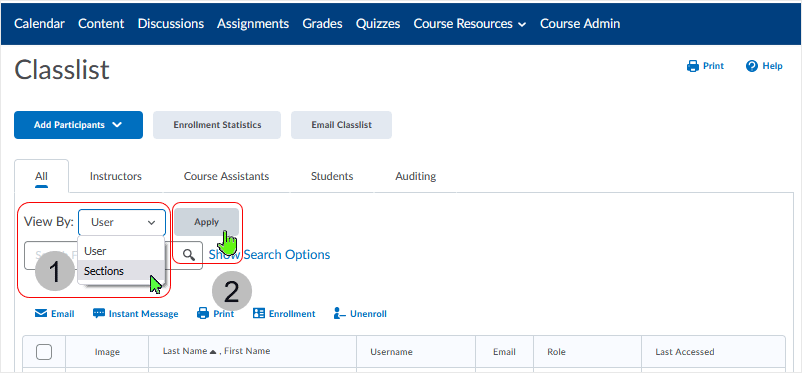
After "Sections:" are showing:
- Select the "Section" to view.
- In this case "Section 882 - XXXXXX" is selected.
- Select the "Apply" button to make the section's participants display in the "Classlist" display table below.
back to top of working in merged courses
back to top
Release Condition mechanisms can be found throughout a Brightspace course. When attaching a release condition to an item it makes it so that users cannot see that item unless they meet the associated condition(s).
One way to help in a merged course is that instructors can set up a release condition based on section enrollment. Viewing a specific item or tool can be restricted for viewing/accessing to one (or more) sections in a course instead being viewable/accessible by all users of the course.
Release Conditions functionality
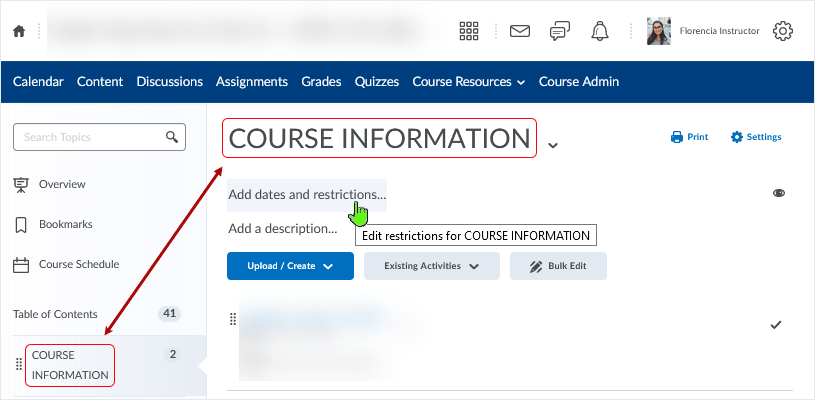
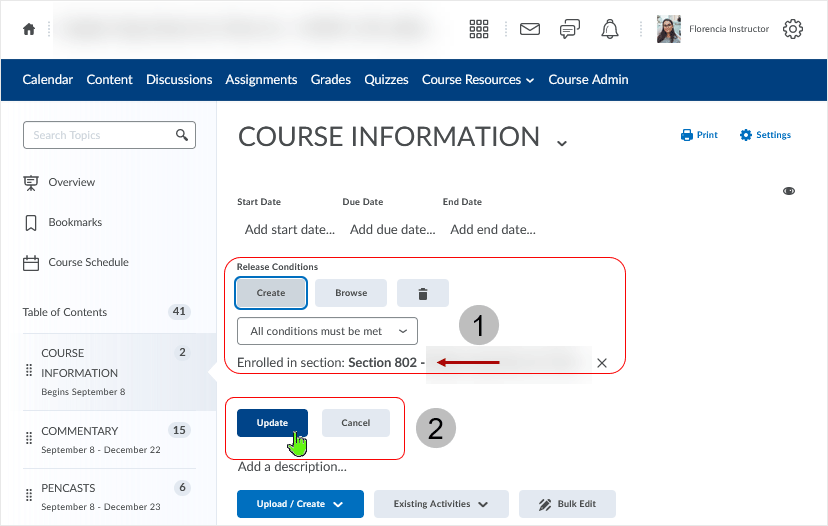
Example: Restricting view/access to a Content Module to one section of a merged course
Release a content module or topic to any of the available sections in a merged course.
In this example, the module "COURSE INFORMATION" is to be released selectively to one of the two available sections in the course.
First, select to work on the module of choice (selecting the module from the left hand nav area) and then choose to edit the restrictions.
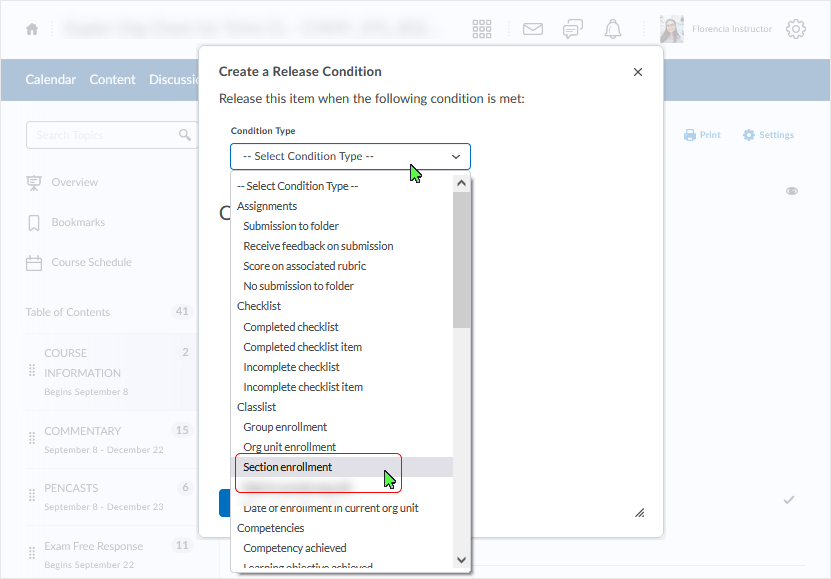
Under the "Release Conditions" area, select the "Create" button.
If an already created Release Condition exists in the course, use the "Browse" button to find it.

The "Create a Release Condition" pop-up dialog box displays.
Select the "Condition Type" - in this case, select "Classlist > Section Enrollment" to isolate to a section.
After the "Condition Type" is selected for "Section enrollment" choose the section to enable the section condition that needs to be met. In this case, "Section 882 - XXXX" is selected.
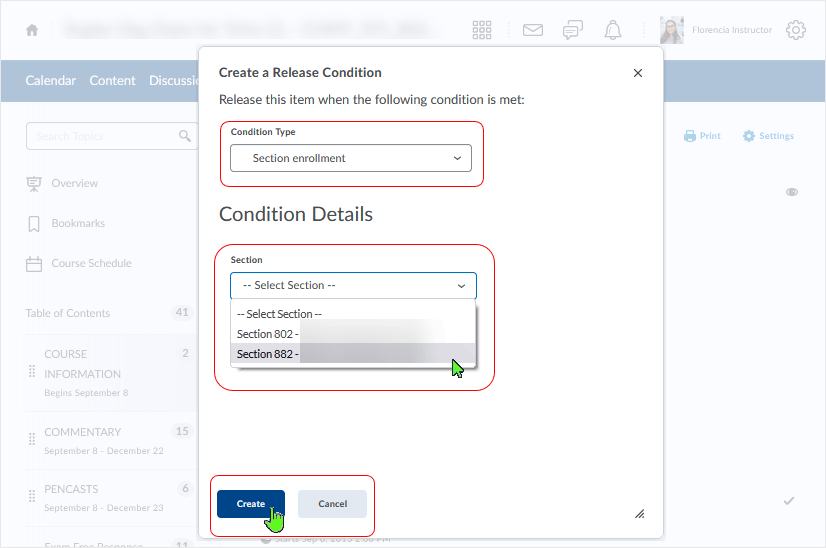
Repeat the process to add other sections as necessary.
Only individuals who are a part of the "Section 882 - XXXX" section will see the module.
Confirming the condition:
- The system shows the "Enrolled in section:" statement.
- Note: selecting the "X" can be used to cancel the release.
- Select the "Update" button to apply the changes.
back to top of working in merged courses
back to top
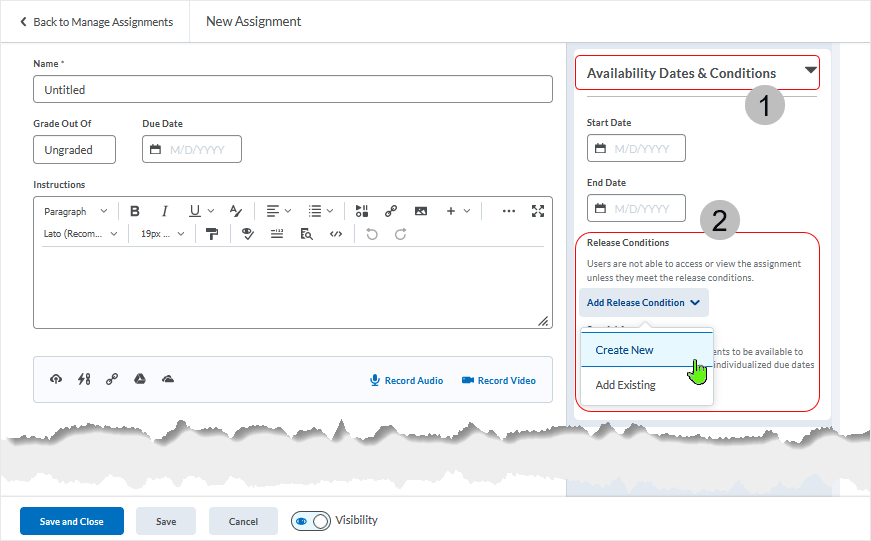
Release Conditions Variations - Release Conditions work areas can look different from tool to tool
Release Conditions graphic/workflow when accessed from the Assignments area.
- Expand the "Availability Dates & Conditions" area.
- Select to "Create New" or "Add Existing" from the "Add Release Condition" drop menu.
Release Conditions graphic/workflow when accessed from the Grades > Enter grades area and the Quizzes area.
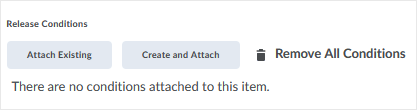
Common areas that use the "Release Conditions" functionality include Assignments, Attendance, Checklist, Content, Discussions, and Quizzes. Typically aligned with "Restrictions" settings.
back to top of working in merged courses
back to top
Some links will open in a new tab or window dependent on browser/OS configuration.
CD 202202