
Import/Export/Copy Components
The Import/Export/Copy Components utility lets instructors copy component(s) from another course offering, export course component(s) and import course component(s).
Copying components saves instructors and designers from having to recreate course resources from scratch and can significantly reduce the amount of work required to create or re-offer a course.
Copy content from one course into another course
Enter the course where the materials are to end up - the course into which the components need to be copied.
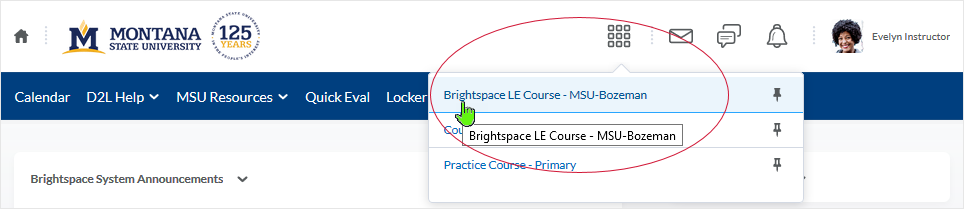
When in the course, from the right side of the user name, select the "Admin Tools" gear icon and then select "Import/Export/Copy Components" from the drop menu.
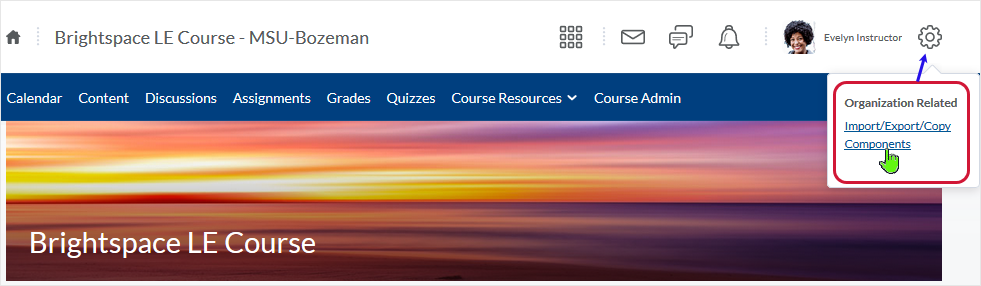
Note: Users can also access the "Import/Export/Copy Components" tool via the "Course Admin" area and via the "Content" area in a course. These alternate methods are in addition to the method described here.
When in the "Import / Export / Copy Components" area
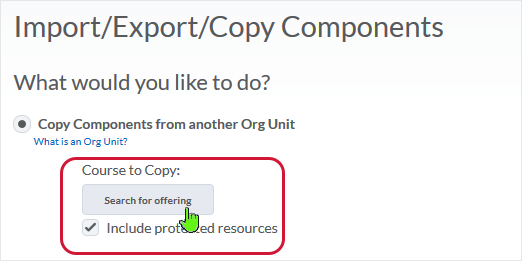
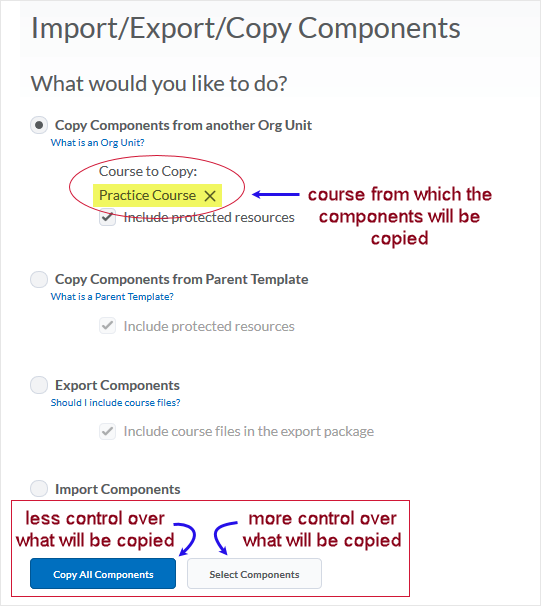
Choose "Copy Components from Another Org Unit" radio button and click the "Search for offering" button.
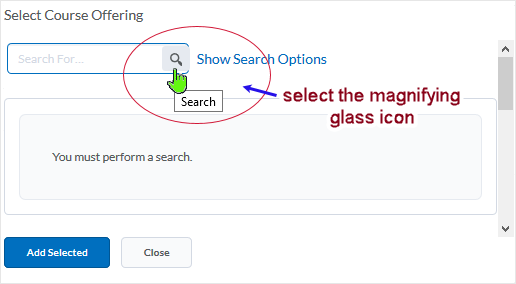
A pop-up window will display. Select the magnifying glass icon to display courses that are affiliated with the user account. Courses that the user is enrolled in as instructor role will display.
After courses display, select the radio button associated with the course from which to copy the components - and then click "Add Selected" to continue the process.
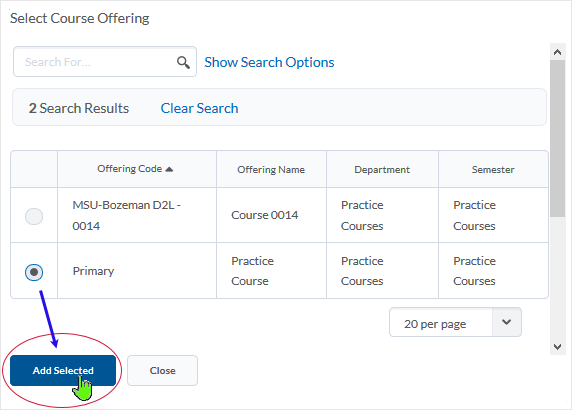
If some courses associated with the user account do not display in the table, the user can search for any non-displayed courses and/or expand the number of courses that display in the table by changing the "per page" drop menu to a larger number.
Selecting the "Copy All Components" button
The course that the components will be copied from displays in the "Course to Copy:" area.
The user then selects either the "Copy All Components" button or the "Select Components" button from the bottom of the page.
Caution: If contents have not already been copied into a target course from another course, selecting the "Copy All Components" button starts the copy of all components from the identified "Course to Copy" into the target course immediately - there is no delay and there is no cancellation of the process once the "Copy All Components" button is selected.
Selecting the "X" to the right of the course name in the "Course to Copy" area will cancel the process by removing the course from the area.
Prior to beginning the copy process, the display typically reads "The copy is queued, please wait for processing..." in a status bar.
During the copy process a "Copying in progress..." indicator will display:

After the "Copy All Components" process completes, a green check-mark indicator icon appears along with the statement "Copy Completed:" and a time stamp display denoting date and time of job completion.

After a successful copy process completes, the user can select either the "Copy Another Package" button, the "View Content" button or the "Review and Manage Dates" button.
- The "Copy Another Package" button takes the user back to the beginning of the Import/Export/Copy Components area and users can select the "Copy Another Package" button to copy more items from the same course or another course as needed.
- The "View Content" button takes the user to the Content area.
- The "Review and Manage Dates" button allows the user to adjust start, end, and due dates related to copied content using the "Manage Dates" tool.
Selecting in the green check-mark "Copy Completed:" icon area will take the user into a detailed step-by-step description of what was copied from which course and when this occurred time-wise.
Use caution when electing to copy more items (using "Copy All Components" or "Select Components") from the same course that has just been copied because duplicates may occur.*
"Validation Logic" will help mitigate the chance that this will occur. Read about "Validation Logic" by selecting this link.
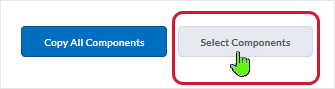
Selecting the "Select Components" button
Selecting the "Select Components" button yields a "Choose Components to Copy" page display which allows users to choose what they wish to copy from the course displayed in the "Course to Copy:" area.
On the "Choose Components to Copy" page, the "Show the current course components" can be selected to show the user all components that are available in the course for transfer. Close the area by selecting "Hide the current course components" as necessary.
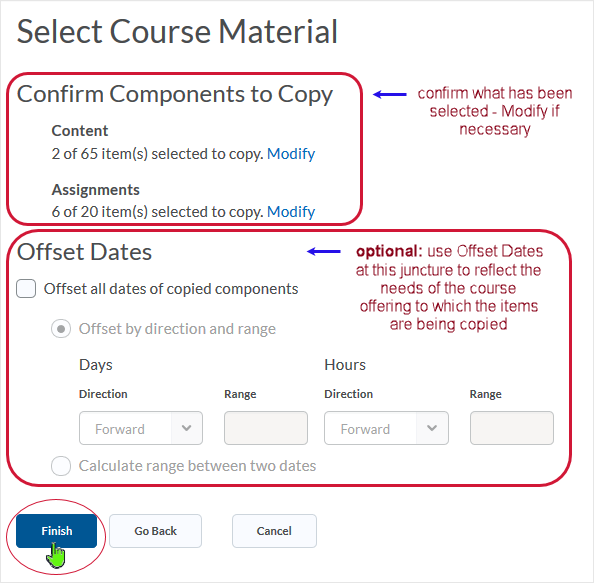
Users can choose to check the "Select All Components" box and/or check any combination of boxes associated with components in the course that is being copied. Users then select the "Continue" button and follow the prompts.

At the end of the prompts related to each components area selected, the user has the option to "Confirm/Modify" and, optionally, elect to "Offset Dates" to adjust dates related to the time frame of the course offering into which the items are being copied. Selecting "Finish" will complete the process.
After copying org-to-org, users should check the course into which the components were copied to see how the copying worked out. Test linkages to verify that all is working as intended.
Validation logic
When copying course content from one course to another, validation logic is part of the copy process.
Copy Course Components contains a validation logic step in the course copy process which informs users if they performed a copy from the source previously. This helps the user avoid unnecessary duplication of copied course components.
If the course the user is copying content from has already been used to copy components into the current course, a "Copy This Again?" dialogue box will pop up. The dialogue box verbiage (as in the image below) is the same whether the user intends to select A (Copy All Components) or B (Select Components).
If the course the user is copying content from has NOT been used to copy components into the current course, a "Copy This Again?" dialogue box will NOT pop up.
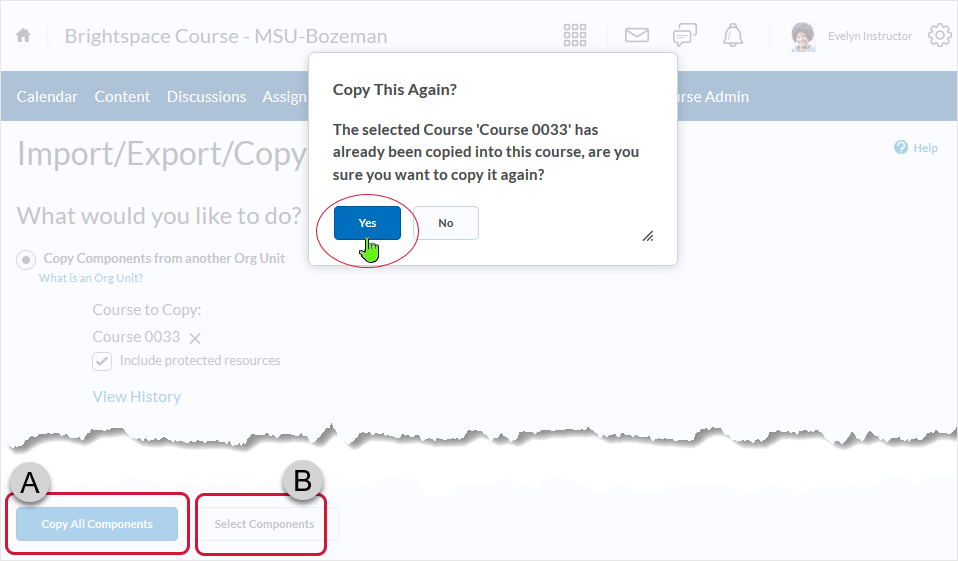
Note that selecting option A (Copy All Components) will start the copy process IMMEDIATELY and, if a complete course copy has already occurred, will have the effect of doubling up existing material that has been copied over previously.
Selecting option B (Select Components) will port the user into the selection process as normal.
---
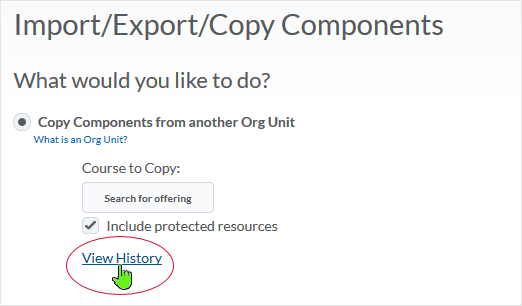
After a "Copy All Components" or "Select Components" routine has been performed, a "View History" link appears. Users can check the status related to what has been copied from where by utilizing "View History" from the "Import/Export/Copy Components" area.
About the "View History" area
On the initial page of the Import/Export/Copy Components area, after a "Copy All Components" or "Select Components" job has completed, a "View History" link appears.
Selecting the "View History" link causes the "Copy Course Components History" page to display. The history area gives access to log files that users can use to review when a copy was performed, what content was copied, if any errors occurred, and from which course the copy was made.
All copies that have occurred are listed in this area. Each copy has a log file associated with it.
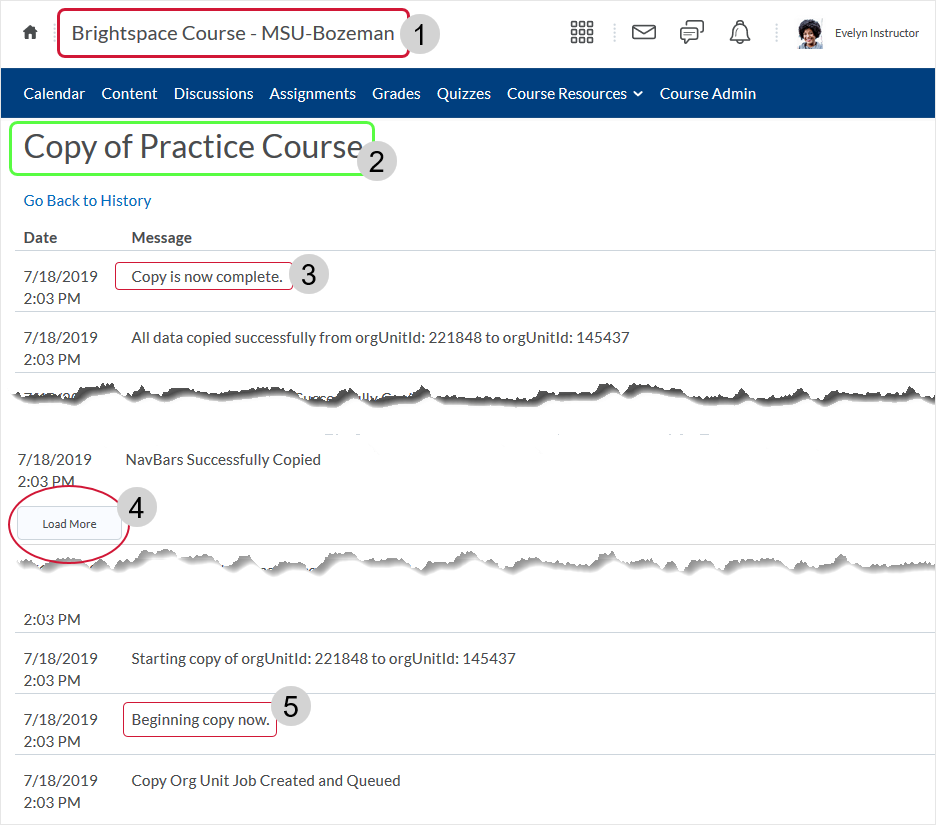
When at the "Copy Course Components History" page, selecting the "Copy Completed:" area specific to a job will display a detailed step-by-step description of what was copied from which course and when this occurred time-wise.

The log file display contains information related to the copy that has occurred.
- The name of the course into which the content has been copied always displays upper left. The user is presently in this course looking at was copied into this course from another course.
- The course from which the copy comes from is always preceeded by the statement "Copy of" in the upper left under the blue course nav bar. There is also a "Go Back to History" link available which, when selected, takes the user back to the "Course Components History" area.
- At the top of the log a time-stamp displays along with the message "Copy is now complete."
- There are "Load More" buttons that the user can select to move through the log. Length of log file display correlates to the amount of items copied over.
- At the bottom of the log a time-stamp displays along with the message "Beginning Copy
Now."
- The log file actually reads from end of file (bottom of display) to the beginning of file (top of display) when a user follows the steps that the process has completed sequentially from beginning to end.
The "orgUnitId" is a number specific to the course as identified in the system. Users can tell which course the content has come from as well as which course the content has been copied into by the "orgUnitId" numbers contained in the "All data copied..." and "Starting copy of..." statements in the log.
When reading the log file:
- Log file indicates that data was successfully copied from "...orgUnitID: 221848 toorgtUnitID:145437"
- Components from the "Practice Course" course were copied to the "Brightspace Course - MSU-Bozeman" course.
- orgUnitID: 221848 corresponds to "Practice Course - Primary"
- orgtUnitID:145437 corresponds to "Brightspace Course - MSU-Bozeman"
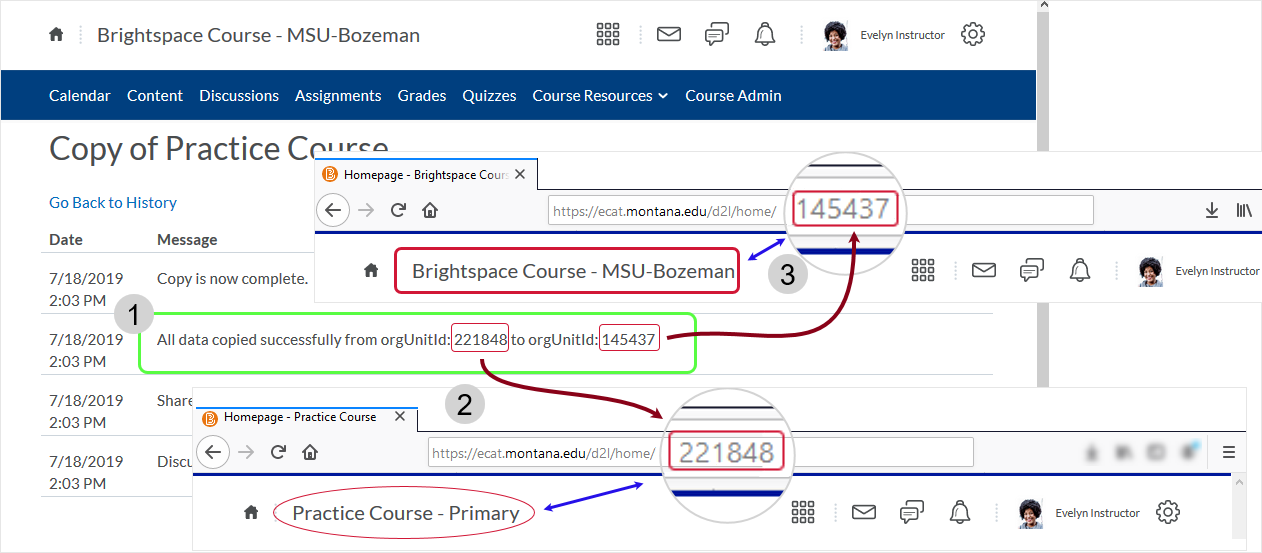
Note where the orgUnitID displays in the address bar of a web browser. It is possible, when in Brightspace, to paste an orgUnitID into the address in the browser and, if the user is associated with that course in some capacity, access the course via orgUnitID.
Course Reset
Contact Brightspace Ecat Team for a Course Reset if necessary.
Important: Course Reset permanently deletes course content, activities, associated files, user grades, user progress records, and interaction data from the course. A Course Reset is permanent and cannot be undone.
Reasons to reset a course may include:
- inadvertently copied wrong course into the targeted course
- targeted course needs a clean, fresh start
If necessary:
- Export a copy of the course prior to requesting the course be reset.
A Course Reset cannot occur in a for-credit course after a semester has started and student data is in the course.
Course Resets for Practice and Master courses can occur at any point in time as determined by the owner of the course(s). A Course Reset for Non-Credit courses can be discussed. It can take up to 72-hours for a requested Course Reset to occur.
*Note
When using the Import/Export/Copy Components tool, Brightspace will only ADD components to a course - the process DOES NOT OVERWRITE (with the exception of course files). Components can double and triple up if the user repeats copying a component(s) over and again. Obviously, this can lead to confusion.
It may take some time for the components to load below the "Choose Components to Copy" statement. Until the components load you can't select and move forward. There is typically a shorter load time for less components and longer load time for more components.
Export Components
Exporting the components of a Brightspace course creates a .zip file. Dependent type of export, a Brightspace export can be imported into Brightspace and/or imported into a different LMS.
Exporting a course package out of Brightspace is facilitated via the Import/Export/Copy Components tool accessed via the Course Admin area.
Export selections:
- Export as Brightspace Package
- The Brightspace Package is the standard export for Brightspace LMS, it contains all the necessary resources you need to share your course with another Brightspace site.
- The Brightspace Package is based on the IMS Content Packaging specification.
- Export as Common Cartridge
- Common Cartridge is a specification developed by the IMS Global Learning Consortium.
- The specification describes a set of open standards for content, assessment, and digital content that allows publishers and content creators to create LMS-independent course packages.
- Brightspace exports as IMS Common Cartridge 1.3
- Export as Thin Common Cartridge
- Thin Common Cartridge (Thin CC) is a specification developed by the IMS Global Learning Consortium.
- The Thin CC standard is a subset of Common Cartridge developed to package Learning Tools Interoperability (LTI) Links, Web Links, and metadata.
- Brightspace exports as IMS Thin CC 1.3.
Brightspace help files are available:
- Brightspace Community Site
- search "export course" (drop the quotes)
To keep a copy of a Brightspace course on a local computer, instructors can export the course components and save the .zip file to a local computer.
When exporting a Brightspace course, course components and course organization are exported. No student data is included in the export.
Import Components
Importing a course package into Brightspace is facilitated via the Import/Export/Copy Components tool accessed via the Course Admin area.
Brightspace help files are available:
- Brightspace Community Site
- search "import course" (drop the quotes)
To update a Brightspace course with components from another Montana State University Brightspace course, instructors can use the import feature to import an exported course .zip file if an export has taken place and the .zip file is accessible.
When importing a Brightspace course, course components and course organization are imported. No student data is included in the import.
Most links will open in a new tab or window dependent on browser/OS configuration.
What dialog boxes look like and how dialog boxes and browsers interact is dependent upon the operating system and browser being used. The screenshots in this tutorial may differ from the screen that the user is viewing when performing actions described.
CD 202305