
My Courses widget - instructor
The My Courses widget provides an access point to favorite courses. Users can utilize multiple ways to display course tiles and enable course access via the My Courses widget.
This document is for instructors. A separate document is available for learners.
Select this link to connect to the learner version with information about the "My
Courses" widget.
Overview of the My Courses widget
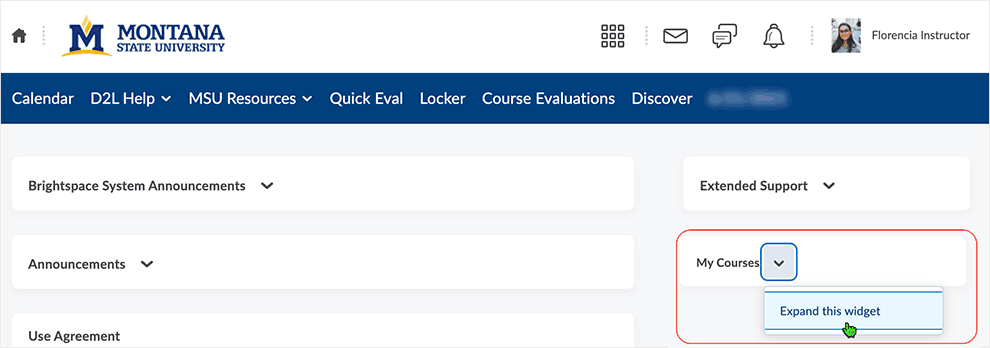
The My Courses widget can be expanded or collapsed and is found on a user's homepage in Brightspace.
Access the My Courses widget by expanding the widget on the home page as necessary.
The My Courses widget displays on the user's homepage.
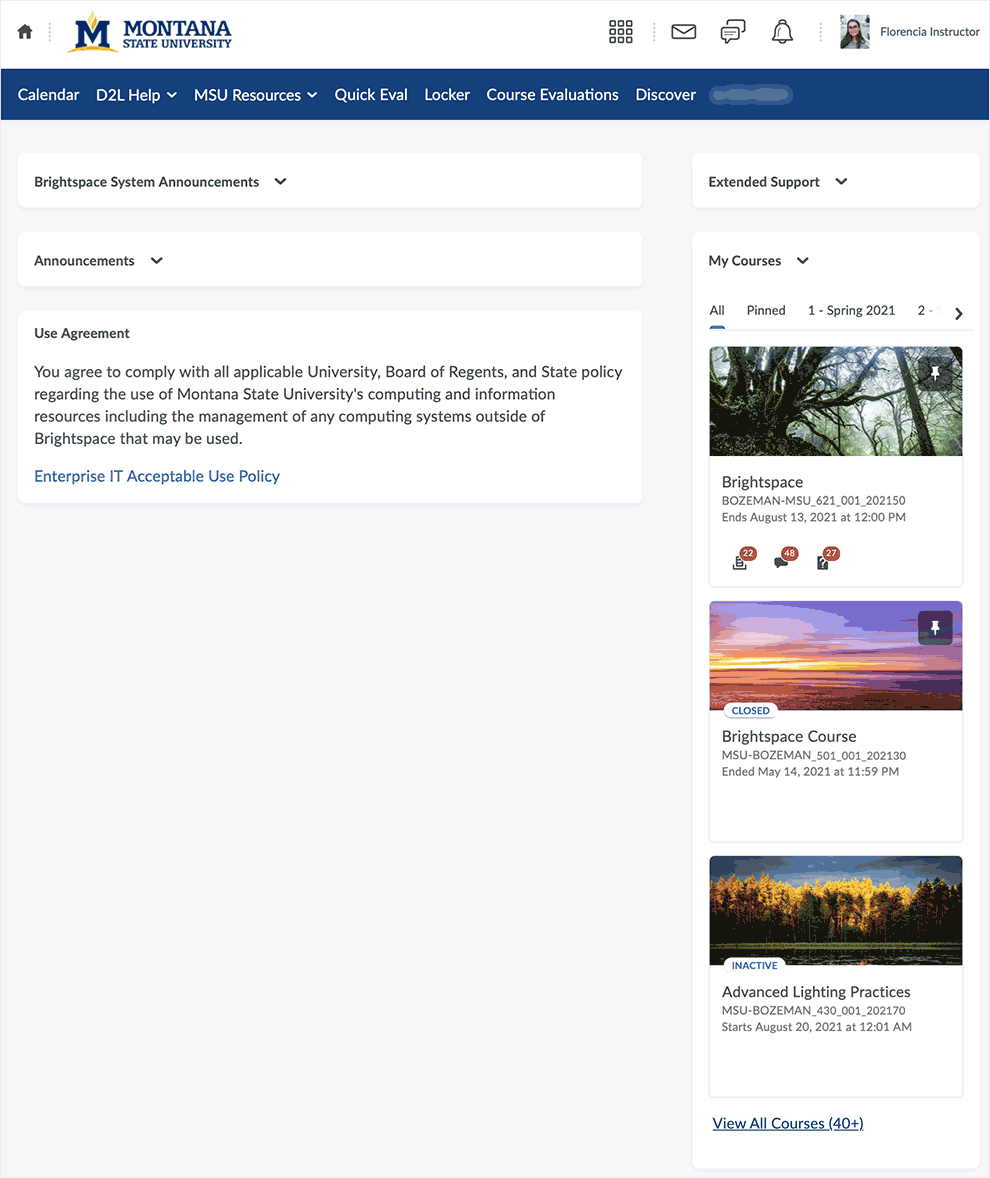
The My Courses widget is consistent in display and is specific to each user. Course tiles are used in the display.
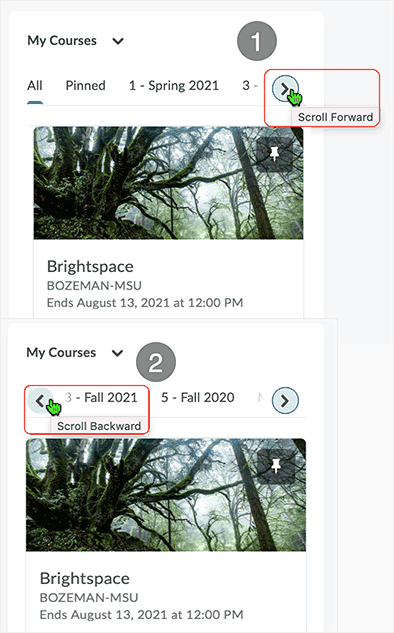
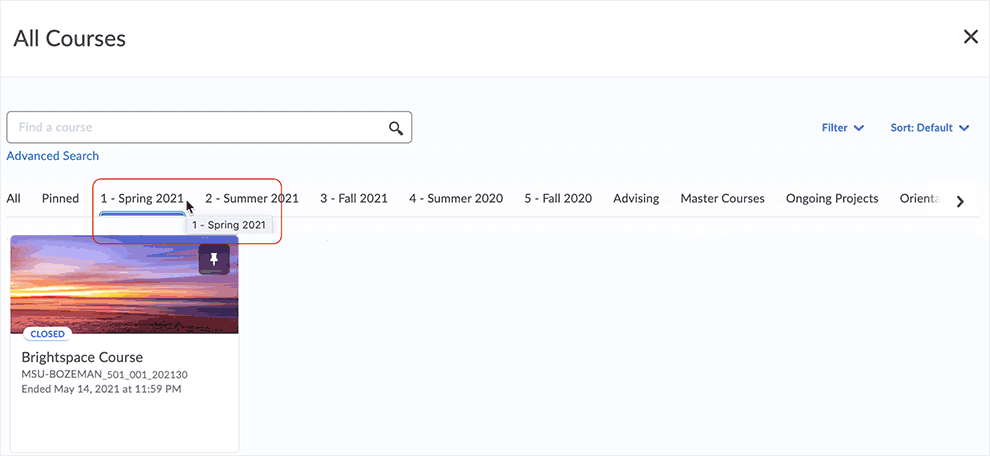
Use the directional arrows to move through available tabs. Select the tab to make it the active tab.
Grouped Courses semester tabs appear only for semesters in which a user is enrolled in semester course(s).
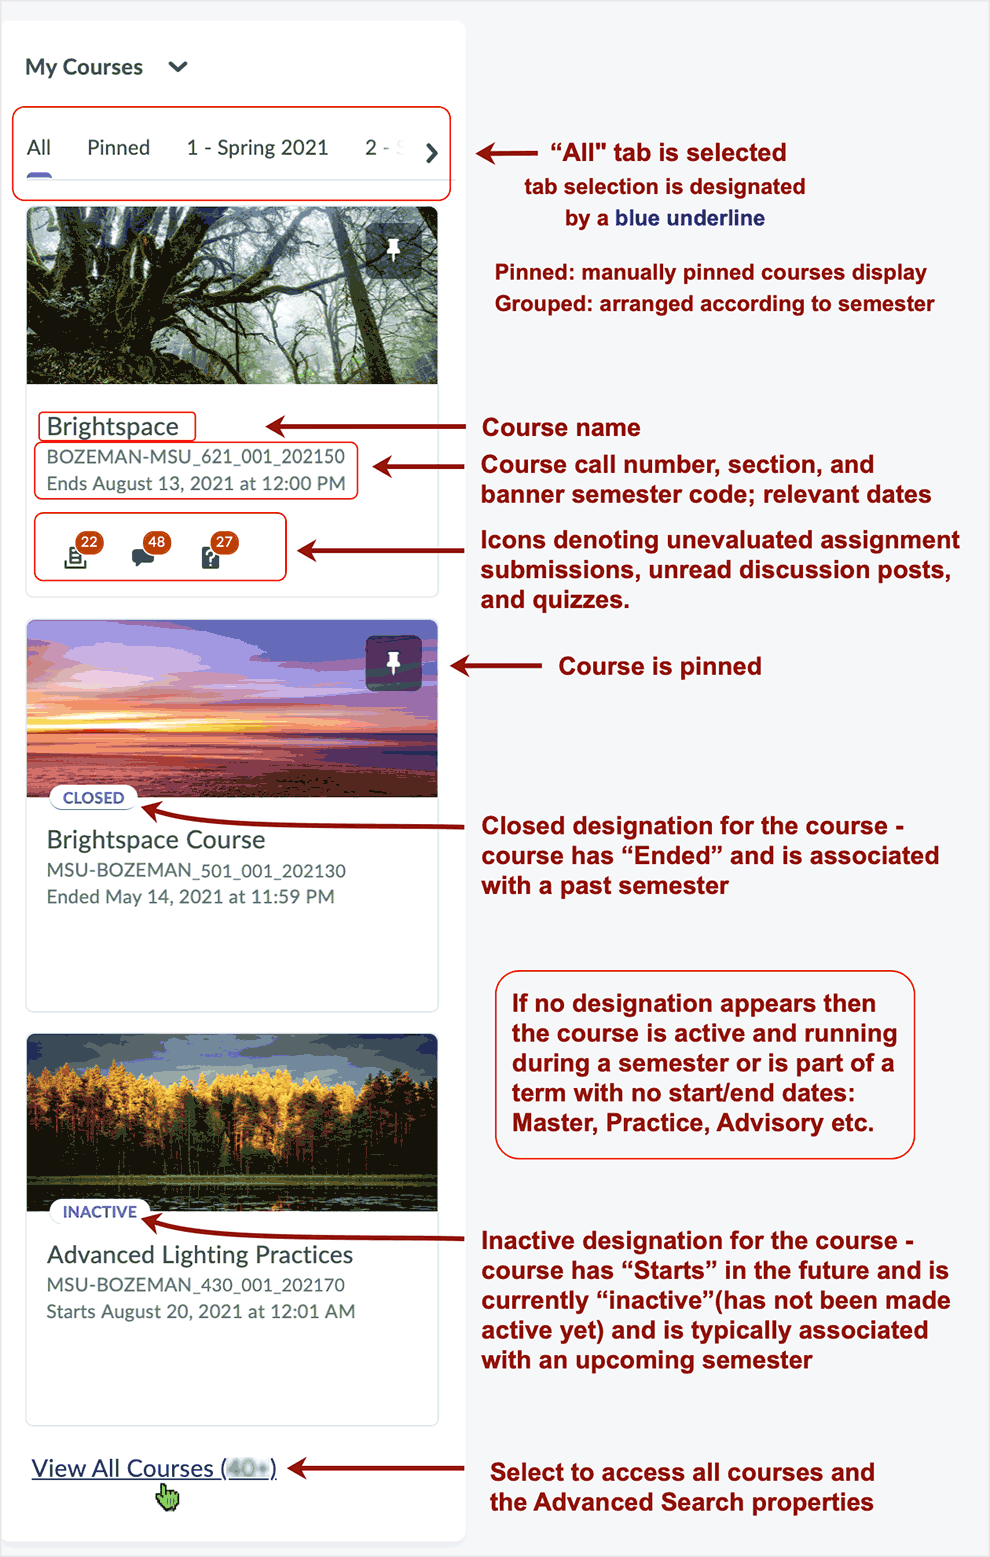
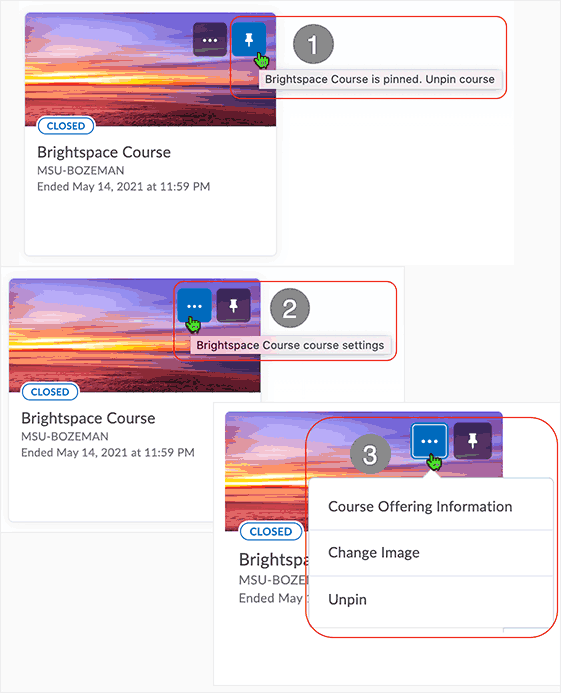
Use the Pin icon and the Horizontal Ellipsis icon on a course tile to adjust course visibility in the My Courses widget and access various other information/function.
- Selecting the Pin icon will unpin the course.
- Selecting the Horizontal Ellipsis icon displays a contextual drop menu of choices.
- Note: the Horizontal Ellipsis icon only shows when user hovers over it.
- Three choices:
- Course Offering Information: to make a course active; access other course information
- Change Image: use to adjust the image associated with a course
- Unpin: select to unpin the course
All Courses and Advanced Search
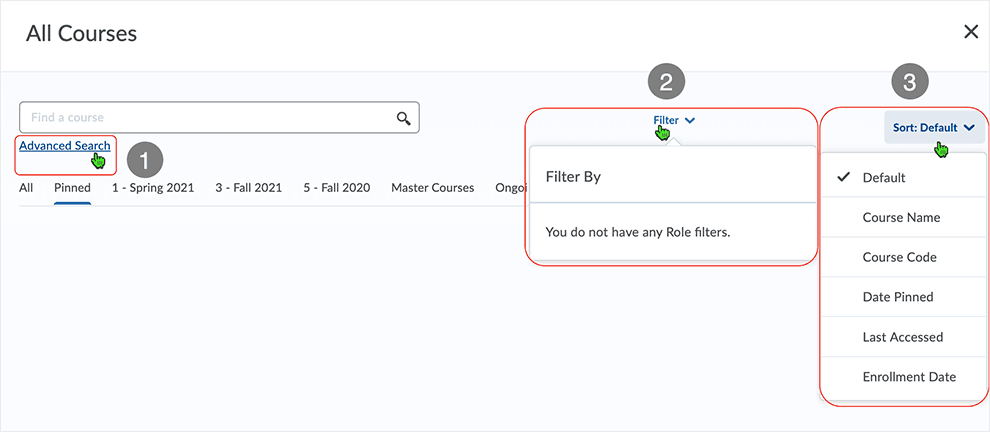
When selecting "View All Courses" from the My Courses widget, users arrive on the "All Courses" page and can access "Advanced Search" from there as necessary.
In the "All Courses" area, selecting the various tabs will display the course(s) associated with the various tabs. Select the "X" in the upper right to exit the area.
Advanced Search, Filter, and Sort Default control viewing parameters related to the "All Courses" area.
- Advanced Search: Select the link to enter an area to search for courses.
- Filter: If user is enrolled in multiple roles in the system, select from drop menu to filter by role.
- Sort: Default: Sets the sort default for the area.
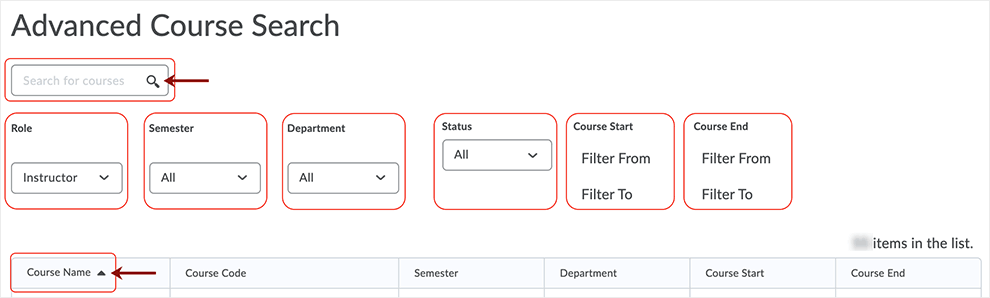
After selecting the "Advanced Search" link, user is ported into the "Advanced Course Search" area.
Use the "Magnifying Glass" icon to run a search. Sort results by selecting a column - the column selected will act on the displayed courses.
Refine the search using the available drop-down lists associated with Role, Semester, Department, Status, and Course Start/End dates as necessary.
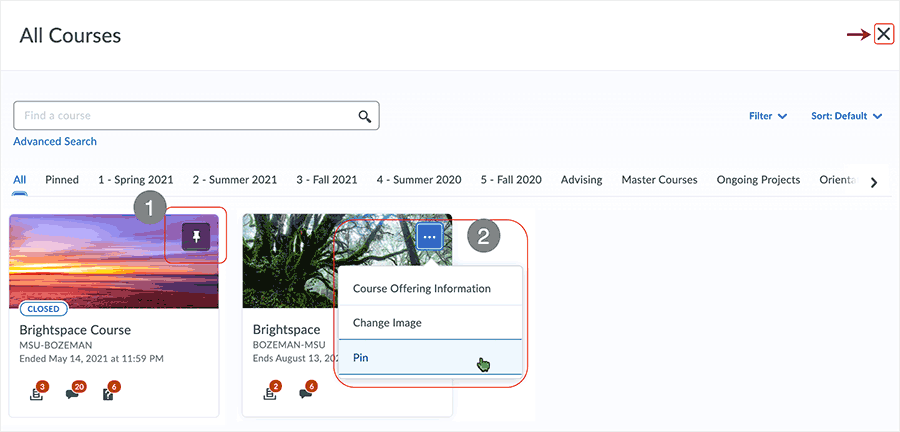
Use the "All Courses" area to "Pin" courses
In the All Courses area, courses that are already pinned display along with courses that are not yet pinned.
In the image below:
- This course is already pinned.
- The status is indicated by the "Pin" icon that displays on the course tile.
- This course is not yet pinned.
- No "Pin" icon is visible on the course tile.
- Pin the course by selecting the horizontal ellipse icon and then select "Pin" from the drop menu.
Courses can also be pinned or unpinned via the "Select a course..." area of the mini-bar.
Sorting Logic - My Courses widget
Pinned, Unpinned, and Grouped Courses display and are accessible via the My Courses Widget.
Sorting Logic is used to organize the courses in the My Courses widget and promotes pinned courses to be displayed first in the widget.
Selecting a course tile, image, and/or course title takes the user to the course.
- In the Pinned tab, all pinned courses display in a list.
- A limited total of 12 course enrollments will appear.
- More than 12 courses appear if user enrolled courses in excess of 12 are pinned.
- Pinned course tiles display notifications below associated images for unevaluated assignment submissions, quizzes, and unread discussion posts.
- A limited total of 12 course enrollments will appear.
- In the All tab, pinned courses appear first, followed by current enrollments, then future enrollments
(if they are available or visible to the user) for a total of 12 enrollments.
- More than 12 courses appear if user enrolled courses in excess of 12 are pinned.
- The Grouped Courses tabs are arrayed across the top of the My Courses widget.
- Navigational arrows support maneuvering from group to group.
- Courses are arranged on tabs according to the course’s Semester.
- Groups appear according to the semesters in which a user is enrolled in semester course(s).
- Instructors are able to access courses in the current semester, as well as older semesters.
For users with less than 50 courses, courses are sorted in the My Courses widget as follows:
- Pinned courses always appear first.
- New pins are added to the end of the pinned list.
- New enrollments appear in the widget following pinned courses as unpinned.
- Current courses are prioritized over future courses and past courses are only shown in View All Courses unless they are pinned manually.
Users with more than 50 enrollments:
- Pinned courses display first, then alphabetical sorting to start. It then slowly transforms into a "last accessed list" as users begin going into various Course Offerings.
The "My Courses" widget and the "Select a course..." area are related.
Select this link to access information on the "Select a course..." area in Brightspace
Links will open in a new tab or window dependent on browser/OS configuration.
What dialog boxes look like and how dialog boxes and browsers interact is dependent upon the operating system and browser being used. The screenshots in this tutorial may differ from the screen that the user is viewing when performing actions described.
CD 202106