
Machine & Tool Safety
Table of Contents
1 Scope and Purpose of this Document
This document is intended to provide an equipment and tool specific overview of safe work practices for the new machining laboratories in Norm Asbjornson Hall.
Due to the changing and broad aspects of these activities, this document may not cover all possible risks at any one time. This safety manual is best used as a guide and cannot be expected to be comprehensive in defining all risks. Common sense and knowledge of safe work practices will be needed in ensuring safety for areas not covered by this document.
It is mandatory that all individuals who perform work in the laboratories are familiar with and understand this document as well as other training requirements set by the M&IE Department, their instructors and shop supervisors. Fulfilling these requirements is a shared responsibility of the instructors, shop supervisors, teaching assistants, students and researchers, according to the specific work performed.
When unsure about a laboratory activity or situation, students are required to seek guidance from the instructor, teaching assistant or shop supervisor.
2 Obtaining Laboratory and Equipment Use Authorization
Before students can work in the machining or welding shops and operate any equipment outside of scheduled classes and laboratories they must
- Read and understand this document.
- Read and understand the policies and instruction published on the M&IE Laboratories web page.
- Obtain a Safety & Operation refresher training for the equipment and the laboratories they intend using. (Training is provided by an M&IE instructor or shop supervisor.)
- Fill out and sign the M&IE Laboratory User Agreement that is available through the M&IE Laboratories web page.
3 Equipment and Process Specific Safety Rules
3.1 Manual Milling Machines (Bridgeport Style)
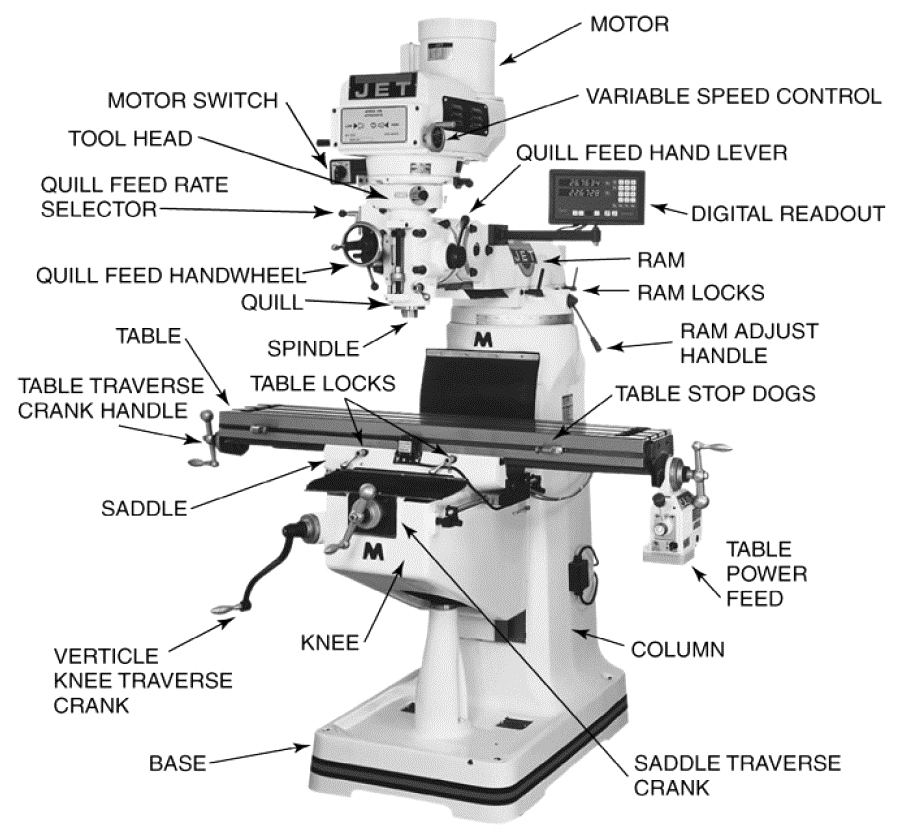
In addition to the requirements described in the General Lab Safety Manual, the following safe working practices need to be observed when working with manual milling machines:
- Before using a manual milling machine, turn off all power and perform the following
functional and safety checks:
- Make sure no cutting tools are mounted. Make sure the vice is mounted securely and all vice mounting screws are tightened.
- Make sure all motion axes work smoothly and free of any obstruction by manually turning their spindles.
- Make sure all servo drives are turned off and set to their lowest speed.
- After successful completion of the above steps, turn on power and test all powered operations, such as x/y/z axis feeds and spindle rotation. Test the emergency stop switches for proper function.
- Before mounting any workpiece, remove any cutting tools that are mounted in the spindle. Work piece must be clamped securely in the vise or clamped securely to the table.
- Inspect cutting tools before use. Always use cutters which are sharp and in good condition. Do not use cutters that have shipped or broken out sections, or cracks.
- Make sure the spindle power is off and the spindle has come to a complete stop before changing cutters.
- Use gloves or a shop towel when inserting or removing cutting tools into the spindle to avoid cutting yourself.
- Make sure the cutter is rotating in the proper direction before cutting material.
- Never run the machine above the recommended cutting speed.
- If at all feasible, add a shield to prevent chips from hitting other people.
- Do not take heavy climb milling cuts on the shop's mills unless instructed to do so.
- Never feed the machine above the recommended feed rates.
- Don't take too heavy (deep) cuts.
- Always use the proper cutting fluid for the material being cut.
- Use an applicator brush to apply cutting fluid. Never use a rag or towel to apply cutting fluids while the machine is running!
- Use a long brush to remove chips form the work piece. Never use a rag, towel or gloves to remove chips while the machine is running!
- Never put your hands onto the cutting tool or workpiece while the machine is running.
- Make sure that the machine is fully stopped before taking any measurements.
- Always stay at the machine while it is running.
- Make sure only one person operates the machine at any time.
- Don't place anything on the milling machine table such as wrenches, hammers, or tools.
- Before removing your work piece from the vice or machine table remove cutting tools from the spindle to avoid cutting yourself.
- Before cleaning the machine turn off the power and remove cutting tools from the spindle to avoid cutting yourself.
3.2 Manual Lathes
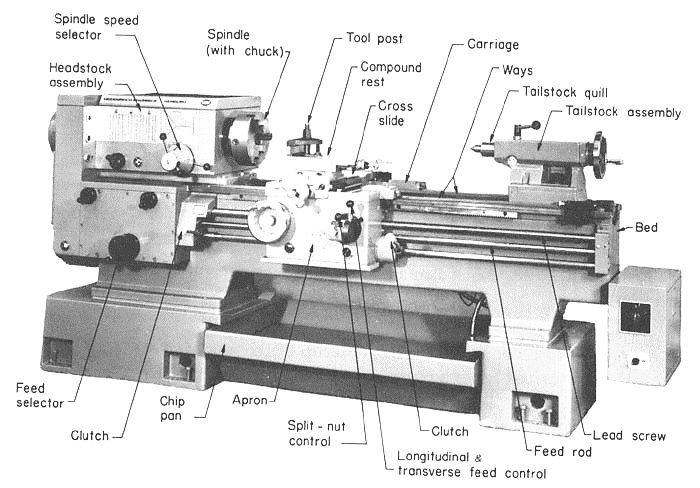
In addition to the requirements described in the General Lab Safety Manual, the following safe working practices need to be observed when working with manual lathes:
- Before using a lathe, turn off all power and perform the following functional and
safety checks:
- Make sure no cutting tools are mounted. Make sure the Compound Rest and Tool Post are mounted securely and all mounting screws are tightened.
- Make sure all motion axes (Apron and Cross Slide) work smoothly and free of any obstruction by manually turning their spindles.
- Before powering up and turning on the machine
- Make sure the spindle speed is set to a low RPM.
- Make sure the feeds for Apron and Cross Slide are disengaged and set to low feed rates.
- Make sure no work piece is mounted and the chuck key is removed.
- After successful completion of the above steps, turn on power and test all powered operations, such Apron and Cross Slide feeds, and spindle rotation. Test the foot brake and emergency stop switches for proper function.
- Before mounting any stock or workpiece, turn off the power and remove any cutting tools that are mounted in the tool post.
- The work piece must be clamped securely in the chuck. Long workpieces must be supported with a rotating center mounted in the quill stock.
- Always remove chuck key from chuck immediately after use.
- Turn chuck or faceplate by hand before turning on the power to be sure there is no binding or clearance problems.
- Inspect cutting tools before use. Always use cutters which are sharp and in good condition. Do not use cutters that have shipped or broken out sections, or cracks.
- Always clamp the tool bit as short as possible in the tool holder to prevent it from breaking or chattering.
- Always make sure that the tool bit is centered and has the proper clearance and cutting angles. Ask for assistance making adjustments.
- Make sure the workpiece is rotating in the proper direction before cutting material.
- Never run the machine above the recommended cutting speed.
- Never feed the machine above the recommended feed rates.
- Don't take too heavy (deep) cuts.
- Always use the proper cutting fluid for the material being cut.
- Use an applicator brush to apply cutting fluid. Never use a rag or towel to apply cutting fluids while the machine is running!
- Never attempt to remove turnings or chips with your bare hands, no matter if the machine is running or stopped!
- Use a long brush to remove chips from the work piece. Never use a rag, towel or gloves to remove chips while the machine is running!
- Never put your hands onto the chuck, cutting tool or workpiece while the machine is running.
- Make sure that the machine is fully stopped before taking any measurements.
- Always stay at the machine while it is running.
- Make sure only one person operates the machine at any time.
- Don't place anything on the top of the headstock housing.
- Do not file on the lathe, unless you have a large amount of experience and have the shop manager's or supervisor's approval.
- If work is turned between centers, make sure that proper adjustment is made between centers and that the tailstock is locked in place.
- If work is being turned between centers and expands due to heat generated from cutting, readjust centers to avoid excessive friction.
- Before removing your work piece from the chuck turn off power and remove cutting tools from the tool post to avoid cutting yourself.
- Before cleaning the machine turn off the power and remove cutting tools from the tool post to avoid cutting yourself.
3.3 Drill Presses
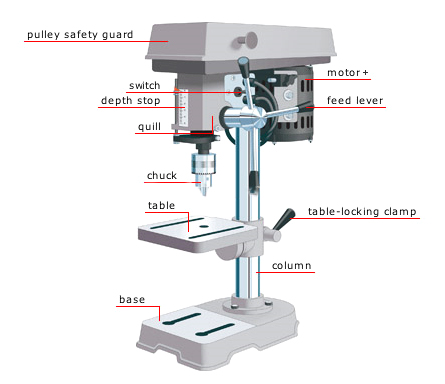
In addition to the requirements described in the General Lab Safety Manual, the following safe working practices need to be observed when working with drill presses:
- Before mounting a work piece, make sure any drill tool is removed from the chuck in order to avoid potential injury.
- Securely mount your work piece in a vise, or clamp it to the drill table. NEVER hold it by hand!
- Always try to support part on parallels or a backing board when drilling through any material.
- When drilling hole-sizes larger than 5/16", it is advised to also secure the vise to the table by means of clamps.
- Especially brass, but also brittle plastics like Plexiglas can be difficult and dangerous to drill. Ask the shop supervisor for advice on drill and coolant selection when drilling these materials.
- Sheet metal can be difficult and dangerous to drill. Ask the shop supervisor for advice on drill when drilling sheet metal.
- Use a correctly ground drill bit for the material being drilled. Ask shop supervisor in case you are unsure which drill bit to use.
- Inspect drill bit before use. Always use drill bits which are sharp and in good condition. Do not use drill bits that have shipped or broken out sections.
- Always clean drill shank and/or drill sleeve, and the spindle hole before mounting.
- Never place taper shank tools such as large diameter drills or tapered shank reamers in a drill chuck. Only straight shank tools such as standard drills can be clamped in chucks or collets.
- Run drill at correct RPM for diameter of drill bit and material. Ask shop supervisor in case you are unsure which drilling speed applies.
- Use the proper cutting fluid for the material being drilled.
- Never remove chips with your bare hands, no matter if the machine is running or stopped!
- Use a long brush to remove chips from the work piece. Never use a rag, towel or gloves to remove chips while the machine is running!
- Don't drill with too much pressure.
- When drilling a deep hole withdraw the drill bit frequently to clear chips.
- If the drill binds in a hole, stop the machine and turn the spindle backwards by hand to release the bit.
- Ease up on drilling pressure as the drill starts to break through the bottom of the material.
- Let the spindle stop of its own accord after turning the power off. Never try to stop the spindle with your hand.
- Never clean the machine while it is in motion!
- If applicable, always remove the drill chuck key or the drill drift from the spindle immediately after using.
3.4 Horizontal Band Saw

In addition to the requirements described in the General Lab Safety Manual, the following safe working practices need to be observed when working with horizontal band-saws:
- Before attempting any work with the horizontal band saw, make sure that the surrounding area is free of tripping and slipping hazards! The most common tripping hazards are stock or other materials left laying on the ground by current or previous users. The most common slipping hazards are cutting fluid splashes on the concrete floor to either side of the machine.
- Always wear thick fabric or leather gloves when installing or removing a saw blade.
- Exercise extreme caution when unfolding saw blades that have been folded for storage. The may suddenly unfold and cause cuts to exposed skin.
- Always use the proper pitch blade for the thickness of the material, and type of material to be cut. At least 3-4 teeth should be engaged in the material when cutting.
- Examine blade before using the band saw or before installing a blade. Do not use or install a cracked blade.
- Check if teeth are dull or broken out; do not use or install a blade with dull or broken out teeth.
- Make sure the blade has proper tension. If in doubt, ask the shop supervisor.
- Securely tighten the work piece or stock in the vice. Especially round stock may rotate and cause blade damage when not tightened sufficiently.
- When cutting short workpieces or stock, insert an appropriately sized spacer at the opposite of the vice plates in order to assure the parallel position of the vice plates.
- When cutting long workpieces or stock, make sure they are supported with posts at the long end.
- When cutting off long or heavy sections, make sure they are supported and held in place before and after the blade has cut all the way through.
- The guides and guards should be set as close to the work as possible, at least within 1/2 inch.
- Do not run the band saw at a higher speed than recommended for the material being cut.
- Use cutting fluid when cutting steel, copper and aluminum. No cutting fluid is needed when cutting brass. Please consult with the shop supervisor if cutting fluid is needed when cutting plastics.
- If applicable, the band saw rpm is to be adjusted while the band saw is running. If applicable, band saw speed range is adjusted when the machine is stopped.
- If the saw band breaks, immediately shut off the power and stand clear until the machine has stopped.
- If the saw blade jumps of the drive wheels, immediately shut off the power and stand clear until the machine has stopped.
- If the saw stalls in a cut, turn the power off and reverse the blade by hand to free it. Wear heavy fabric or leather gloves! If unsure about freeing the blade, contact the shop supervisor.
3.5 Vertical Band Saw

In addition to the requirements described in the General Lab Safety Manual, the following safe working practices need to be observed when working with vertical band-saws:
- Always wear thick fabric or leather gloves when installing or removing a saw blade.
- Exercise extreme caution when unfolding saw blades that have been folded for storage. The may suddenly unfold and cause cuts to exposed skin.
- Always use the proper pitch blade for the thickness of the material, and type of material to be cut. At least 3-4 teeth should be engaged in the material when cutting.
- Examine blade before using the band saw or before installing a blade. Do not use or install a cracked blade.
- Check if teeth are dull or broken out; do not use or install a blade with dull or broken out teeth.
- Make sure the blade has proper tension. If in doubt, ask the shop supervisor.
- When cutting long workpieces or stock that extend the saws working table, make sure they are supported beyond the working table.
- When cutting off long or heavy sections, make sure they are supported and held in place before and after the blade has cut all the way through.
- Never cut round stock on a vertical band saw!
- Never cut workpieces or stock with a high aspect ratio (height/length)!
- The guides and guards should be set as close to the work as possible, at least within 1/2 inch.
- Do not run the band saw at a higher speed than recommended for the material being cut.
- Do not feed the work piece with your hands into the blade unless your fingers, hands and wrists can stay 6 inch away from the right and left side of the blade.
- Never feed the work piece with your hands into the blade while having your fingers, hands or wrists in front of the blade!
- When feeding small work pieces into the blade, use extensions to push the work piece into the blade, i.e. a two-by-four wooden plank – not your fingers!
- Don't lean into the machine when cutting a work piece. Always keep one foot forward.
- Only apply low forces when feeding a work piece into the blade! If you have to push hard, in order to cut a piece, stop sawing! It means that the blade is dull.
- If you have to cut a non-straight line, do not overly rotate the work piece. It may twist and break the saw blade.
- If applicable, the band saw rpm is to be adjusted while the band saw is running. If applicable, band saw speed range is adjusted when the machine is stopped.
- If the saw band breaks, immediately shut off the power and stand clear until the machine has stopped.
- If the saw blade jumps of the drive wheels, immediately shut off the power and stand clear until the machine has stopped.
- If the saw stalls in a cut, turn the power off and reverse the blade by hand to free it. Wear heavy fabric or leather gloves! If unsure about freeing the blade, contact the shop supervisor.
3.6 Cut-Off Saws

In addition to the requirements described in the General Lab Safety Manual, the following safe working practices need to be observed when working with circular saws or cut-off wheels:
- Before using any power tool, inspect it to make sure the cord is not damaged in any way and that the ground pin is intact.
- Do not use the saw, or any other power tools, in a wet area.
- Do not run the extension cord across walkways where people might trip over it or where the cord may be run over and damaged.
- Inspect the cut-off wheel. Make sure it is undamaged, has no cracks or broken or chipped-off sections.
- Use the proper cut-off wheel for the type of material to be cut.
- Make sure the wheel has sufficient size/diameter to cut through the work piece you intent to cut.
- Secure your work piece with the integrated vice clamps.
- Wear a clear face mask in addtion to your safety glasses before turning on the cut-off wheel.
- When cutting off long or heavy sections, make sure they are supported and held in place before and after the blade has cut all the way through. However – take measures to avoid cut off stock from wedging or stalling the saw blade once the blade has cut through all the way!
- As far as possible, engage the front part of the blade so that the cutting forces push down on the work piece. Engaging the back part of the blade may create upwards forces that will pull the work piece out of the vice clamps.
- Keep your head out of the path of particles and sparks thrown out by the blade. Wear eye and ear and face protection.
- Be aware of your surroundings! Make sure that sparks are not thrown towards people or flammable materials. Use a protective screen if necessary.
- Disconnect the power cord before cleaning, changing blades, or making any adjustments to the saw.
- When it is necessary to raise the guard for certain types of cuts, use the guard lever.
- Never wedge, wire, or otherwise jam the guard to prevent it from working.
- Wait until the saw stops before lifting it from a cut.
- Before setting the saw down, make sure the guard is closed, as the blade may still be turning.
- Don't carry the saw with your fingers on the switch trigger.
- Do not use the cord to move or drag the saw.
- Before cutting small work pieces, the shop supervisor should be consulted.
3.7 Angle Grinders

In addition to the requirements described in the General Lab Safety Manual, the following safe working practices need to be observed when working with angle-grinders wheels:
- Before using any power tool, inspect it to make sure the cord is not damaged in any way and that the ground pin is intact.
- Do not use the grinder, or any other power tools, in a wet area.
- Do not run the extension cord across walkways where people might trip over it or where the cord may be run over and damaged.
- Inspect the grinding wheel. Make sure it is undamaged, has no cracks or broken or chipped-off sections.
- Use the proper grinding wheel for the type of material to be ground.
- Make sure the wheel has sufficient size/diameter for the work piece you intent to grind.
- Make sure the wheel guard is properly installed and secured. Never use an angle grinder, whose guard has been removed.
- Keep your body out of the path of particles and sparks thrown out by the blade.
- Wear eye, and ear protection. Wear a clear face mask in addition to your safety glasses before turning on the wheel frinder.
- Wear a dust mask during prolonged grinding operations!
- Be aware of your surroundings! Make sure that sparks are not thrown towards people or flammable materials. Use a protective screen if necessary.
- Always use the downward motion side of the wheel to grind. Never use the upward motion side as this can throw your part upwards with tremendous force.
- Make sure small work pieces are sufficiently fixed. Otherwise they may be accelerated and displaced at high speeds, potentially causing damage or injury.
- Do not sand any material that will give off a dangerous dust. Such materials as beryllium or copper beryllium alloys must not be sanded or filed. Asbestos must not be sanded. Always ask the Shop Manager if you are unsure.
- Disconnect the power cord before cleaning, changing blades, or making any adjustments to the grinder.
- Before setting the grinder down, make sure the wheel has come to a halt.
- Don't carry the grinder with your fingers on the switch trigger.
- Do not use the cord to move or drag the grinder.
- Sweep/vacuum all particles when you are done grinding.
3.8 Grinding Wheels
Students are not allowed using grinding wheels without direct supervision. All students are advised to use belt sanders for material removal whenever possible.
3.9 Vertical Belt Sanders

In addition to the requirements described in the General Lab Safety Manual, the following safe working practices need to be observed when working with vertical belt sanders:
- Do not operate belt sanders with torn or ripped belts.
- Always rest the work piece on the table in front of the belt.
- Check and make sure the gap between the table (rest) is significantly smaller, than the work piece to be sanded. Otherwise the work piece may get pulled into the gap, jam and rip the belt. As a guideline, the gap between the rest and belt should not be larger, than 3/32".
- Keep your body out of the path of particles and sparks thrown out by the belt. Wear eye, ear and face protection. Wear a dust mask during prolonged grinding operations!
- Be aware of your surroundings! Make sure that sparks are not thrown towards people or flammable materials. Use a protective screen if necessary.
- Do not sand any material that will give off a dangerous dust. Such materials as beryllium or copper beryllium alloys must not be sanded or filed. Asbestos must not be sanded. Always ask the Shop Manager if you are unsure.
- Sweep/vacuum all particles when you are done sanding.
3.10 Welding Equipment
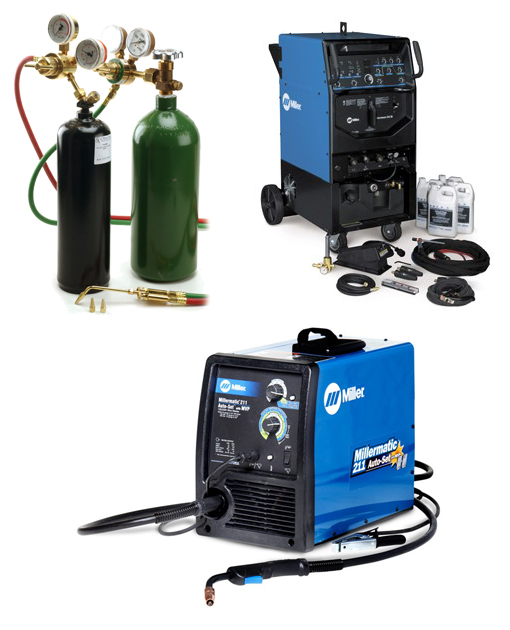
In addition to the requirements described in the General Lab Safety Manual, the following safe working practices need to be observed when working with vertical belt sanders:
- Welders, assistants, and anyone else in the welding area shall wear glasses or shields of recommended shades during welding operations.
- Inspect all welding equipment to be used, prior to each use, for possible damage.
- Avoid handling oxygen bottles with greasy hands, gloves or rags! Fatal explosions have resulted from this.
- Always strap tanks to a welding cart or a fixed object. Never allow a gas cylinder to be free standing. Replace the safety cap on all cylinders when not in use.
- When doing any kind of TIG/ARC/MIG welding, make sure work and/or work table is properly grounded.
- Do not weld in or near a wet area or with wet gloves/hands.
- Be alert to possible fire hazards. Move the object to be welded to a safe location, or, remove all flammable materials from the work area.
- Never weld in the same area where degreasing or other cleaning operations are performed.
- Keep suitable fire extinguishing equipment nearby and know how to operate it.
- Shut off the cylinder valves when the job is completed, release pressure from the regulators by opening the torch valves momentarily and back out regulator adjusting valves. Never leave the torch unattended with pressure in the hoses.
- Utilize all protective equipment and clothing. Do not weld with any part of the body uncovered, the arc light will cause burns similar to severe sunburn.
- Never weld inside drums or enclosed spaces without adequate ventilation, or, the use of airline respirators or self-contained breathing apparatus.
- Check the ventilation system before starting to weld and periodically thereafter to insure adequate performance. Welding fumes should not be allowed to get into the rest of the shop working areas.
- Never cut or weld any container that has held explosive or flammable materials.
- Abide by any other safety measures required for each particular type of welding.
- Allow for proper ventilation when brazing or soldering. The fluxes are acidic and toxic.
- Do not weld on painted, galvanized or greasy, oily metals. Not only can the fumes be toxic, but the welds will not be satisfactory and will fail in use.
3.11 Pallet Jacks

In addition to the requirements described in the General Lab Safety Manual, the following safe working practices need to be observed when working with pallet jacks:
- Students using the pallet jack must wear steel toed safety shoes! If you don't have steel-toed safety shoes, ask the shop supervisor to move loads for you.
- When moving a load, always make sure the load is distributed evenly.
- Do not move loads that extend the pallet jack forks by 12" on either side.
- Never use the pallet jack on sloped floors or pathways!
- Always pull the pallet jack behind you. Never push, unless absolutely necessary.
- Be aware of the inertia of moving loads. Makes sure to maintain sufficient clearance from machines, walls or other objects that are in your path of travel.
- Don't use the pallet jack as a scooter.
- Never transport personnel on a pallet jack.
3.12 Overhead Cranes
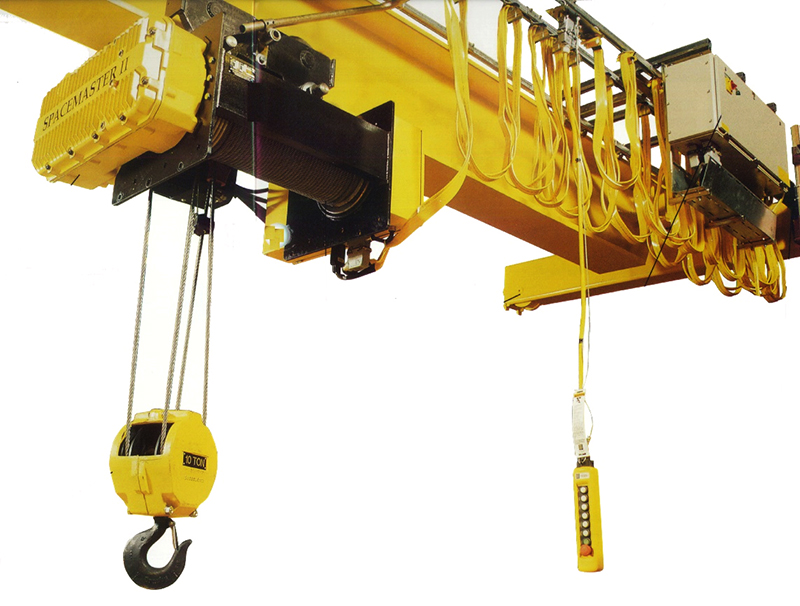
Students are not authorized to use any overhead crane. Please contact the shop supervisor if you need any overhead crane.
3.13 Forklifts

Students are not authorized to use any fork lifts. Please contact the shop supervisor if you need a fork lift.
E-Signature this document