Developing and Using Models

Toolkit Overview Video for this Practice

BUILDING AWARENESS


Framework
Rationale
Science

Science often involves the construction and use of a wide variety of models and simulations to help develop explanations about natural phenomena. Models make it possible to go beyond observables and imagine a world not yet seen. Models enable predictions of the form “if . . . then . . . therefore” to be made in order to test hypothetical explanations.

Engineering
Engineering makes use of models and simulations to analyze existing systems so as to see where flaws might occur or to test possible solutions to a new problem. Engineers also call on models of various sorts to test proposed systems and to recognize the strengths and limitations of their designs.

See A Framework for K-12 Science Education, 2012, p. 56 for the entire text.

BUILDING
AWARENESS QUESTIONS
1.  From the background information, what new awareness do you have about developing and using models?
2.  In a 3-Dimensional classroom, what would this Practice look like?
3.  What questions did the background raise for you?

4.  Unpack this Practice by identifying the verbs and nouns in the description.  Is your list similar to this?

NSTA Banner

EXPOSING BELIEFS

Developing and Using Models Podcast

NGSS @ NSTA


NSTA Banner

EXPOSING BELIEF
QUESTIONS

1.  What are your current beliefs about this practice?
2.  In what ways do you think you are using this practice?
3.  What challenges do you see to using this practice?

CONFRONTING BELIEFS


Conceptual Change Activities:
Developing and Using Models Activity#1: Syringe and Plunger
Developing And Using Models Activity #2: Create Your Own Water Cycle
Developing And Using Models Activity#3:Build a Bug
Developing and Using Models Activity #4:Goldilocks Principle

Developing and Using Models Activity #5: Measuring Atmospheric Pressure


Developing Conceptual Understanding of Developing and Using Models Activity Background

The purpose of the following activities is to engage teachers in the practice of developing and using models.  The emphasis is NOT on the activity itself, but rather the conceptual change related to the practice. Consumers of this Toolkit are reminded not to get wrapped up in the activity, but rather continually reflection on the conceptual nature of the practice to gain deeper understanding . Five activities have been provided to engage in each Practice.


Since the following activities are NOT lesson plans, in some cases only a brief explanation of the activity has been provided.  The facilitator should encourage learners to direct their own investigations and intervene only as needed to redirect.


Developing and Using Models Activity #1: Syringe and Plunger
 
General Objective: The purpose of this activity is to make a model from the evidence based on observation.
In this activity we will observe the phenomenon of a syringe and a plunger.
 
Materials: large syringe
 
Each group of students is given a syringe and a plunger. Students are instructed to complete two tasks:
 
1.   Fill the syringe with air and place your finger over the end and observe what happens when the syringe is pulled back.
2.  With the end still sealed, push the plunger in as far as you can and observe what happens.
 
Students then create models (drawings in notebook) to show the phenomenon of what they think happens to one air particle.  Students will draw three models, one showing a picture of a particle of air in the middle of the syringe when filled with air, one showing where and what the single particle looked like when the plunger was pulled back, and one with the plunger pushed in.  In both instances the plunger returned to its original spot.
 
The students then share the models and describe their models.  Students may struggle with this concept because it is difficult to picture one particle of air.  It may be easier to show the relationship between particles, but looking at one particle might help students to understand the idea of compression and expansion.  
 
Extension: Have students explore further to see what might happen if water or bubbles were placed inside the plunger.
 
From Starr & Associates, Educational Consultants


Developing and Using Models Activity #2: Create Your Own Water Cycle
 
This activity is used to simulate how to develop and use models in the classroom.  
 
Objective: Students will learn the water cycle and different states of matter.
 
Background: Water enters the watershed from a three stage cycle that starts when water falls from the sky in a process called precipitation.  Precipitation begins when water vapor molecules become too large and heavy to remain in the atmosphere (in the form of clouds) and fall to the ground in the form of rain, snow, sleet or hail.  Once precipitation has fallen to the ground, it is collected in large bodies of water such as lakes, ponds, rivers and oceans.  Water at the surface of these bodies of water heats up under the sun and evaporates.  Evaporation occurs when water transforms from a liquid into a gas, rising up toward the sky.  Next, evaporated water condenses in the atmosphere.  Condensation transforms water from a gas into a vapor and becomes suspended in the atmosphere; this is visually represented by clouds.


Materials:


•  Water Cycle Diagram (Transparency)
•  Large piece of paper
•  Small paper squares
•  Clear plastic cups
•  Ice cubes
•  Electric tea kettle
•  Water
•  Plastic wrap
•  Bucket
•  Science Notebook
•  Pencil
 
Prep: Create Transparency from Water Cycle Diagram
 
Procedure:
 
1. Display the Water Cycle Transparency to the class. Ask students to draw a model of the water cycle in their science notebooks.
2. Fill plastic cups halfway with water and place one cup on the student's desk. Explain to the students that this is liquid water, representing the rain and lake water in the picture of the water cycle.
3. Boil water in the kettle. Explain to the students that the steam is water in the form of gas called water vapor.
4. Give each student some ice cubes and explain to the students that this is water in a solid state. Have them put the ice cubes in their cup of water.
5. Let the ice sit for a few minutes.
6. When the cups start “sweating” explain to the students that this is condensation and ask what is causing the sweating.
 
Modeling Investigation:
 
Materials:
 
•  Large, empty, well cleaned pickle Jars for each group of students or individuals
•  Plastic wrap
•  Rubber bands for each jar
•  Water
•  Sand or pebbles to line the bottom of the jar
•  Plastic cup


Have students place a layer of sand or pebbles at the bottom of each jar.  Plant small plant in the jar and bury plastic cup in soil to simulate a pond or lake and add enough water to fill the cup.  Put plastic wrap over the entire mouth of the jar and secure with a rubber band.  Place the jar in a warm, sunny spot.  The students will see droplets of water on the bottom surface of the plastic wrap.  Ask the students to explain in their science notebooks why this occurred.  Ask students to illustrate their jars and write observations focusing on the three states of matter (liquid, gas and solid) and transferring the vocabulary to precipitation, condensation and evaporation.  Further investigation would be to add an ice cube on top of the plastic wrap to see if it causes any change.  Ask students what the ice cube would represent in the atmosphere, and why it would cause condensation.

Click http://water.epa.gov/learn/kids/drinkingwater/upload/activity_grades_k-3_watercycle-2.pdf for worksheet.

 
Extension:
 
Using an aquarium, ask the students to design a more realistic ecosystem using moss, lichen and small plants to investigate if the water cycle can sustain life ( i.e. terrarium).
 
 
Additional Resources:   http://www.neok12.com/Water-Cycle.htm
                                        http://water.epa.gov/learn/kids/drinkingwater/teachers_k-3.cfm
                                       http://www.sciencepartners.info/
 
 
Developing and Using Models Activity #3: Build-A-Bug
 
General Objective:  Students will create a model of an insect to show how internal and external components are essential for the function and survival of their model insect.
 
**This modeling activity could be used for multiple grade levels and with many various organisms and groups of animals.
 
Materials:
 
•  Science notebooks
•  Construction paper
•  Tissue paper
•  Clay
•  Markers, crayons, colored pencils
•  Glue
•  Scissors
•  Aluminum foil
•  Plastic wrap
•  Pipe cleaners
•  Encourage individual materials brought from home
 
Procedure:
 
1.       Students need basic background knowledge of the structures of insects, such as, exoskeleton, head, abdomen, thorax, antennae, and 6 legs and also the concept of specialization and adaptation.  Student interest can be introduced by showing examples of unique insects that exist in nature.
2.       Using provided materials, students are to design a new insect.  Their models are to include the all the standard parts of an insect, along with their own unique additions.  Students are to consider special adaptations for their insect depending on where the habitat is located.
3.       Students can draw their insects in their student notebooks and include detailed labels.  You can also have students describe how their insect performs the following tasks:
 
•  Movement
•  Camouflage
•  Defense against predators
•  How the insect changes throughout lifespan
•  Survival in the environment conditions
•  Reproduction
•  Unique behaviors
•  Sight
•  Food consumption
 
Extensions:
 
Have students write creative stories or comics using their insect models as main characters.
Build insects in other stages of their life cycles.
 
Resources:
 
Montana Science Partnership - Resources for teaching students about insects & macroinvertebrates in Montana: http://www.sciencepartners.info/?page_id=43
 
CFWEP - Resources for identifying macroinvertebrates: http://www.cfwep.org/?page_id=437


Developing and Using Models Activity #4: The Goldilocks Principle: A Model of Atmospheric Gases
 
Grades Targeted:  6-8
 
General Objectives:  Students will understand that our two closest neighbors, Venus and Mars, have very different atmospheres than Earth does in terms of pressure and composition.  
 
Students will be able to understand the “Goldilocks Principle” and understand that Earth’s moderate temperature is due primarily to its unique atmosphere.
 
Background:  On earth, two elements, nitrogen (N2) and oxygen (O2), make up almost 99% of the volume of clean, dry air.  Most of the remaining 1% is accounted for by the inert gaseous element, argon (Ar).  Argon and the tiny percentage of remaining gases are referred to as trace gases.  Certain trace atmospheric gases help to heat up our planet because they appear transparent to incoming visible (shortwave) light but act as a barrier to outgoing infrared (longwave) radiation.  These special trace gases are often referred to as "greenhouse gases" because a scientist in the early 19th century suggested that they function much like the glass plates found on a greenhouse used for growing plants.
 
The earth's atmosphere is composed of gases (for example, CO2 and CH4) of just the right types and in just the right amounts to warm the earth to temperatures suitable for life. The effect of the atmosphere to trap heat is the true "greenhouse effect."
 
We can evaluate the effect of greenhouse gases by comparing Earth with its nearest planetary neighbors, Venus and Mars.  These planets either have too much greenhouse effect or too little to be able to sustain life as we know it.  The differences between the three planets have been termed the "Goldilocks Principle" (Venus is too hot, Mars is too cold, but Earth is just right).
 
Mars and Venus have essentially the same types and percentages of gases in their atmosphere.  However, they have very different atmospheric densities:
 
•  Venus has an extremely dense atmosphere, so the concentration of CO2 is responsible for a "runaway" greenhouse effect and a very high        surface temperature.
•  Mars has almost no atmosphere; therefore the amount of CO2 is not sufficient to supply a warming effect and the surface temperatures of Mars are very low.
•  Mars is much further away from the Sun than is Venus.


Earth has a very different type of atmosphere.  Our atmosphere has much less CO2 than Venus or Mars and our atmospheric pressure is close to midway between the two (1/90th that of Venus and 100 times that of Mars).


Many scientists believe that the composition of our atmosphere is due to the presence of life.  Life acts to keep Earth's atmosphere in a dynamic balance.  In other words, if life were to completely disappear, eventually our atmospheric composition could come to closely resemble Mars or Venus.  Only with life continually producing oxygen through photosynthesis and removing and re-circulating CO2 does Earth's atmosphere remain fairly stable.


This activity introduces students to the atmospheric differences between the three "sister" planets in a graphic and hands-on way.  Students need not memorize the chemical compositions and pressures of the three atmospheres; rather, the activity should give them an overall appreciation of the important similarities and differences.  Students will use this understanding later as they begin to appreciate the scope and importance of the greenhouse effect on earth and realize that rather than being a bad thing, the greenhouse effect is critical for the survival of the biosphere


Materials:
 
•  Colored cotton balls, jelly beans, or different colored beans (or similar materials) to represent gases in the atmosphere
•  Re-sealable plastic bags
•  Science notebooks
 
Procedure:
 

1. Discuss the "Goldilocks Principle." Use the information in Tables 1 and 2 to engage the class in a discussion of the greenhouse effect. If available, you may want to share illustrations or slides of Mars, Venus, and Earth.

2. After discussing the atmospheres of Earth and the other planets, ask the students (in teams or pairs) to build models of the atmospheres of Earth and the other planets. Emphasize that models are critical tools for planetary scientists trying to understand phenomena too distant to experience directly

3. Depending on the material available, ask students to represent the atmospheric gases with different colored beans, cotton balls, or jelly beans. (We will use jellybeans for examples in this activity.) They might represent:

•  Nitrogen (N2) with red jellybeans
•  Oxygen (O2) with green jellybeans
•  Argon (Ar) with purple jellybeans
•  Carbon dioxide (CO2) with yellow jellybeans

•  Methane (CH4) with white jellybeans

4. Representing atmospheric density with jellybeans is impractical - if Earth's atmosphere has 100 jellybeans, Venus will have 9,000, and Mars will have slightly more than 1/2 jellybean (0.6). Suggest that the students use 10 or 100 as the base number for each planet. Let the students know what the real differences in density are.


5.


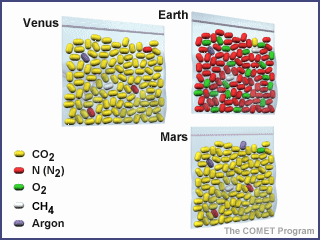
6. Challenge the students to produce a model atmosphere for each planet by placing the appropriate number of jellybeans in three small, re-sealable plastic bags. The necessary information is provided in Table 2. They will have to translate percentages into numbers of jellybeans, and in many cases, will face the difficulty of cutting the jellybeans into small enough pieces to represent small atmospheric concentrations.

7. Have students explain what they found to the class and write about it in their notebooks..

8. To extend this activity, you could take one set of bags and distribute the contents in areas measured to represent atmospheric pressure of each planet. For example, the jellybeans representing Earth might be distributed in a meter square. You might have to go outside to find an area big enough to represent the thin atmosphere found on Mars. To concentrate the beans representing the dense atmosphere of Venus, you could use a food processor or mortar and pestle to concentrate the jellybeans.


Assessments:
 
1. Have the students display their work in the classroom and allow time for them to observe and discuss each other's work as you circulate.
2. Have students respond in writing to the following questions in their science notebooks:
•  Describe the atmospheric conditions you might encounter as an astronaut setting foot on Venus and Mars.
•  Name at least two ways that the atmospheres of Venus and Mars are similar to each other, and one way that both differ from Earth's.
What new information did you learn in this lesson? What did you already know? What was the hardest thing about the activity?
 
Idea taken and adapted from:   http://www.ucar.edu/learn/1_1_2_1t.htm
 
Developing and Using Models Activity #5: Measuring Albedo and Climate Modeling
 
Grades targeted:  HS
 
General Objective:  Students manipulate clouds, albedo and carbon dioxide within a computerized atmospheric model.
Students investigate and analyze each variables impact on global climate temperature.
 
Brief Details:  Lessons leading up to this modeling activity:  Students complete the “Radiant Energy Lab” and “Reflection and Absorption Lab” as needed to build background knowledge regarding energy conversion prior to this activity (lessons included within the resources below).
 
Before launching the “Measuring Albedo Simulation” I also play a short NASA video regarding Polar Ice Modeling.


REINTERPRETING BELIEFS

1. In what ways did this activity change your beliefs about developing and using models?
2. How difficult do you find it to develop and use models?

3. Discuss your level of confidence along the process of developing and using models.

INTEGRATION OF THE CONCEPTS

1. How do you currently help students develop and use models of science phenomenon in your classroom?
2. Review a recent lesson you taught and evaluate the effectiveness of engaging students in developing and using models.

3. What is the relationship between this practice and others?

INVENTION

1. Ask a colleague to observe one of your lessons OR video yourself teaching and tally the number of questions YOU ask and the number of questions STUDENTS ask.

2. Use the EQuiP Rubric for Lessons & Units:  Science to evaluate a recent science lesson you taught.


Learning Progression for Developing and Using Models
 
Elementary: Students should be able to create “pictures” and or physical scale models to more abstract representations.
 
Middle School: Students should be able to use diagrams, maps and other abstract models as tools that enable them to elaborate their own ideas or findings and represent them to others.
 
High School: Students should develop more sophisticated models as they progress through their education and refine their models as their understanding develops. (Framework, pgs. 58-59)
 
See p. 6  Appendix F Science and Engineering Practices in the NGSS for a more thorough grade band progression.