
Proposing a New Program Using CIM
PROPOSING A NEW PROGRAM USING CIM
Updated: August, 2023
MSU's Program Review Process
Proposers of new programs need to make sure that their idea appears on the Internal MSU Academic Plan. Then, a Request to Plan is submitted to announce the proposed new program to the entire MUS system. This allows the leaders of the other campuses to raise concerns long before the proposal goes to the Board of Regents.
Once the Request to Plan is approved by OCHE, then the campus review process (i.e., the CIM system) can be initiated.
- Internal MSU Academic Plan – this is the official list of potential new programs that MSU might propose to the Board of Regents in a three-year
- Request to Plan https://mus.edu/che/arsa/RequestToPlan.html– the MUS review process begins with filing a Request to Plan that serves to notify all MUS campuses of our intent to propose a new program, center, or The Request to Plan is filed at the beginning of the MUS review process so that any concerns from other campuses can be raised early in the process, long before the proposal goes to the Board of Regents. Request to Plan forms are discussed by the Chief Academic Officers (CAOs) from all campuses and approved by OCHE monthly. Please use the necessary forms found on the OCHE website: http://mus.edu/che/arsa/Forms/AcademicForms.asp
- Campus Planning and Review (CIM) – Approval of the Request to Plan allows the campus review process to At MSU this means that a CIM proposal can be prepared and submitted into workflow.
The workflow process is the campus review process and includes the Faculty Senate and Academic Council.
- BORPaperwork– All of the necessary Board of Regents paperwork must be correct and in CiM BEFORE advancing to the Academic Council. This includes the Curriculum Proposal Form and the budget piece, if applicable. http://mus.edu/che/arsa/Forms/AcademicForms.asp
- Level II Submission – Once a proposal has been approved at all levels on campus, the CIM proposal is converted to a Level II Curriculum (The questions on the CIM form are identical to the questions on the Level II proposal.) The Level II proposal must be submitted to OCHE at least six weeks prior to the next meeting of the Board of Regents.
- Approval by Board of Regents – Under the new process, the proposal is approved by the Board of Regents at a single (It took two meetings under the old system.)
- Approval by NWCCU – For new academic programs, after approval by the Board of Regents a substantive change proposal must be prepared and submitted to the Northwest Commission on Colleges and Universities (NWCCU), our regional Approval by NWCCU is the final step in the review process and the new process can be implemented as soon as NWCCU approval is granted.
The remainder of this document is focused on using the CIM system to propose a new course. This is an important step in the MUS review process, but not the first step. Before creating a CIM proposal make sure that the program, center, or institute that you are proposing is on the MSU Academic Plan and go through the Intent to Plan process.
Campus Planning and Review Using CIM
MSU has a new online process for managing course and program changes. The Course Inventory Management software, or CIM (pronounced Kim) is now available for:
- Proposing a new course
- Changing the characteristics of an existing course
- Proposing a new program (i.e., major, minor, option, or certificate)
- Modifying an existing program
CIM is connected to the catalog management software, CourseLeaf, so that course and program changes are automatically reflected in the next MSU catalog, both online and print versions.
The intent of this information sheet is to help people know how to use CIM to propose a new program.
Overview
A new program1 proposal requires Level II documentation2 for the Montana Board of Regents, plus answers to a few additional questions required for the required by MSU’s accreditation body, the Northwest Commission on Colleges and Universities (NWCCU). All of the information needed to prepare the Level II documentation and the substantive change prospectus has been built into an online form in CIM.
The process of proposing a new program is as follows:
- Preliminary Preparations
- Access CIM
- Complete the CIM online form
- Submit the program proposal to workflow with all of the required Board of Regents forms signed by the Dean, when
- Obtain required approvals through the CIM workflow process
- Registrar builds the new program into Banner
1. Preliminary Preparations
Completing the online form in CIM is straightforward, but some preparation before accessing CIM will make the process go more smoothly. Specifically, the CIM form will ask for the following items that you should collect prior to accessing CIM:3
- Program Requirements and Curriculum List
- Implementation Plans
- Assessment Plan (may be attached as a supporting document)
- Budget Projections (meet with Budget & Finance)
- Institutional Support Information
- Library and Information Resource Needs
- Board of Regents forms signed by the Dean, when applicable
Program Requirements and Curriculum List
This is one of the most important parts of a new program proposal because it is the description of the program. The description should list all program requirements and include a curriculum. For a new major or option, this should include a list of required courses taken by semester (preferred) or year. For a new minor or certificate, a list of required courses should be included, but the courses do not need to be listed by semester.
Building the list of required courses into CIM is straightforward but takes a little practice. The process is demonstrated later in this document using a proposed new minor as an example.
Note:TheRegistrar’sOfficeprovideshands-ontrainingsessionstohelpwithbuildingprogramrequirementsinto CIM and/or the MSU catalog (the same user interface is used for both).
Implementation Plans
The section of the CIM online form used to describe your plans for implementing the new program is also a formatted text area so that numbered lists can be used if needed. For a minor or certificate the implementation plan might simply say “the minor (or certificate) will be available to students upon approval.” But for a new degree program the implementation plan might include details about plans to hire new faculty members in certain years, anticipated enrollments as the program develops, and when specific courses will need to be offered.
For some new programs the implementation plans can be quite involved. You have the option to attach the implementation plan as a supporting document if the plan is complex. Supporting documents are uploaded using a button located near the bottom of the CIM form.
Assessment Plan
All programs4 at MSU are required to have assessment plans that describe how the faculty overseeing the program are verifying that students are learning what is expected from the program. An assessment plan needs to include at least the following elements:
- Program learning outcomes
- Identified sources of assessment data
- A schedule for assessing the learning outcomes
- A plan for using the assessment results
There are resources available on the Provost’s website to assist with developing an assessment plan:
- Developing Program Learning Outcomes
- Step-By-Step Assessment Plans
- Template: Department Assessment Plan
Because assessment plans must be submitted as separate documents to the Office of the Provost, it is likely that you will want to attach your assessment plan to the new program proposal as a supporting document. Supporting documents are uploaded using a button located near the bottom of the CIM form.
Budget Projections
Budget projections are a required component of a Level II proposal for the Montana Board of Regents and are a required part of the substantive change prospectus required by NWCCU.
There is a long history of programs being proposed to the Board of Regents with the associated statement that “no additional resources are required.” Everyone, including the Regents, is aware that such a statement is rarely accurate. Even the smallest of minors that depends in its entirety on courses already offered still requires staff time to certify the students who complete the minor requirements. It is far better to try to accurately reflect the actual costs (money, time, space, etc.) associated with the new program than to try to convince the approvers that no additional resources are needed.
You must make an appointment with the Budget Office to complete the budget piece of your program proposal, (If applicable). There is a template for your budget information at the bottom of the Curriculum Proposal Form. All necessary BOR forms must be complete and correct and must be attached to the CiM proposal before the proposal will go forward to Dean’s Council.
Institutional Support Information
If the Budget Projections section includes a realistic description of the actual costs (money, time, space, etc.) associated with the new program, then the Institutional Support Information is the section that describes how those costs will be covered. Discussions with your Department Head, Dean, and/or Provost on how to cover costs should be completed before developing the new program proposal.
Library and Information Resource Needs
Again, it is common for new program proposals to include a statement that “no additional resources are required” for library and information resources. Most often this statement indicates that the proposal is due and no conversation with the library faculty has taken place. Such a conversation is well-received by the library faculty, and they can often offer suggestions that will strengthen your proposal and the proposed program.
Contact Library Dean Kenning Arlitsch (x6978) or Associate Dean Brian Rossman (x6549) for assistance with this topic.
2. Access CIM
Once the preliminary materials are gathered, use the following link to access the CIM software to propose a new program.
https://nextcatalog.montana.edu/programadmin/
You will see the CIM page in the background, but in the foreground, you will see the following box indicating that you need to log into the CIM software.
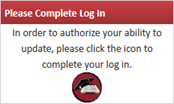
Click the circle icon in the box to access the log in screen (shown below).
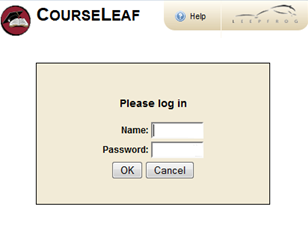
Use your MSU NetID in the Name field, and the same password that you use to log into your MSU computer in the
Password field.
Notes:
- There is additional information available about accessing CIM on the Provost’s Curriculum Developmentwebsite.
- If you cannot access CIM, contact Keely Holmes in the Provost’s
Once you have logged in, you will see the CIM Program Management entry page, shown below.
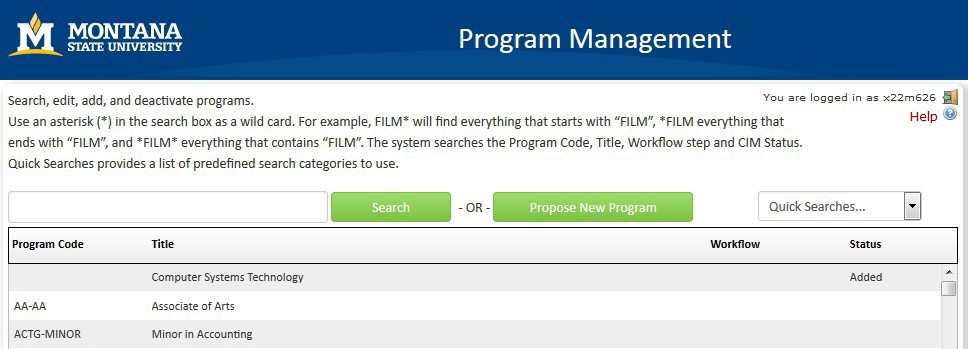
Click the Propose New Program button to open the CIM online form to propose a new program.
3. Complete the CIM Online Form
The CIM online form will open in a new browser window. This is a large form, only the first portion is shown below.
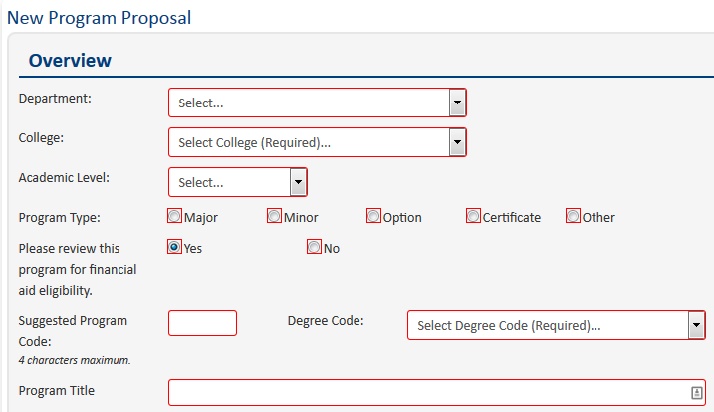
The CIM online for is a dynamic form; the fields will change depending on your answers to certain questions. For example, if you click the checkbox asking if additional faculty resources will be required for the new program, then a new text field will be displayed so that you can describe the additional resources needed.
Help Bubbles
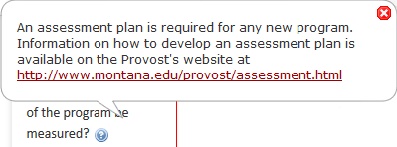
Small blue help icons ![]() appear next to some of the questions on the form. These provide access to help bubbles that try to provide additional information in areas that can be confusing. For example,
clicking the help bubble next to the question “How will the success of the program
be measured?” opens the following help bubble that lets you know that information
about assessment is available on the Provost’s website.
appear next to some of the questions on the form. These provide access to help bubbles that try to provide additional information in areas that can be confusing. For example,
clicking the help bubble next to the question “How will the success of the program
be measured?” opens the following help bubble that lets you know that information
about assessment is available on the Provost’s website.
Required Fields
On a new program proposal, most of the fields are required fields. That is, you cannot submit a new program proposal to workflow (the approval process) until all required fields have been completed. Required fields are shown with red borders in the online form.
Program Learning Outcomes
Program Learning Outcomes must each go in their own test field. Use the green plus sign to add a field for each outcome.

Mapping your Program Learning Outcomes (PLOs) to your Course Learning Outcomes (PLOs)
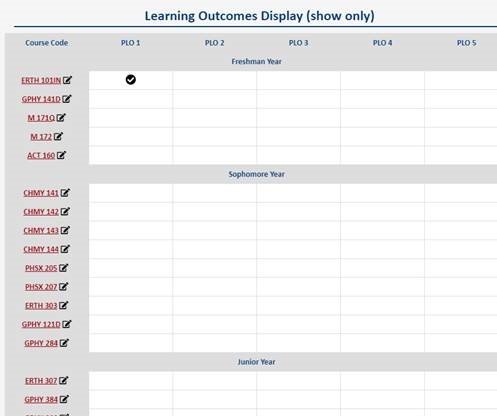
Search your program in https://nextcatalog.montana.edu/programadmin .
Once you click on it, scroll down to the field just below your learning outcomes called Learning Outcomes Display (show only). (If your learning outcomes are not in individual text boxes, you may run into issues with this. Contact Keely Holmes if you have issues with this.)
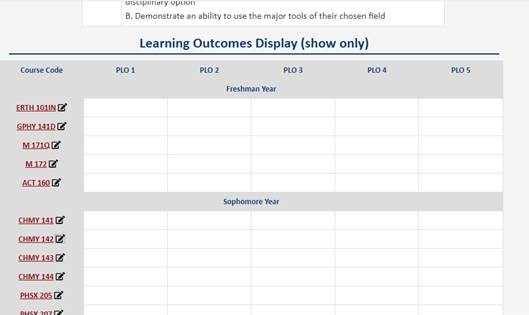
Click on the black box with the pencil icon in it, not the underlined course rubric and number.

This will open up another window with the program outcomes listed.
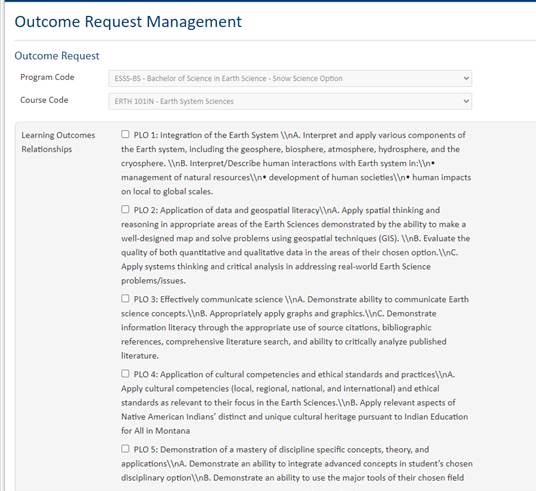
Once you click on a program outcome, the course learning outcomes will drop down.
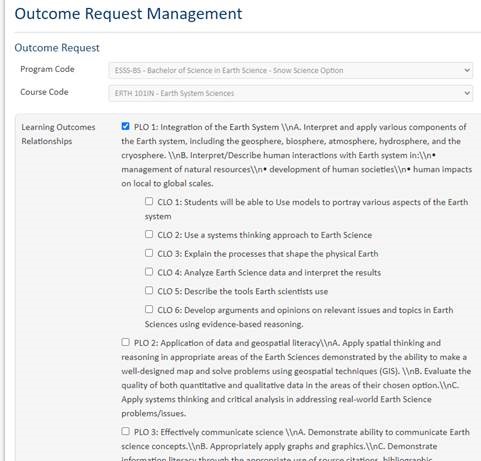
You will then check the box for each CLO that meets the PLO you have checked.
When you are finished, you just need to save. You do not need to send them through workflow at this point. We may start doing that later.
You will need to refresh your page to see it reflected in your proposal.
Program Details
The field labelled Program Details is one of the most important parts of a new program proposal because it is the description of the program. We will again use the Synchronized Swimming Minor as an example to illustrate how to build the curriculum listing into the CIM online form.
Note:TheRegistrar’sOfficeprovideshands-ontrainingsessionstohelpwithbuildingprogramrequirementsinto CIM and/or the MSU catalog (the same user interface is used for both).
Example: Minor in Synchronized Swimming
As an example, consider a topic that is not likely to be a real minor at MSU anytime soon: Synchronized Swimming. The proposers intend to require students to complete courses in beginning and intermediate swimming (ACT 170 and 270), dance (DANC 150), and basic acting (THTR 122). Beyond that one additional course is to be selected from an electives list.
Electives (take one)
- ACT 232 Argentine Tango
- ACT 236 Dance as Cultural Expression
- THTR 304 Theatre Production
The following steps illustrate how to build these minor requirements into the Program Details Section of CIM’s online form.
Step 1. Introductory statement (optional)
An introductory statement or paragraphs can be added if needed.

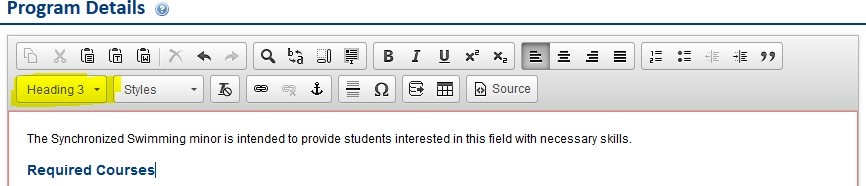
Step 2. Heading for Requirements Section
There is typically a heading titled Required Courses. The paragraph format used for the heading is shown in the example as Heading 3 (highlighted in the following image). Heading 3 was used because, in the MSU Catalog, Heading 1 would be used for the department name, Heading 2 for the name of the minor, and the list of required courses would be Heading 3. Actual heading levels will depend on how the information is organized in your section of the catalog. Heading levels in the catalog can be updated as needed, so the level used to propose a new program in CIM is arbitrary.
Step 3. Insert a Course List (or Plan of Study Grid) to show the required courses
CIM has predefined formats to display program requirements. When required courses are listed by semester or year, a Plan of Study Grid is used. When course requirements are not listed by semester, such as in the example used here, then a Course List is used.
A course List is a predefined table in CIM and can be inserted using the table icon highlighted in the image below.

When you click on the table icon, a list of preformatted tables is displayed. For this example, we select the Course List option.
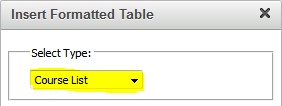
Selecting a Course List opens the Course List dialog (shown below) which is used to build the listing of required courses.
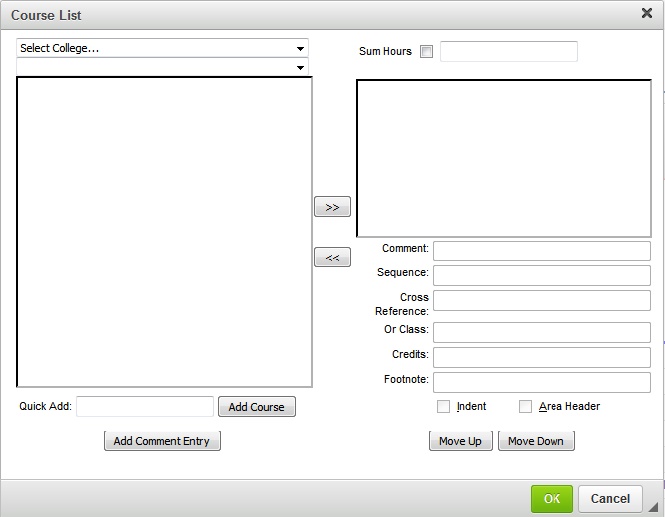
The box on the left will provide a list of course options which can be moved to the box on the right by clicking the
>> button. The courses listed in the box on the right are the required courses for the program.
Step 3.A Adding Required Courses
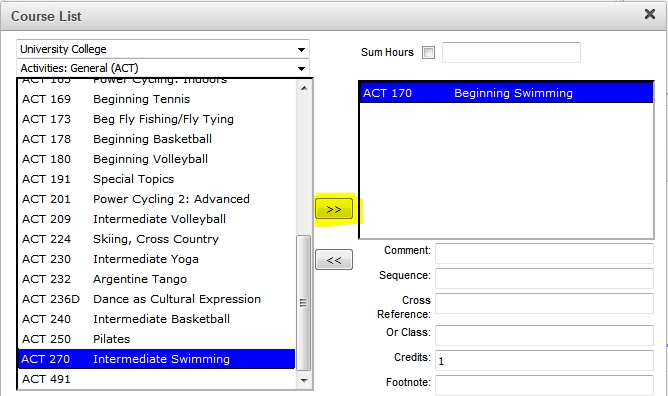
To add the swimming courses (ACT 170 and 270) we begin by selecting University College (a virtual college used to hold the activity courses) and the ACT rubric (listed as “department” – we lost the connection between departments and rubrics with Common Course Numbering). The list of available ACT courses is shown on the left side. ACT 170 has already been moved to the right box, and ACT 270 is selected and will be moved to the right when the >> button is clicked.
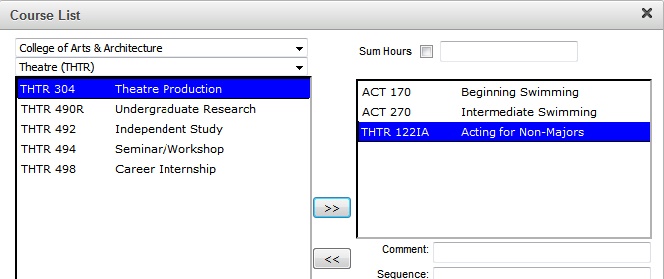
THTR 122 is added in similar fashion by selecting the College of Arts and Architecture, and the Rubric (listed as department) of THTR. The result of adding the three required courses is shown below.
Step 3.B Adding the List of Electives
To display a list of options (electives in this example), we will (1) add a comment to the list (a heading indicating that the student should choose one), (2) add each course in the elective list, (3) indent each course in the elective list, (4) add a comment to each indented item indicating the number of credits for each elective.
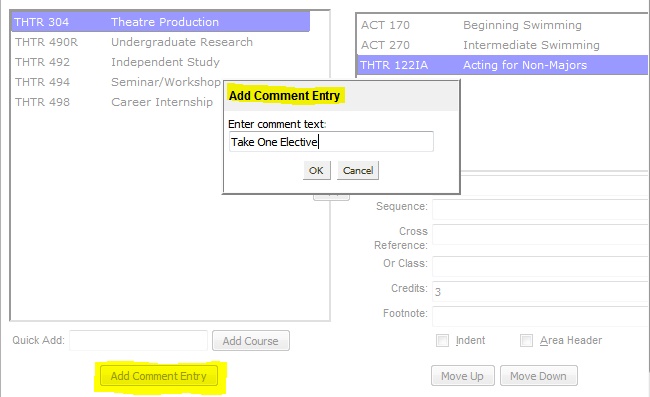
Step 3.B.1 Adding a Comment to the List
To add a comment line to the list of required courses (in the box on the right) click the Add Comment Entry button (highlighted in the following image). This opens the Add Comment Entry dialog. In this example the comment text is “Take One Elective”.
Step 3.B.2 Add Each Elective Course to the Box on the Right
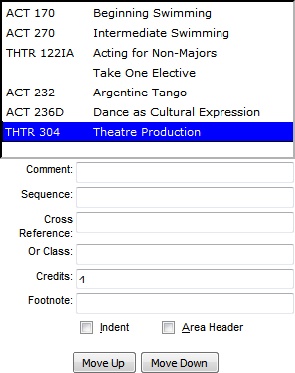
The same process of selecting the College and Rubric (listed as department) and course is used to include all of the elective courses in the box on the right. The result is shown below.
Notice in the image above that there are buttons that allow the items in the list to be reordered (Move Up and Move Down buttons) and an Indent check box to indicate that an item should be indented. Also, just below the list of courses there is a Comment field. We will use that field in step 3.B.4.
Step 3.B.3 Indent Each Elective Course
To indent each elective course your first select the course in the list, then click the Indent checkbox. The result of indenting the elective courses is shown below.
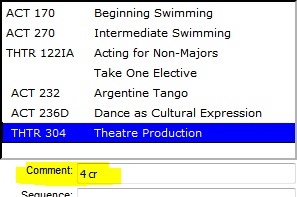
Step 3.B.4 Add a Comment after Each Elective to Indicate the Number of Credits
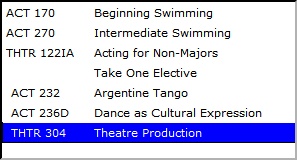
When courses are indented, they are not included in the automatic display of the number of credits. To indicate the number of credits we can include the number of credits as a comment after each course title. The Comment field is used to add a comment after the title of a selected course. The use of the Comment field is illustrated for the THTR 304 course in the following image.
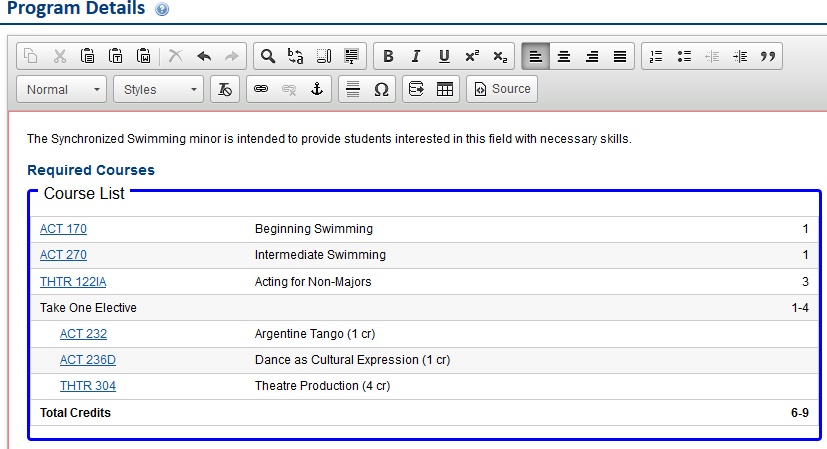
We have now created the basic layout of the requirements for the minor (there will be a few corrections needed). When you click the OK button on the Course List dialog, the course list is inserted into the CIM Program Details area as shown below.
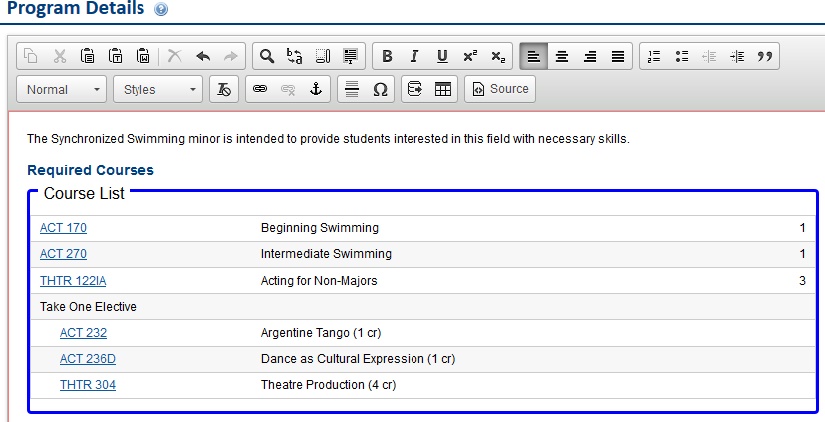
The heavy blue line shows the borders of the inserted course list. The line does not appear when the Program Details are inserted into the catalog page (after editing the catalog).
Notice that the course list includes the number of credits for the required courses, but not the indented elective courses. We are getting close to having a finished curriculum list, but a couple of improvements can be made:
- Display the number of elective credits on the “Take One Elective”
- Show the sum of the number of credits required for the
To make these changes we need to reopen the Course List dialog. To do so, double-click anywhere inside the heavy blue order.
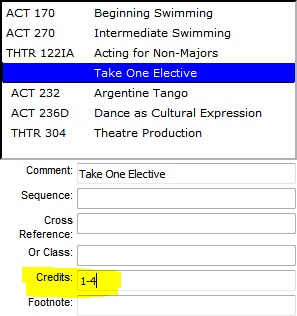
Step 3.B.5 Display the number of elective credits on the “Take One Elective” line
To display the number of elective credits on the “Take One Elective” line we simply need to tell CIM how many credits to display. Since the number of credits on the elective courses varies from 1 to 4, we can include the range “1-4” in the Credits field on the “Take One Elective” comment line. This is illustrated in the following example.
Step 3.B.6 Show the sum of the number of credits required for the minor
CIM will automatically sum the displayed course credits. To display the sum of the displayed credits, check the Sum Hours box near the top-right corner of the Course List dialog.
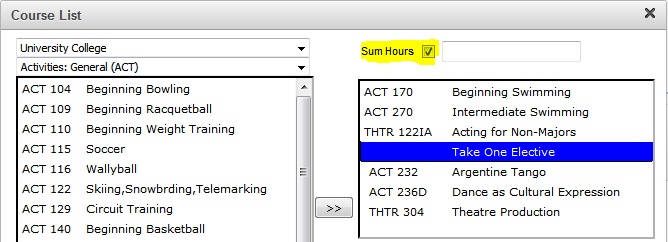
The result of all of these changes is shown below.
While building course lists into CIM takes a little practice, you will recover the invested time later because the course list used to get the new program approved is the same course list that will appear in the catalog once the program has been approved. You should not have to reenter the information in the catalog.
Note:TheRegistrar’sOfficeprovideshands-ontrainingsessionstohelpwithbuildingprogramrequirementsinto CIM and/or the MSU catalog (the same user interface is used for both).
Saving a Program Proposal
CIM allows you to save a program proposal at any time. This allows you to complete the program proposal in multiple sessions. To save a new program proposal, click the Save Changes button at the bottom of the online form.
Note:Savingaproposaldoesnotsubmittheproposaltotheapprovalprocess(workflow).
Shredding a Program Proposal
If you decide that you do not want to propose the new program after the proposal has been saved, then you can shred the proposal to completely eliminate the proposal. Be careful with shredding because the action cannot be undone.
The Shred Proposal button is located on the main Program Management page. Select your proposal (or search for it) to preview the proposal. The Shred Proposal button is located at the top-left corner of the preview window (shown below).

4. Submit the Program Proposal to Workflow
The automated approval process in CIM is called the workflow. There is a button at the bottom of the online form labelled Start Workflow. (This is at the bottom of the online form in the Edit (New Record) window, not on the main Program Management page.)
When you have completed the online form to create the new program proposal, click the Start Workflow button to begin the approval process.
Once the workflow has been started, you will be returned to the main Program Management page, with a preview of your proposal and the workflow for the new program proposal.
Note:YoucanreturntoCIMatanytimetoseewhereyourproposalisintheworkflowprocess.
5. Obtain Approvals through the Workflow Process
The approval process is automated through CIM. Once you click the Start Workflow button, CIM takes it from there and steps through the approval process, called the workflow.
A typical workflow approval process for a new undergraduate program includes the following steps:
- Associate Provost – this is a verification step to ensure that the proposal is complete
- Department Curriculum Committee (if there is one)
- Department Head
- College Curriculum Committee (if there is one)
- Dean
- Curriculum and Programs Committee (CPC)
- Academic Programs Working Group
- Faculty Senate
- BOR Prep-this step stops the proposal to ensure that all required BOR documents are complete and correct before going forward to Deans Council
- Deans Council
- Financial Aid
- Associate Provost
- Board of Regents
- NWCCU
- Registrar – to build the program into Banner
A graduate program is reviewed by the University Graduate Council and the Graduate Dean rather than the CPC and the Associate Provost.
Note:YoucanreturntoCIMatanytimetoseewhereyourproposalisintheworkflowprocess.
At any point in the approval process a reviewer might have questions about the proposal. You may be asked to provide additional information about your proposal. You cannot edit your proposal while it is in the workflow process, but you can respond to questions (typically via email) and the reviewer can include your responses with the proposal for later reviewers.
In a worst-case scenario a reviewer can Rollback a proposal, but this returns the proposal to the original submitter and requires a complete restart of the workflow process from the beginning. At MSU we try to avoid rolling back proposals to expedite the review process.
Give yourself plenty of time to get your program approved. At any time during approval process (workflow) using CiM, a proposal can be returned for edits/corrections, put on hold, or denied. It is impossible to give definitive deadlines for the curriculum development process. It is suggested that you start the process for new programs at least three full semesters in advance (not counting summer semester).
6. Registrar Builds the Program into Banner
In the last step of the workflow the proposal is sent to the Registrar to build the program into Banner. When the proposal goes to the Registrar it has completed the review and approval process. You will be notified by an email from the CiM system that the proposal has completed the approval process.
_________________________________________________________________
1 A “program” is a major, minor, option, or certificate.
2 While the Montana Board of Regents allows for Level I documentation (much shorter than Level II) for certificates of less than 30 credits, we still need all of the information for the NWCCU substantive change prospectus.
3 CIM allows you to save an incomplete program proposal at any point, so it is possible to begin the online form, leave CIM to gather the required information, and then return to complete the online form.
4 If assessment of the new option can be included in the assessment of the other option(s) in the same major then you can simply reference the existing assessment plan for the major.
If you have questions about CIM, please contact: Keely Holmes
Program Manager, Office of the Provost